Devices
The ‘Devices’ area lets you view and configure all physical, virtual and bridge devices on your account. You must have added at least one controller with devices before you will see anything in this area.
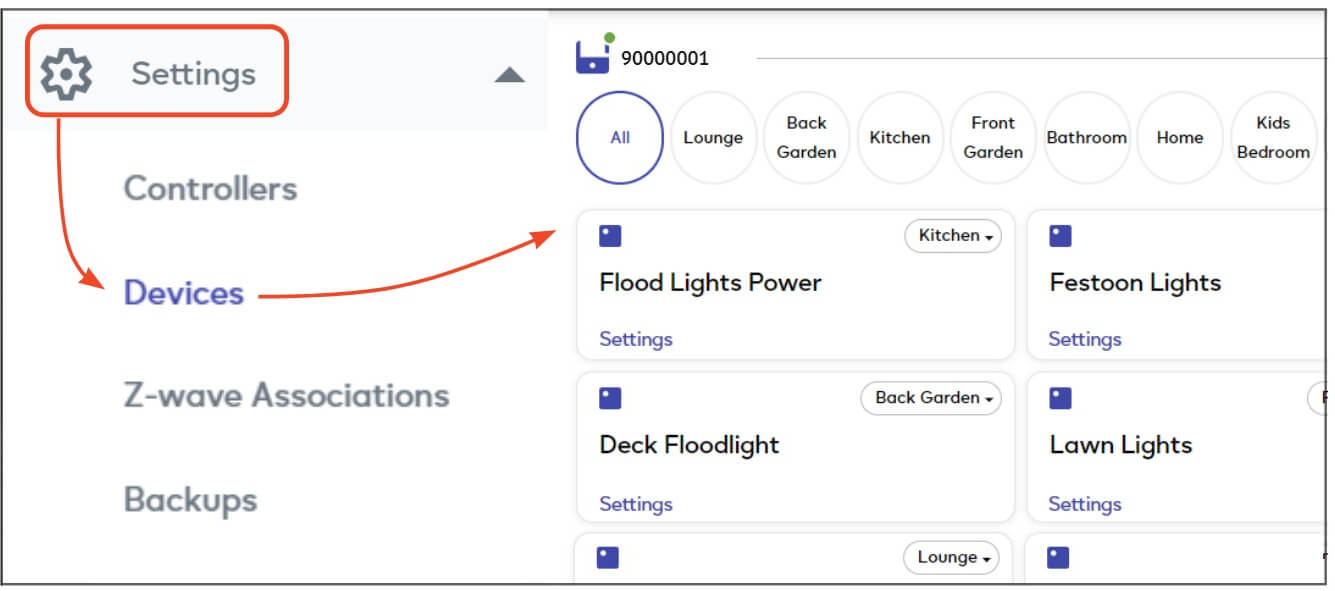
Click ‘Settings’ > ‘Devices’ to open the devices area:
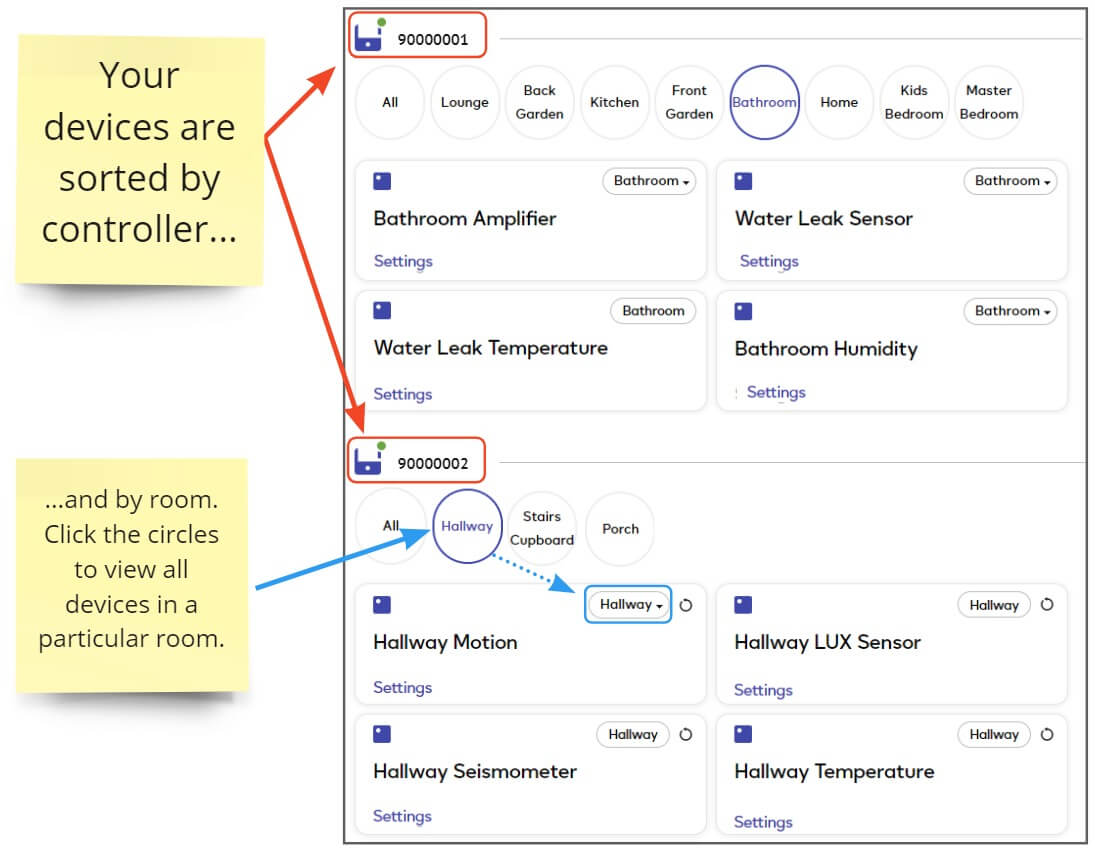
Devices are organized by controller then by rooms on that controller:
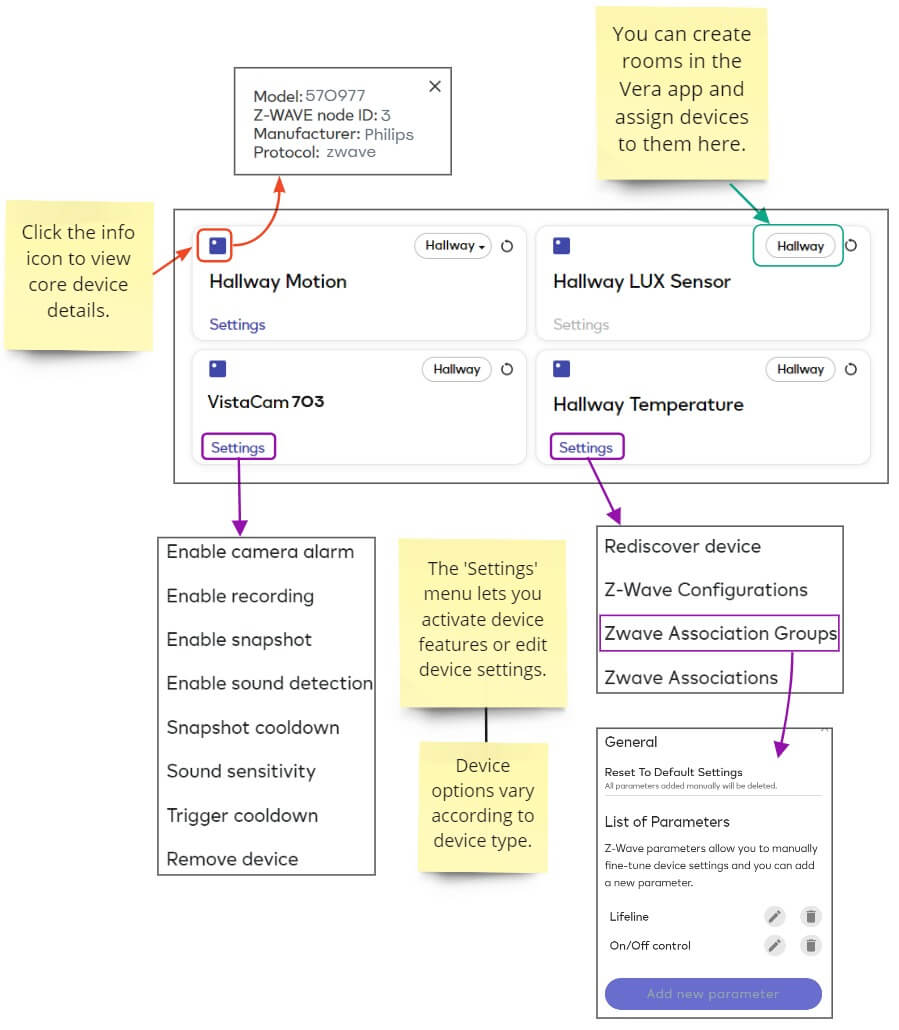
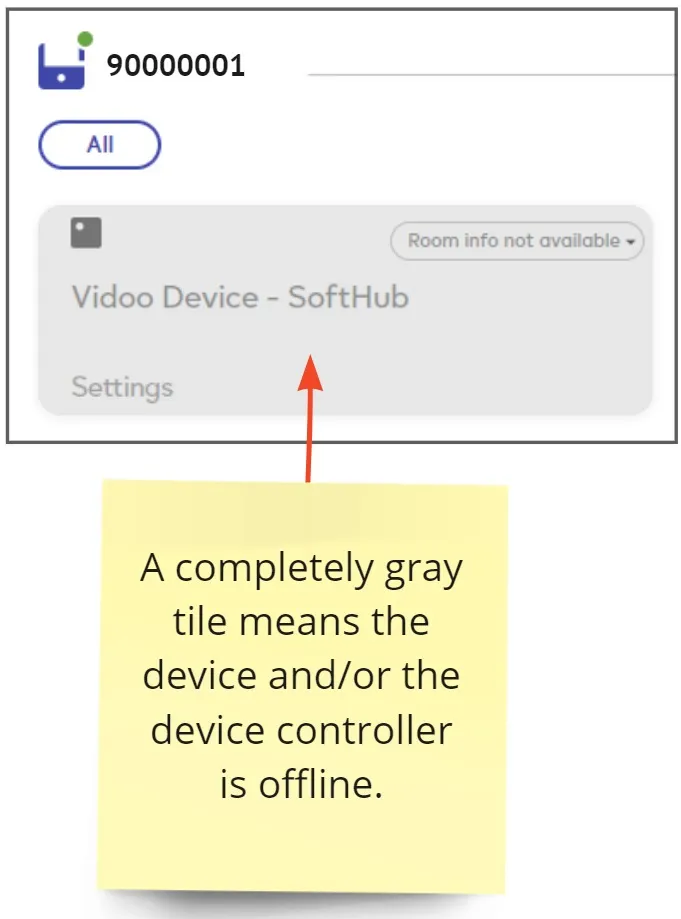
Each device added to a controller on your account has its own tile in the devices area. The information and options on a tile depends on the device type, device on/off status, and controller connection status:
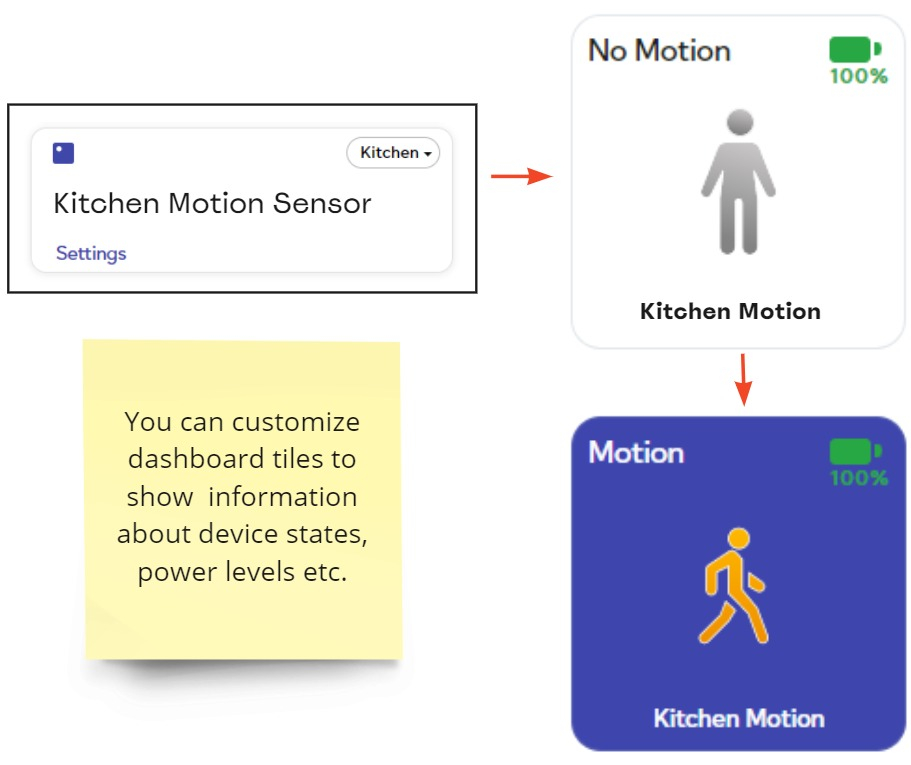
Device tiles are also shown on your dynamic dashboard. Dashboard tiles let you control your device and can be customized to show exactly the information you want. The following image shows the dashboard tile for a device in two different states:
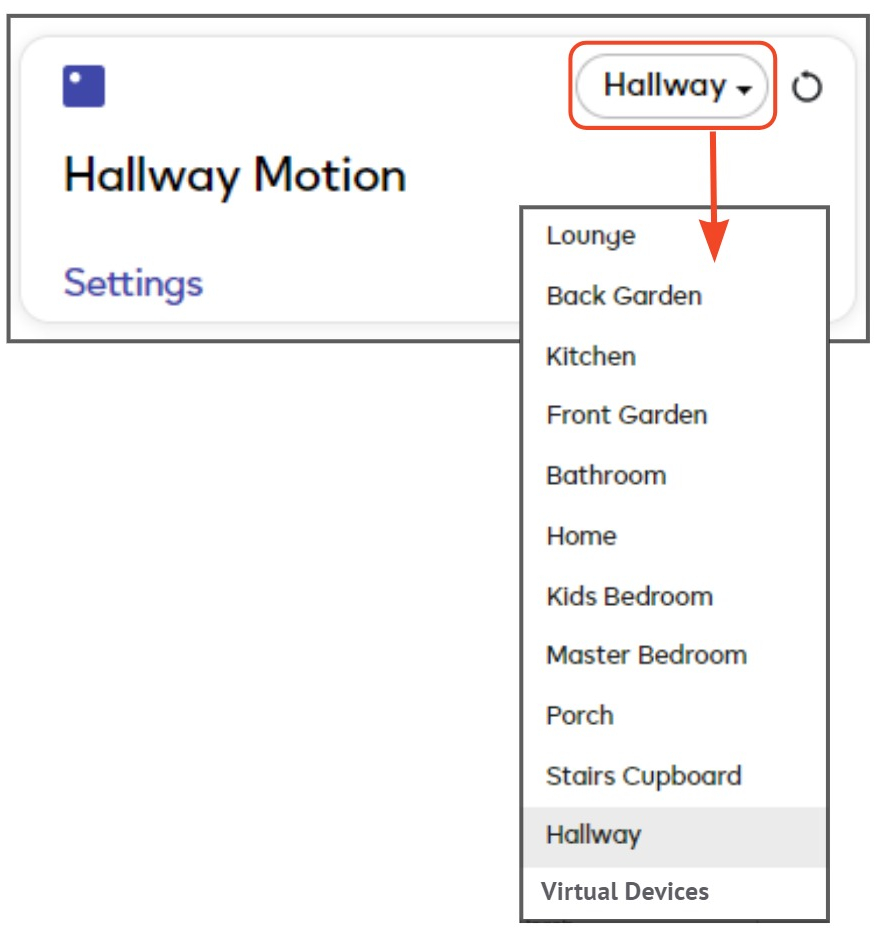
Rooms let you organize your connected devices into separate groups so you can more easily view and manage them. You can use rooms to organize devices by any criteria you want. For example:
- By physical location – kitchen, lounge, hallway, garden, etc,
- By type – motion sensors, cameras, lights, virtual devices, etc.
- By function – security devices, entertainment devices, HVAC devices, etc.
Note – You can only create new rooms in the Vera app – we will add this functionality to EZLogic in later versions. See this support page for help to create rooms in the mobile app.
Once created, you can use the device tiles in EZLogic to assign devices to rooms
Some devices consist of a parent device and one or more ‘child’ devices. For example the Philips Hue Plugin is a parent device and all imported Hue lights are considered children of this parent. However, you might want to assign the plugin a room called ‘Plugins’, but want all the lights to be in various different rooms (lounge, kitchen, bedroom, etc).
In such cases:
- Assign each child device to your desired room via its device tile as explained above.
- When you move the parent device to a different room, you will be given the option to also move child devices or leave them in their existing room:
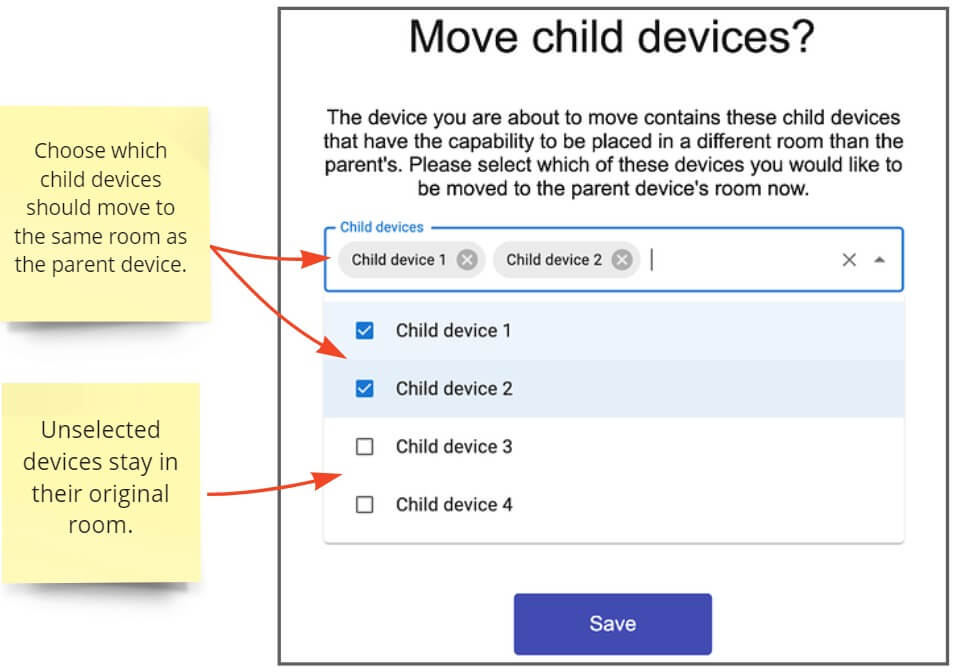
Note – Whether or not a child can go in a different room to the parent is defined by the device manufacturer or plugin developer. This capability is determined by the “parentRoom” property. If “parentRoom” is ‘false’ then you can move its child devices to a different room. This property is listed in our API documentation here and here.
Currently, you must use the Vera mobile app to import your connected smart devices:
- Make sure all devices and controllers that you wish to use are plugged in and operational.
-
Install the Vera mobile app on your preferred device. Create an account if you don’t already have one.
- iOS — https://itunes.apple.com/us/app/veramobile/id787203434?mt=8
- Android — https://play.google.com/store/apps/details?id=com.vera.android
- Windows Phone / Windows 10 / 8.1 — https://www.microsoft.com/en-us/store/apps/veramobile-beta/9nblggh1rl9l
- Open the app then tap ‘New to Vera’. This starts a wizard to import all your connected hubs and devices.
- All controllers and devices you add to the Vera app are automatically imported to EZlogic too.
- Login at https://ezlogic.mios.com with the same username and password you created for the Vera app.
- Click ‘Settings’ > ‘Devices’ in the left-hand menu to view your newly imported devices. You can now use these devices in meshbot triggers and actions.
See the following pages if you need more help to add devices or setup an Ezlo controller:
- Pair devices to an Ezlo controller
- Ezlo Atom quick start guide
- Ezlo PlugHub quick start guide
- Ezlo Plus quick start guide
There are three main types of device you will see in the ‘Devices’ area:
All three types can be used in EZLogic meshbots and placed on the dynamic dashboard.
These are what most people think of when they hear the term ‘smart device’. Smart devices often found in homes and buildings include thermostats, light bulbs, door locks, refrigerators, thermostats, motion detectors, cameras, alarms, doorbells and stereos.
You can create meshbots to run actions on a device when another device changes status. For example, if the temperature changes, or a door opens, or motion is detected. You can also create device-based meshbots to send notifications, interact with services and collaboration platforms and more.
The ‘Function’ menu allows you to modify various settings on a physical device, as long as it is connected and switched on. The function menu is not available on physical devices that are off, disconnected, or bridged from another controller:
Virtual devices work exactly the same way as physical smart devices. They can help save you time via automation and can act as a ‘universal translator’ for unsupported devices.
Virtual devices appear in the devices area, the dashboard, and can be used in meshbots. However, unlike physical devices, you cannot edit their settings via the ‘Function’ menu:
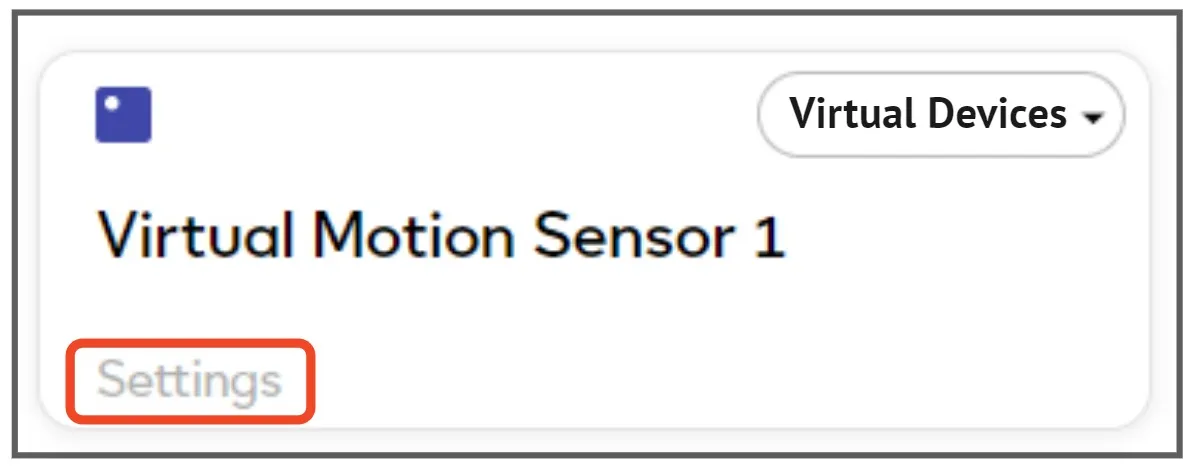
- You can create virtual devices of various types in in the ‘Virtual Devices’ area of EZLogic:
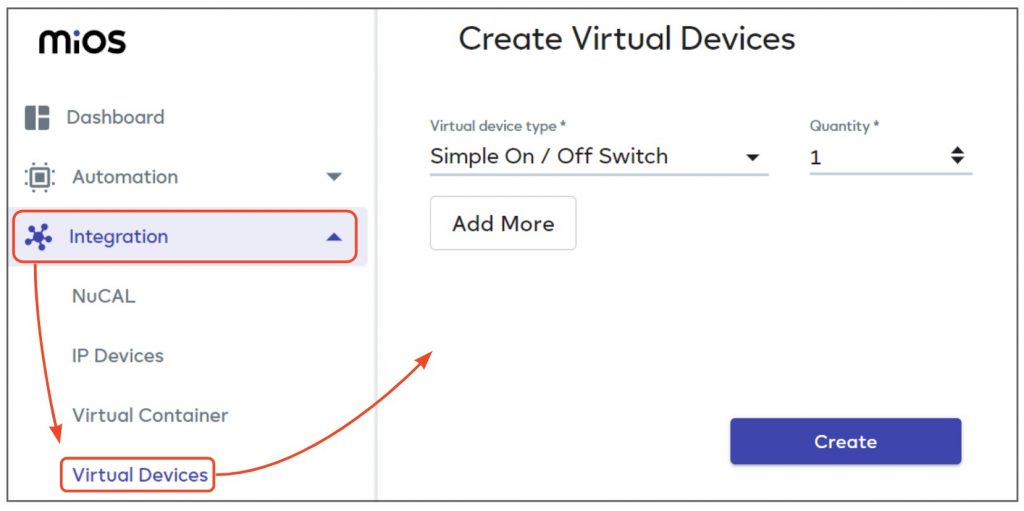
See the Virtual Devices help page if you want more assistance with this.
- The ‘Virtual Container’ area of EZlogic also lets you create a virtual device and set up its states and commands. These commands can be mapped to real device commands or cloud service commands. A virtual switch, for example, lets you control physical devices that are monitoring the on/off state of the switch.
- A third way to create virtual devices is by using an EZLogic plugin. For example, the WiFi Device Generator Plugin and the Ezlo Protocols Plugin let you create virtual devices in a few simple steps.
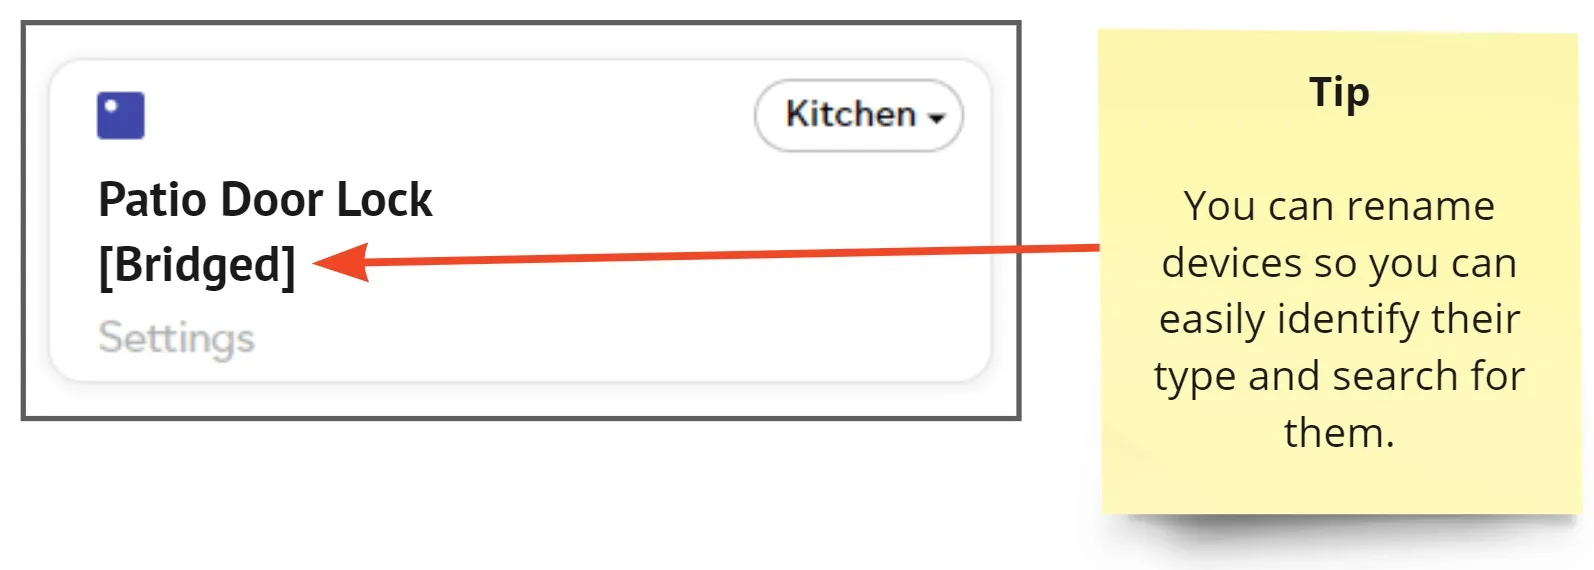
These are devices added to a controller which has been connected (or bridged) to your main Ezlo controller. Bridging a controller lets you issue commands to that controller’s devices via EZLogic.
Note – You cannot currently bridge two Ezlo controllers together. Bridging is mainly for connecting an Ezlo controller to a non-Ezlo controller (e.g. a Vera hub).
- You can control bridged devices in meshbots just like you would any other device. The device will also appear on your dynamic dashboard.
- You can view the on/off status of bridged devices in the device tile, but you won’t be able to edit their settings using the ‘Function’ menu:
- Save time. If you already have a controller setup then bridging can save you the hassle of rebuilding your network on your new controller. You can then control all bridged devices via EZLogic’s superior rule creation interface.
- Centralized control. Large deployments such as offices and apartment blocks may need several controllers to handle the bandwidth of all their devices. Bridging these controllers to an Ezlo hub lets you use EZLogic to issue commands to all their devices at once.
- Support unsupported devices. A specific device or plugin might not (yet) be supported by your Ezlo controller, but is happily running on another controller. Bridging controllers lets you operate such devices in EZLogic meshbots and the dashboard.
- Vera to Ezlo Bridge – Written by reneboer, one of our most respected community members, the VeraBridge plugin lets you import devices from your Vera hub so they can be controlled via EZLogic. See this community post to download and find out more about the plugin.
- EzloBridge (openluup) – Also by reneboer, this plugin runs on openLuup and makes Ezlo controlled devices available on openLuup, along with its plugins. See this community post to download and learn more.
- Bridge two Vera controllers – See this help page on the Vera support site.
- The following two documents may also be helpful – Add another Z-Wave controller to an Ezlo controller and Connect Ezlo secure to another Z-Wave controller.
Note – You cannot currently bridge two Ezlo controllers together. Bridging is mainly for connecting an Ezlo controller to a non-Ezlo controller (e.g. a Vera hub). A good alternative is to use a ‘global’ meshbot. Global meshbots let you control devices from multiple Ezlo controllers in a single meshbot.
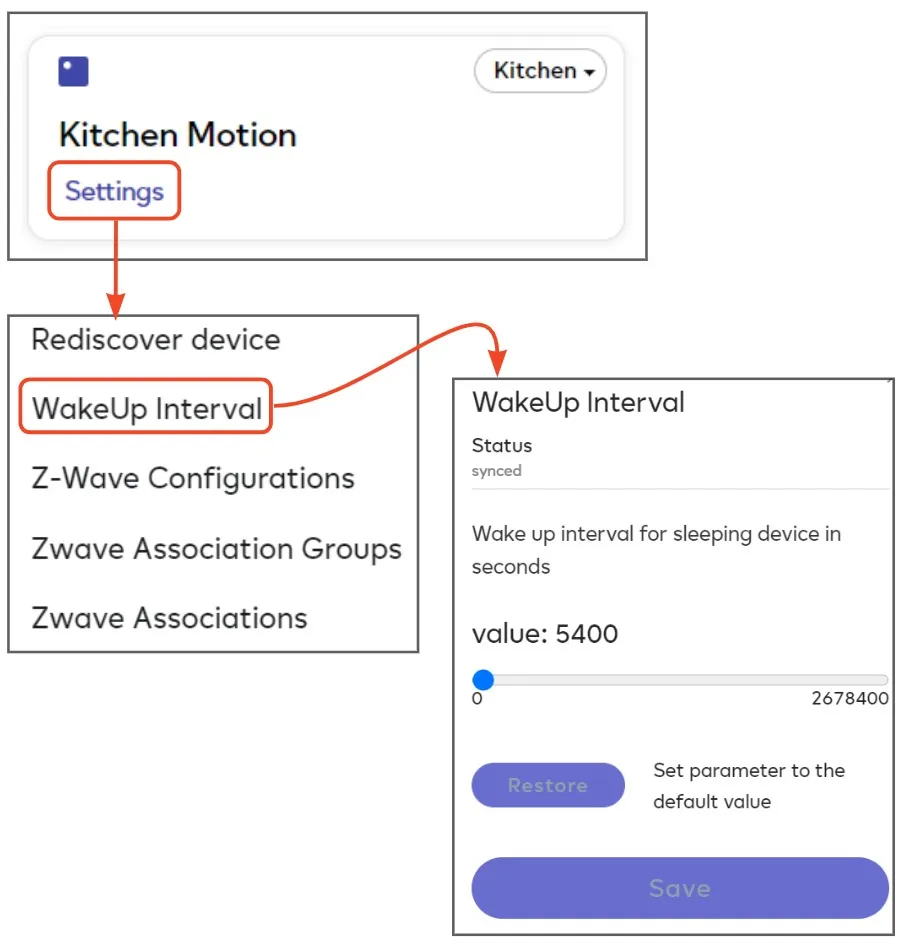
Most Z-Wave devices have a set of generic options that you can configure. These are in addition to any device-specific settings you may see:
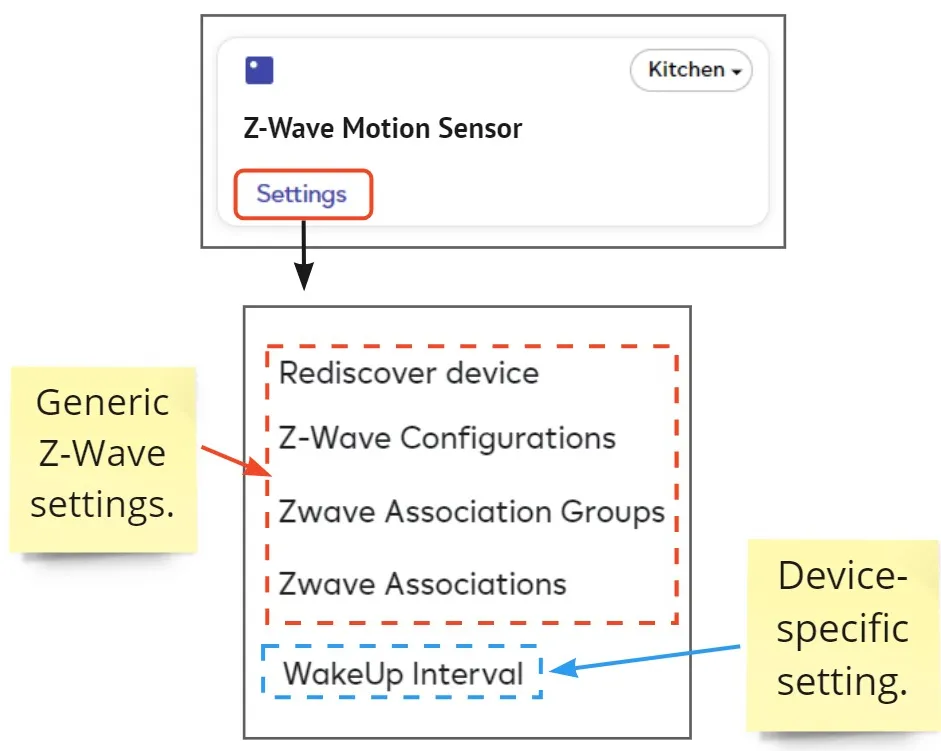
Rediscover device — Force your Ezlo hub to rescan your network and update the device’s status and settings (if required). Use this feature if you have recently made changes to your Z-Wave network. Rediscovery makes sure each device uses the best possible communication routes. You can also try this option if you are having communication issues with the device.
Z-Wave Configurations — Lists all native parameters implemented by the device manufacturer and lets you create and edit your own parameters. Configuration parameters are tweakable settings that determine how your device functions.
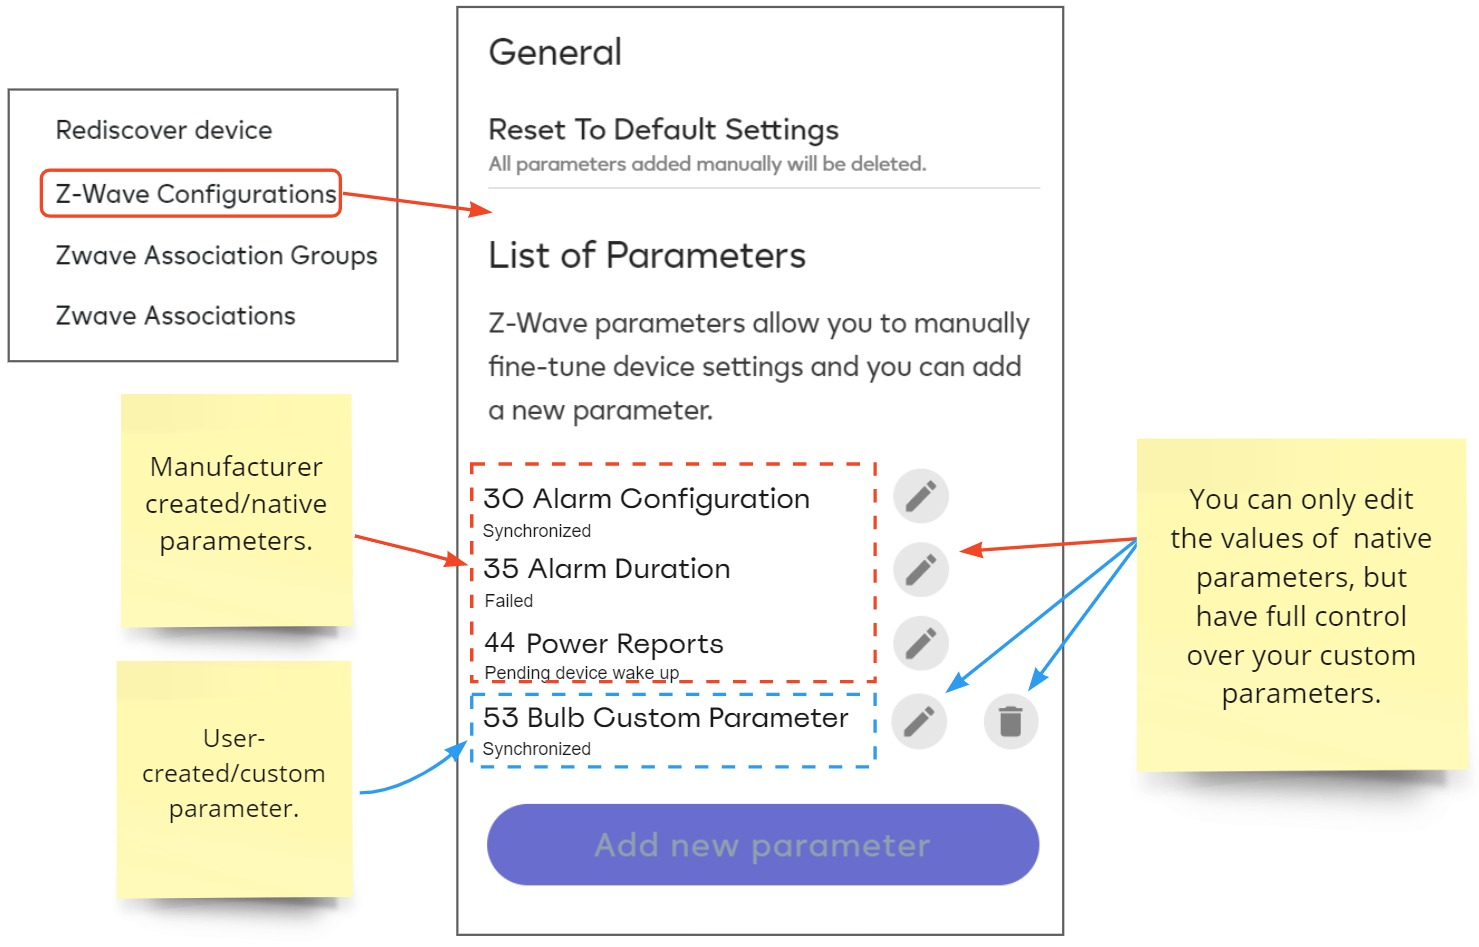
Reset to default settings – Deletes all custom parameters and returns all native parameters back to their defaults. Battery operated devices need to be manually activated after the reset to implement the change.
List of Parameters
The parameters you see here will vary from one Z-Wave device to another. For example, a motion sensor may have a parameter that lets you adjust passive infrared (PIR) sensitivity. An alarm could have a parameter that lets you change the length of time its siren remains active. Please see the device’s user manual for a full list of the parameters you can configure.
- Native parameters – You can only edit the values of parameters which were created by the device manufacturer. For example, how often in seconds a power report is sent from a sensor device to your controller. You cannot change other settings like name, description etc.
- Custom Parameters – You can edit any setting of a manually added parameter, including value, name, ID, description, display format, and data size.
- New and edited parameters are applied automatically when the device is synchronized with the hub. You can also activate the device manually to implement the synchronization.
Each parameter’s current status is listed underneath its name:
- Synchronized – The device is active and the parameter was implemented.
- Pending device wake up – The parameter was not implemented because the device is awaiting data synchronization.
- Failed – The device is active but the parameter was not implemented due to an error during data synchronization.
Add / Edit a Parameter
- Click ‘Functions’ > ‘Z-Wave Configurations’ on your target device.
- Click ‘Add New Parameter’, or click the edit icon next to a parameter name.
- This opens the parameter config screen:
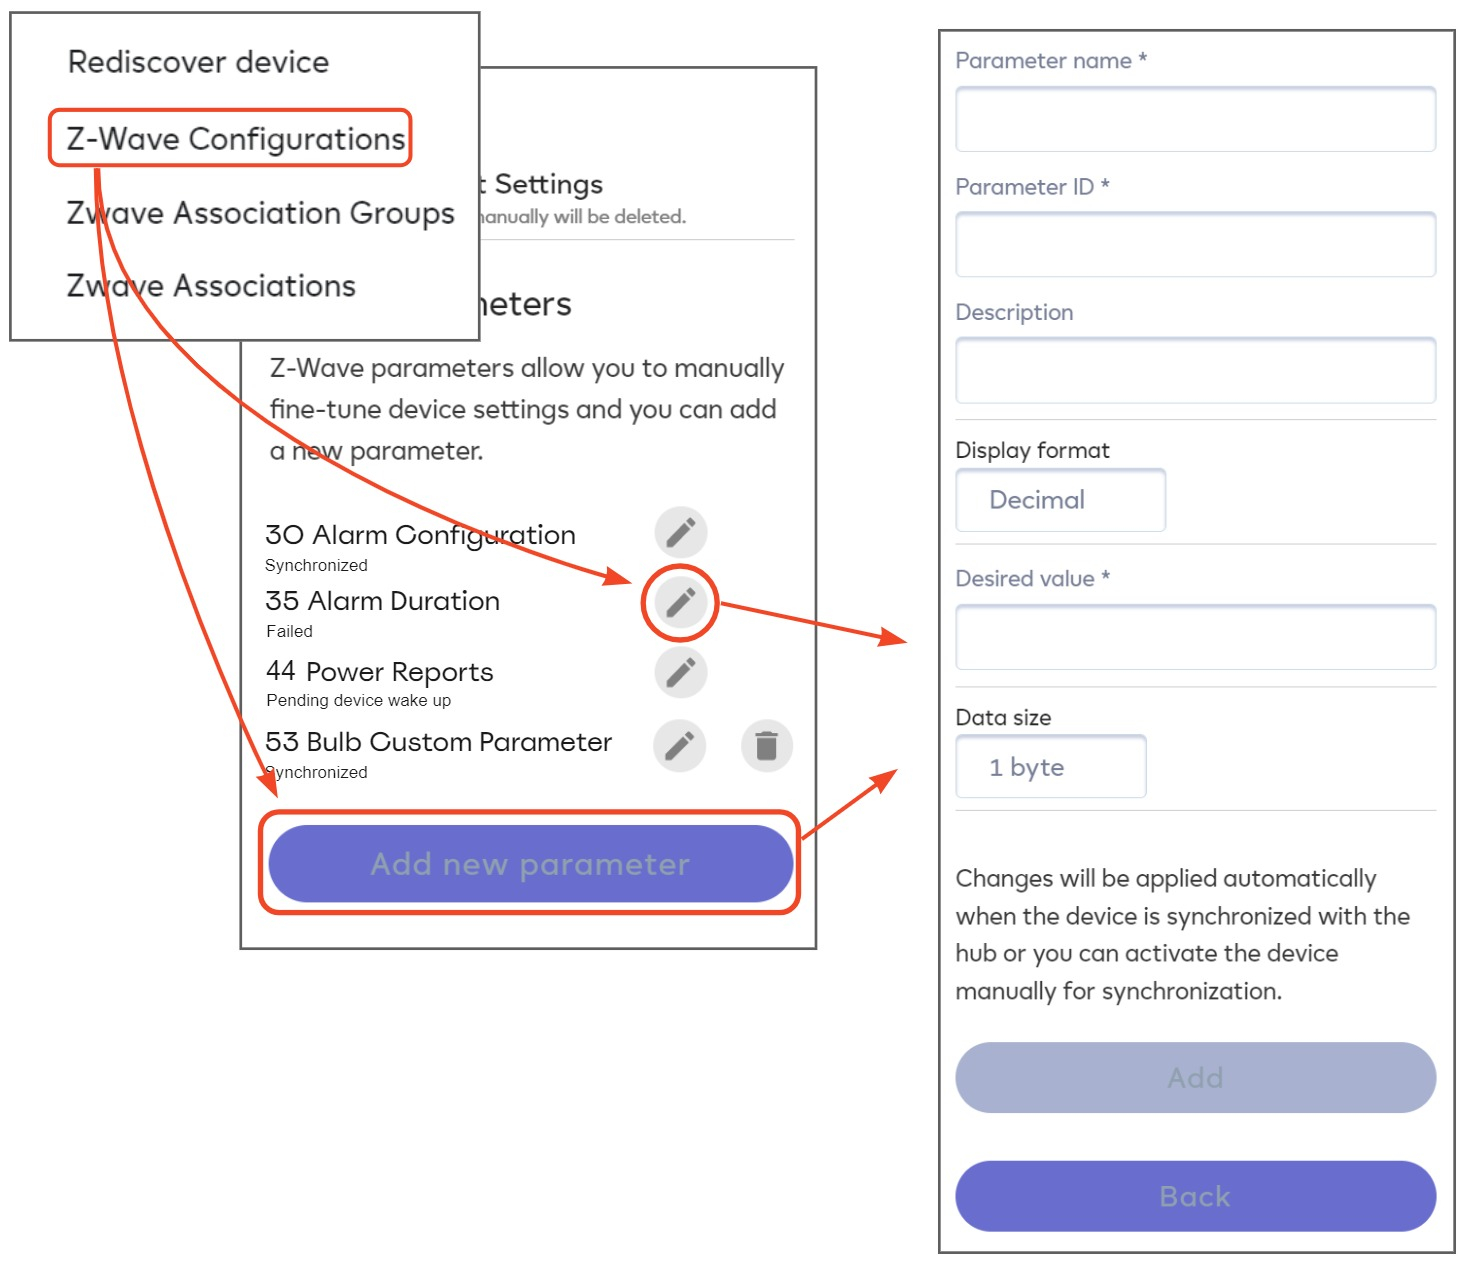
Parameter Name – Name which lets you easily identify the purpose of the parameter. You cannot edit the names of native parameters, but can do so with custom parameters.
Parameter ID – The number of the parameter on the Z-Wave device. This can vary from manufacturer to manufacturer, even for the same function. For example, a Fibaro motion detector might use a different number for its ‘motion detected’ parameter than an Aeotec motion detector.
Description – Optional. Create a friendly description of the parameter setting. You cannot edit the description of a native parameter, but you can create and edit descriptions for custom parameters.
Display Format — Specify the notation that the device uses to identify its parameters:
- Decimal — Base 10 notation. A value containing any mixture of the numbers 1 to 9. For example, 3, 300, 123456 etc
- Hexadecimal — Base 16 notation. A value containing a mix of the numbers 1 through 9 and/or the letters A, B, C, D, E and F. For example, 3, 12C, 1E240 etc. You may also see hex values written in the format 0x3, 0x12c, 0x1E240. Please check your device for the exact format.
Notes:
- You can only edit the display format on parameters you have added manually.
- Make sure the value you enter in ‘Desired Value’ matches your display format. For example, ‘23’ in decimal is actually ‘17’ in hex, and ‘14’ in decimal is ‘E’ in hex. Don’t mix the two types.
- You should only change the display format if your Z-Wave device requires the parameters to be in a certain format. Please consult your device’s documentation to find out whether its parameters are decimal or hex.
Data Size — The number of bytes required by the parameter — 1 byte, 2 bytes, 3 bytes or 4 bytes. This determines that the parameter passes the correct amount of data to the device.
- Unless stated otherwise, most parameters are 1 byte decimal. However, some devices require different data sizes.
- Consult your device manual to find which data size to use for your parameter. An incorrect data size will not work and could stop your device working properly.
Desired Value — Enter a number which corresponds to the setting you want to implement on the parameter. Again, please consult your device’s manual to find out which values you can enter here.
Z-Wave Association Groups — Association groups let you create direct communications between two or more Z-Wave devices. This lets the device send commands straight to all (slave) devices in the group, bypassing the controller.
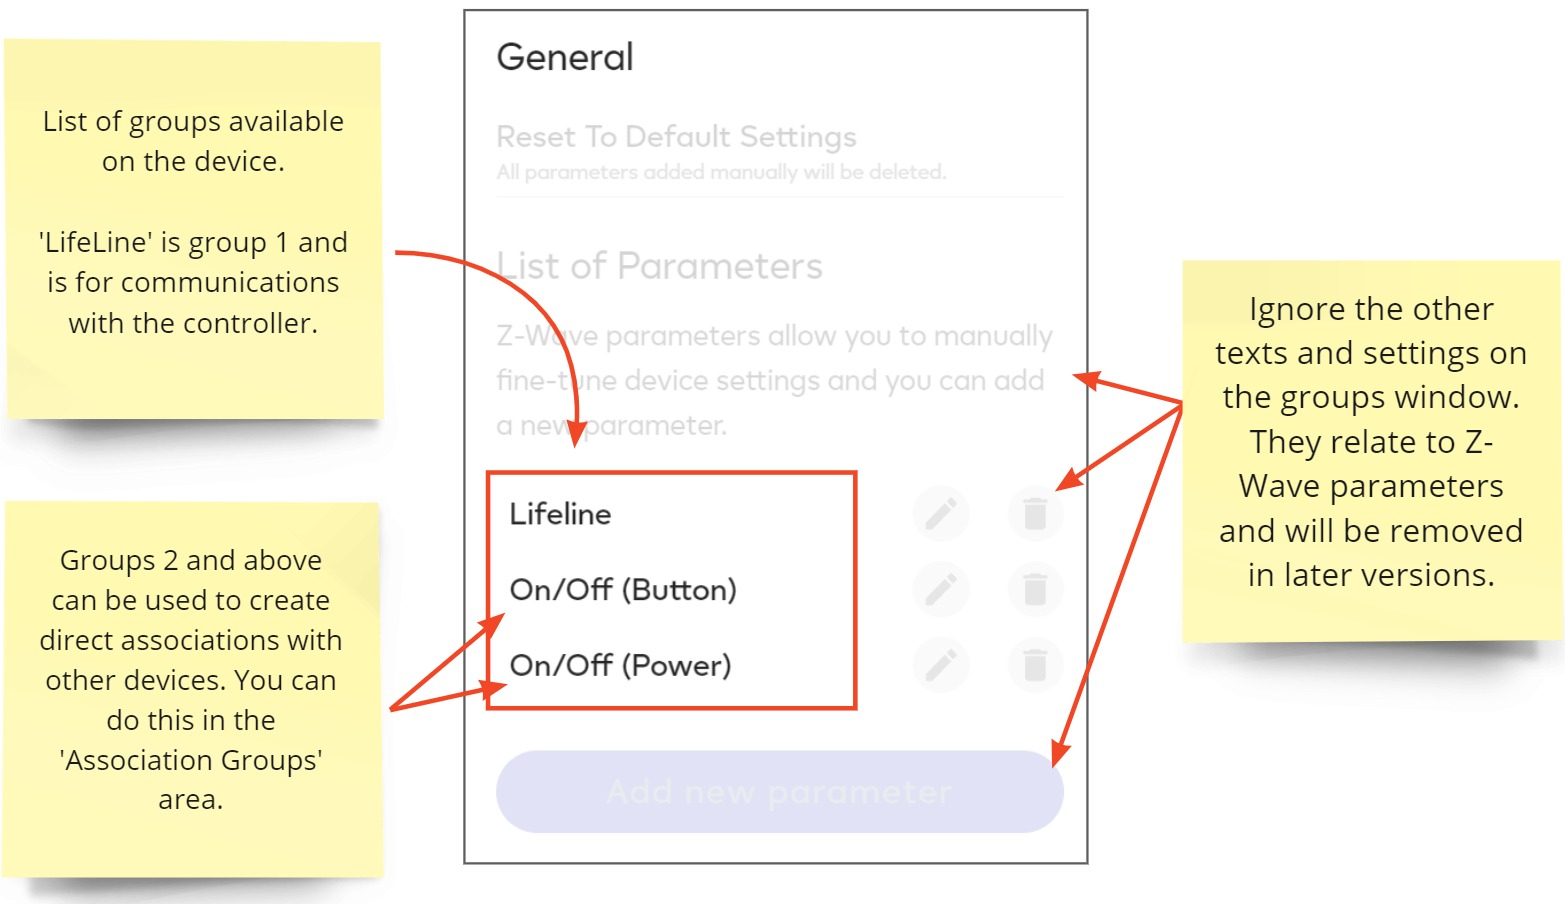
- Click ‘Settings’ > ‘Device Associations’ in EZLogic to view and create associations.
- See the device associations page for more help with this topic.
Z-Wave Associations
Lists all devices with which the device is associated. See the device associations page for more details.
Use the API tool to get more device information
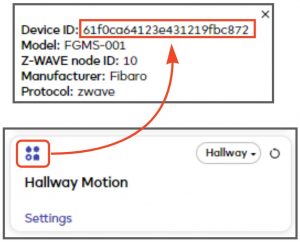
Advanced users can use the ‘Device ID’ shown on the device’s tile to extract further information about the device from the Ezlo API tool at https://apitool.ezlo.com/.
For this example, we will retrieve advanced device details by using the ‘hub.items.list’ command. ‘items’ are the features (capabilities) of a device. For example, a motion detector may have items called ‘motion’ and ‘acceleration’ and ‘battery’. You can use the id of the items to control the device via, for example, the HTTP Server API.
- Go to ‘Settings’ > ‘Devices’ then click the info icon on your target device.
- Copy the ‘Device ID’. Tip – double-click on the device id to select the string:
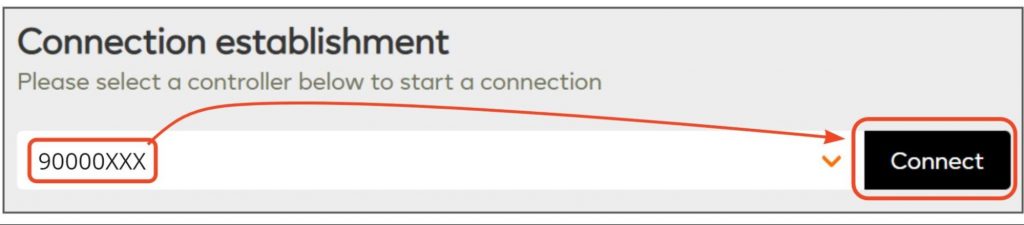
- Go to https://apitool.ezlo.com/ and login with your EZLogic / Vera username and password.
- Select your controller in the ‘Connection Establishment’ menu then click ‘Connect’:
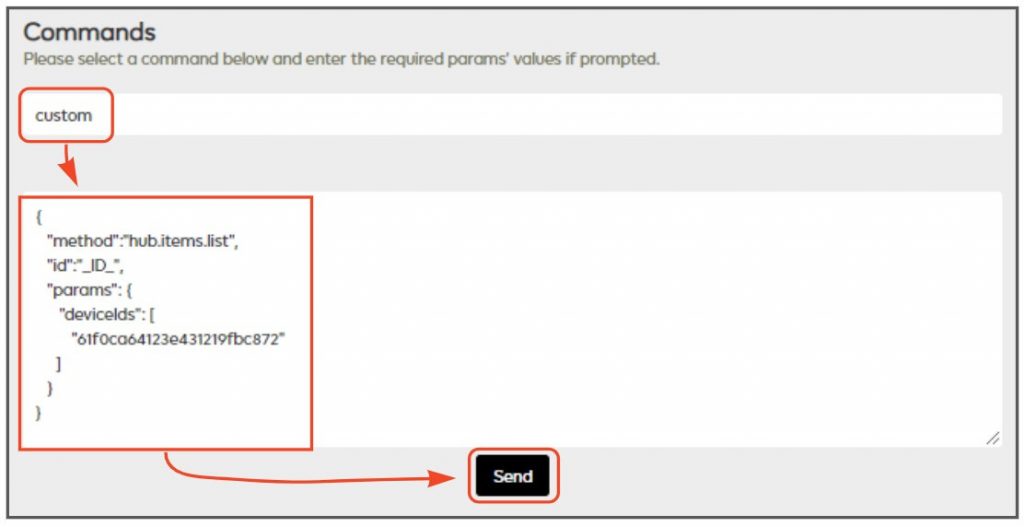
- Select ‘Custom’ in the ‘Commands’ menu.
- Enter the following command into the field:
{
   "method":"hub.items.list",
   "id":"_ID_",
   "params": {
      "deviceIds": [
         "deviceId0"
     ]
   }
}
…replace “deviceId0” with the id you copied earlier, so the command looks something similar to this:
{
   "method":"hub.items.list",
   "id":"_ID_",
   "params": {
      "deviceIds": [
         "61f0ca64123e431219fbc872"
     ]
   }
}
- Click ‘Send’ to publish the request:
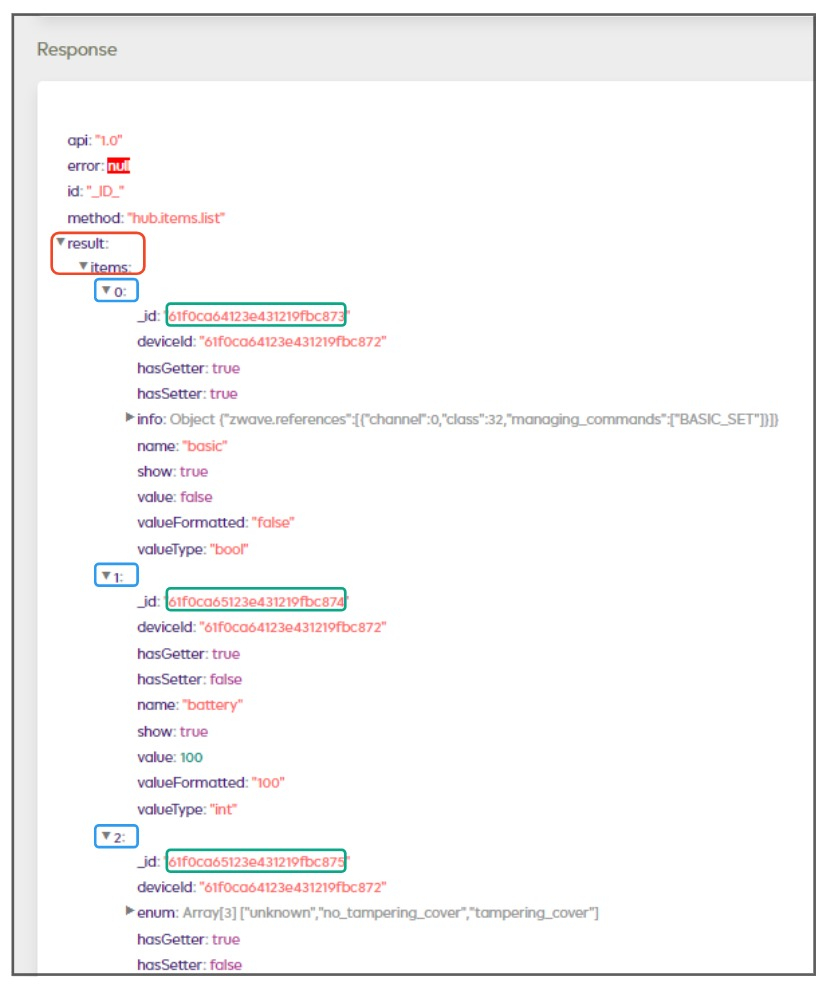
- The ‘Response’ field lists all items (capabilities) of the device along with each item’s ID string:
You can learn more about how to use the API tool to extract information for requests in this community post by community leader @cw-kid.