Notification Meshbot
Notification meshbots let you send push messages and emails to yourself and other users. For example, you might want to receive a notification when:
- A device such as a thermostat reaches a certain setting.
- There is an emergency such as a flood or smoke detected.
- A door or window has been left unlocked, or there is movement in your back-yard.
There are three types of meshbots that allow you to send notifications – local meshbots, cloud meshbots and notification meshbots. Notification and cloud meshbots have similar features and capabilities, but notifications in local meshbots are somewhat different:
- Notification and cloud meshbots run in the cloud and are not tied to a specific controller. This means you can use devices paired with any controller on your account to trigger an alert. Local meshbots only let you trigger notifications from devices on a single controller.
- Because of this, notification/cloud meshbots let you create more complex notifications based on inputs from devices on multiple controllers. For example, the statuses of a motion sensor on controller A and a door lock on controller B can be used in a single trigger group for a notification.
- Notification and cloud meshbots let you create HTML email notifications with the option to insert keywords. Local notification meshbots do not allow either of these features.
- You cannot create ‘False’ actions in notification or cloud meshbots. For example, you want a notification when a light switch is turned on, and a different notification when the switch is turned off. A work-around is to create two meshbots – the first to send an alert when the trigger conditions are true, and the second to send an alert when those same triggers become false. Local meshbots *do* allow you to create ‘False’ actions but, as mentioned above, only on devices on a single controller.
- You cannot create action exceptions or action execution policies in notification or cloud meshbots. Local meshbots allow both these features.
- Available Triggers. Local meshbots allow you to use a wide-range of different inputs to trigger your scenes. Notification and cloud meshbots are limited to devices, date/time, NuCAL services and cloud variables.
- Available Actions. Similarly, local meshbots let you use the full range of controllables as your meshbot action. Notification meshbots only allow you to select ‘Notification’ as your action. Cloud meshbots let you select notifications, devices, dashboards and NuCAL services.
The following table shows the different capabilities of notifications in each type of meshbot:
| Notification Meshbot | Cloud Meshbot | Local Meshbot | |
|---|---|---|---|
| Triggered by devices on: | Any controller on your account | Any controller on your account | Single controller on your account |
| Push notifications | |||
| Text emails | |||
| HTML emails | |||
| Use keywords | |||
| Create ‘False’ actions | |||
| Create Exceptions | |||
| Create Execution Policies | |||
| Available Triggers |
|
|
|
| Available Actions | Notification |
|
|
See the notifications in a local meshbot page if you want help with local meshbot notifications
- Click ‘Automation’ > ‘Meshbots’ > ‘Create New Meshbot’ > ‘Notification Meshbot’:
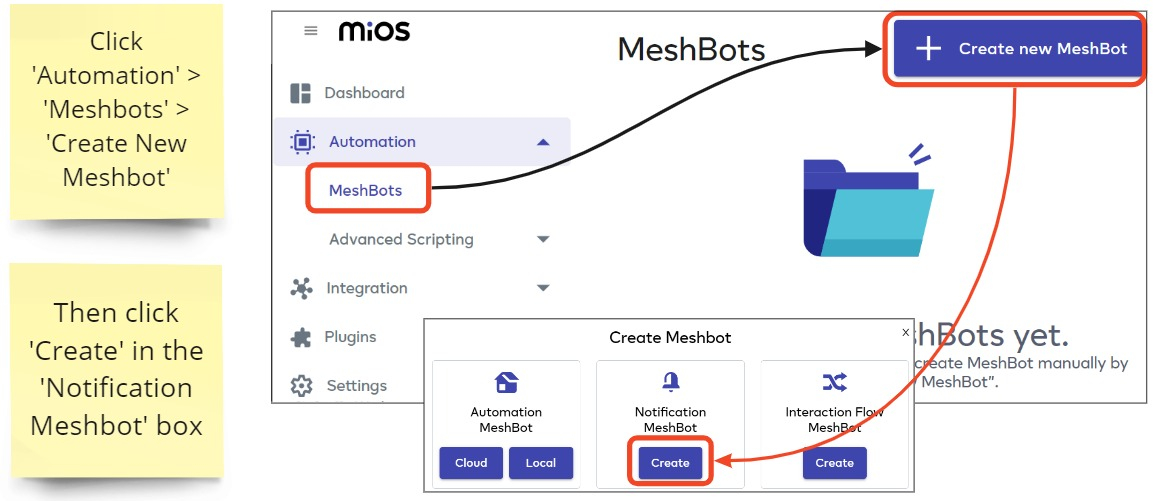
- Create a name for your meshbot then click ‘Add Trigger’ to create the conditions under which the notification gets sent. See the triggers help page if you want help with this.
-
- Tip – you can create a meshbot with no triggers and only the notification action if you want. For example, you might just want to test whether the notification gets sent before creating your full scene. If you do this, then you can run the meshbot manually using the ‘Play’ button on the meshbot list screen.
- You can also run ‘triggerless’ notification meshbots by calling them in another meshbot’s actions. See the meshbot as an action page if you want to learn more about this.
- Next, click ‘Add Action’ then select ‘Notification’ in the first drop-down menu.
- Choose your recipient users, then choose whether you want to receive the notification via push or email, or both.
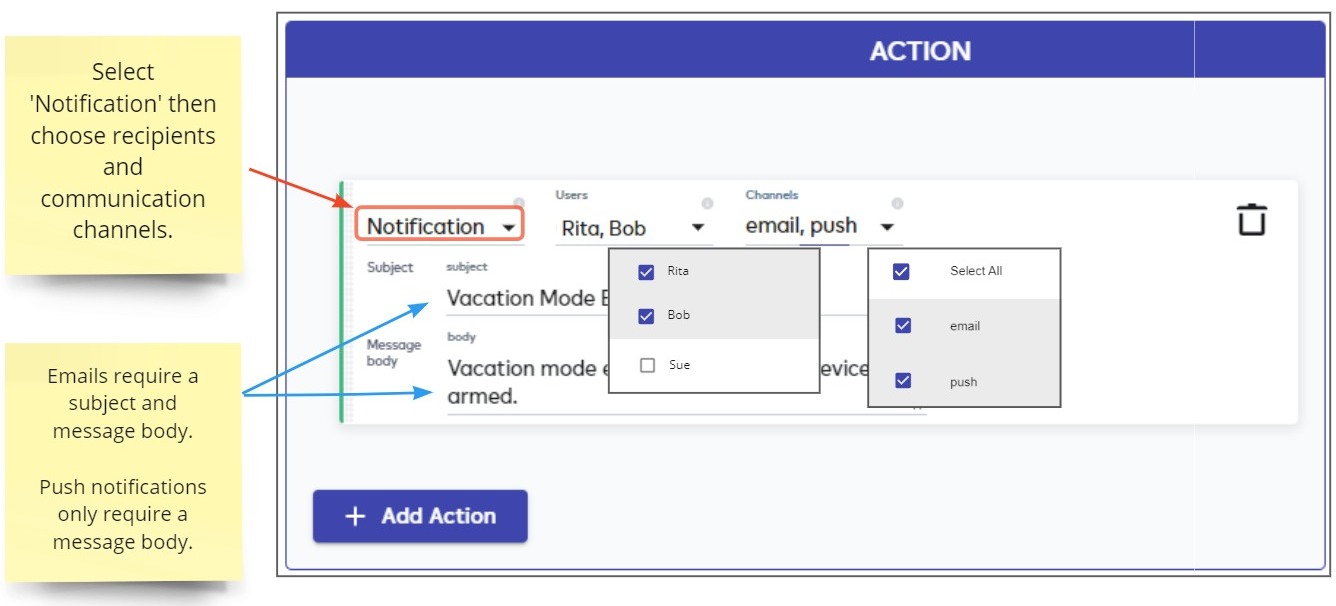
Users – You can send notifications to the email addresses and/or mobile devices of the account admin and any secondary users.
- Click ‘Account’ > ‘User Management’ to create and manage users in EZLogic:
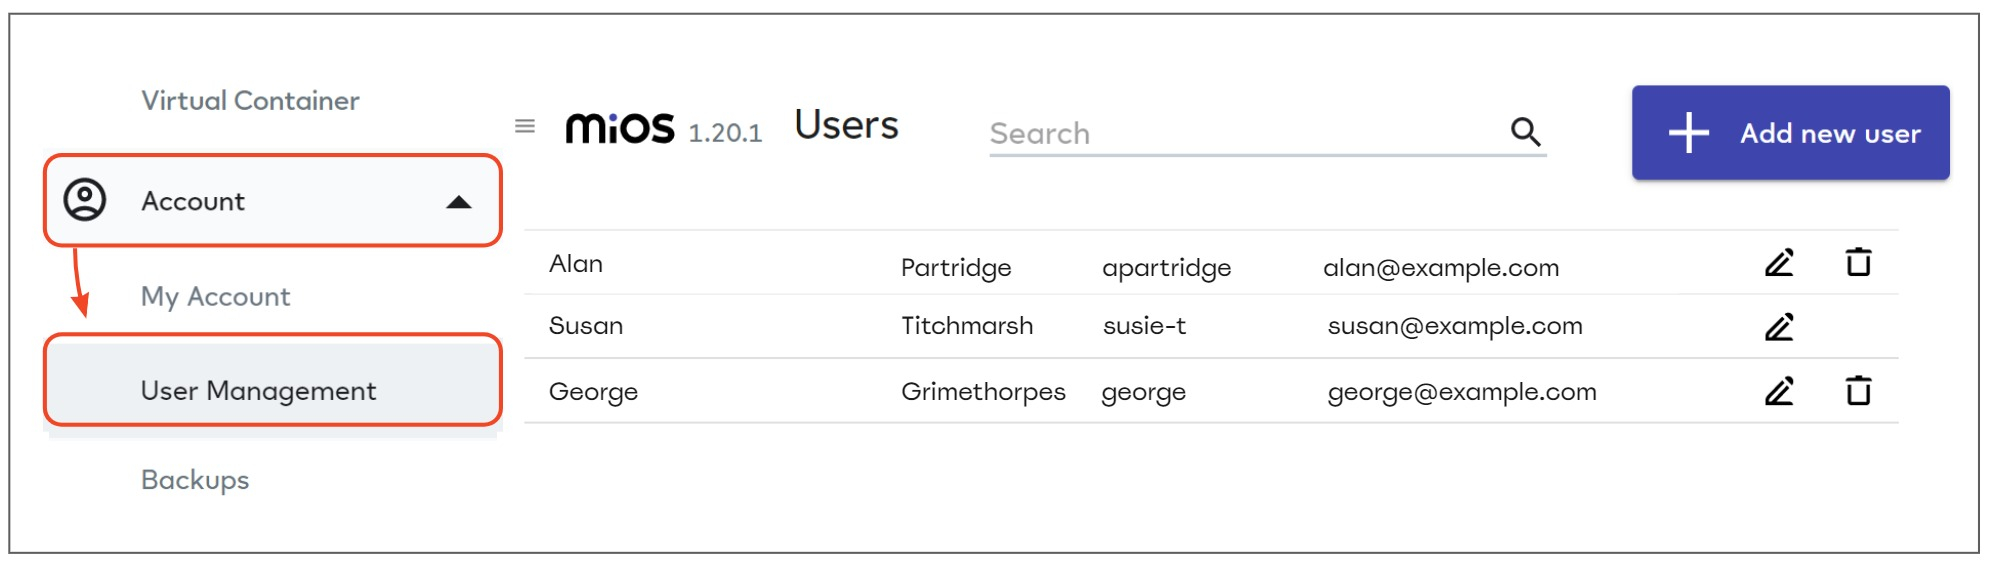
- See the User Management help page if you need help with this.
- Alternatively, click here for help to add new/secondary users in the Vera app.
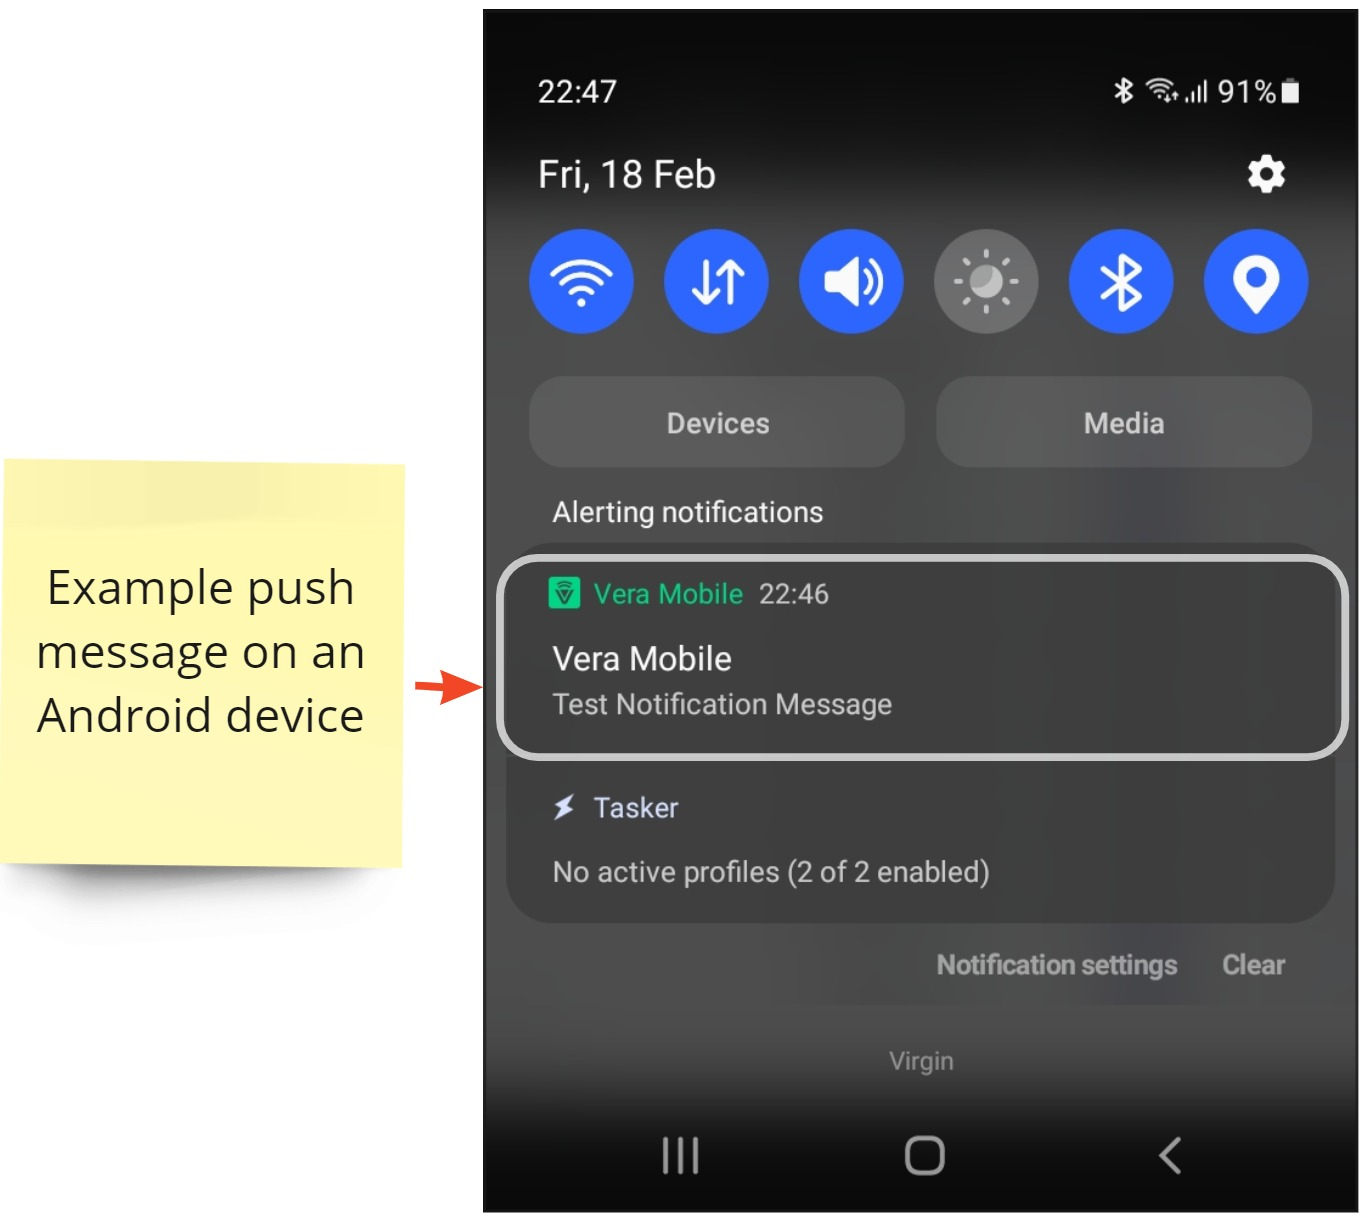
Push – Sends a message that pops up on the selected user’s phone if they have the Vera app installed. Push messages have a similar appearance to regular text messages but only appear if the Vera app is on the device:
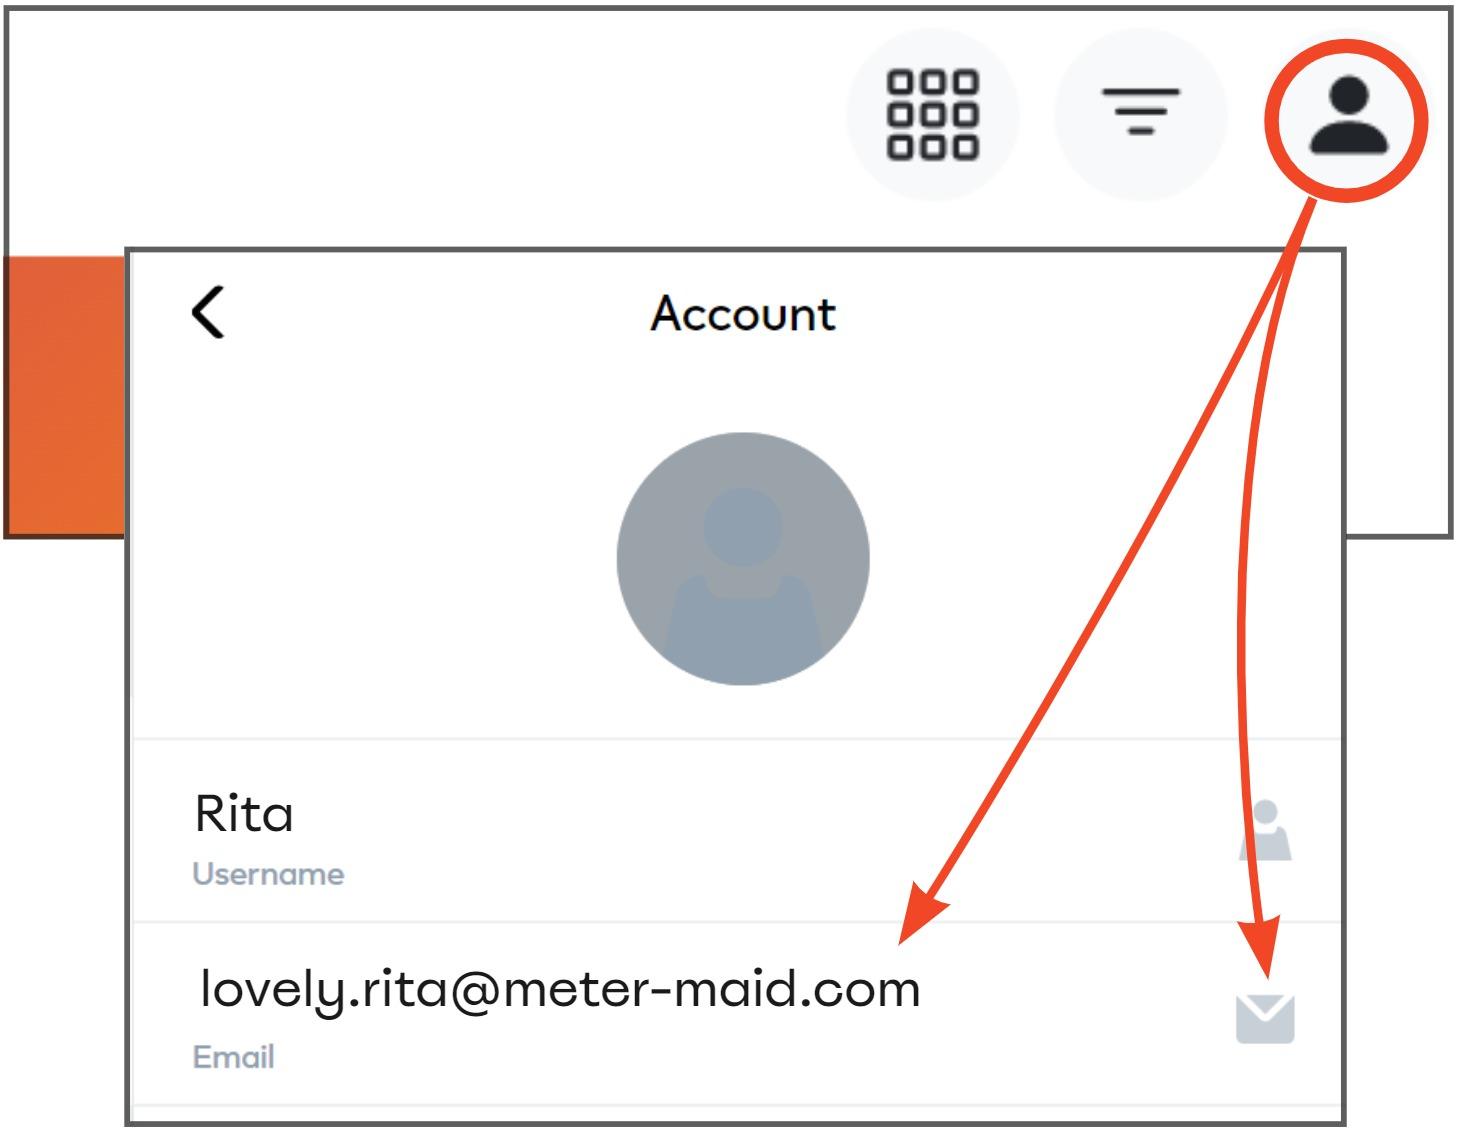
Email – Sends an email to the people selected in the ‘Users’ drop-down. You can send the mail to the address of the currently logged in user plus any secondary users that have been added to the Vera mobile app. You can view and edit your account email address by clicking the user icon at the top-right of the EZlogic dashboard screen:
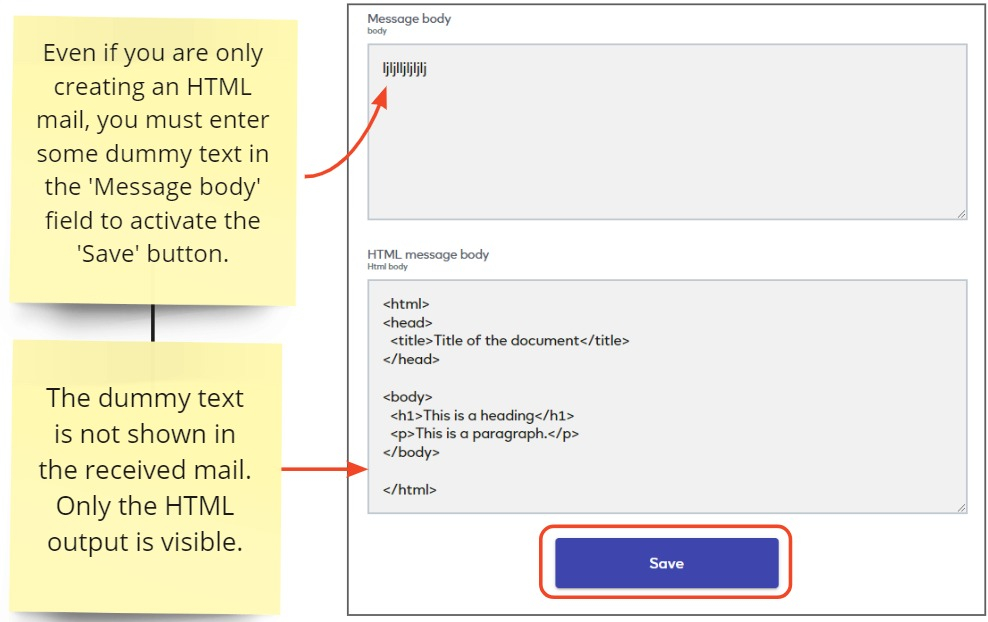
HTML emails – You can send your email notifications in HTML format by simply pasting your code into the ‘HTML Message body’ field. Please note that you must still type some text in the ‘Message Body’ field above in order to activate the ‘Save’ button. This text does not appear in your final email.
Keywords – The keywords feature is still under development. Once complete, you will be able to insert device item values into your HTML messages.
Example
- You are a landlord with two vacant properties in the local area. The devices in each property are controlled by a different Ezlo hub.
- You have already set up meshbots to open and close the window blinds at sunrise and sunset in each property. This is to deter intruders by creating the illusion that the properties are occupied.
- You want a notification when the blinds in all properties are opened in the morning, and another when they are closed in the evening.
- Notification meshbots allow you to create alerts based on the status of devices paired with any controller on your account. In this case, you simply add the blind devices from each property to a single meshbot trigger group. The following screenshot shows an example trigger set for your ‘Blinds Opened’ notification:
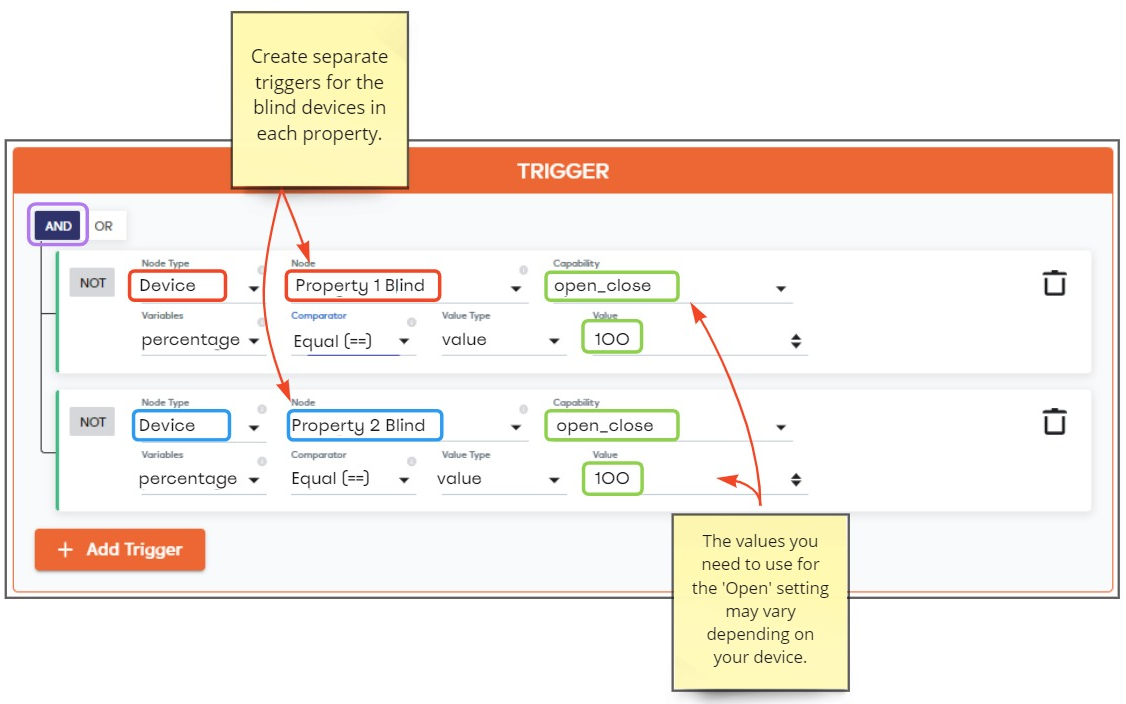
- The trigger group above will become true when the blinds in both properties are open.
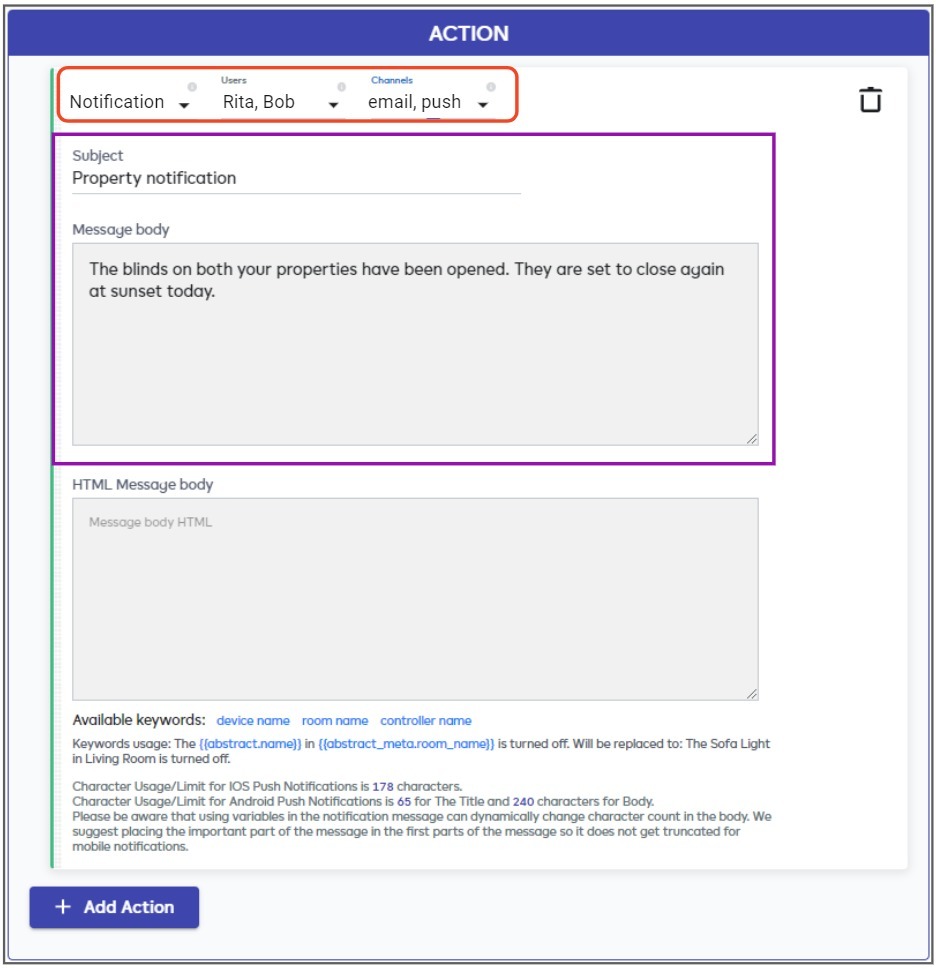
- Next, add an action to send your chosen notification message. An example is shown below:
- Click ‘Save’ to save your meshbot. You should next set up the complementary meshbot to send you a notification when both blinds are closed in the evening.
- The push notifications feature is great for sending simple messages that keep you updated on the status of your meshbots. However, it might not be suited to advanced use-cases due to its reliance on users needing the Vera app installed.
- Businesses and teams looking to integrate meshbots with a notification framework may find greater flexibility and power in a NuCAL integrated service. For example, MessageBird, Slack or EmailOctopus.
- Another alternative is to use the ‘HTTP Request’ action to send notifications through a dedicated messaging service like Telegram. You will need to use a local meshbot for HTTP requests.