User Management
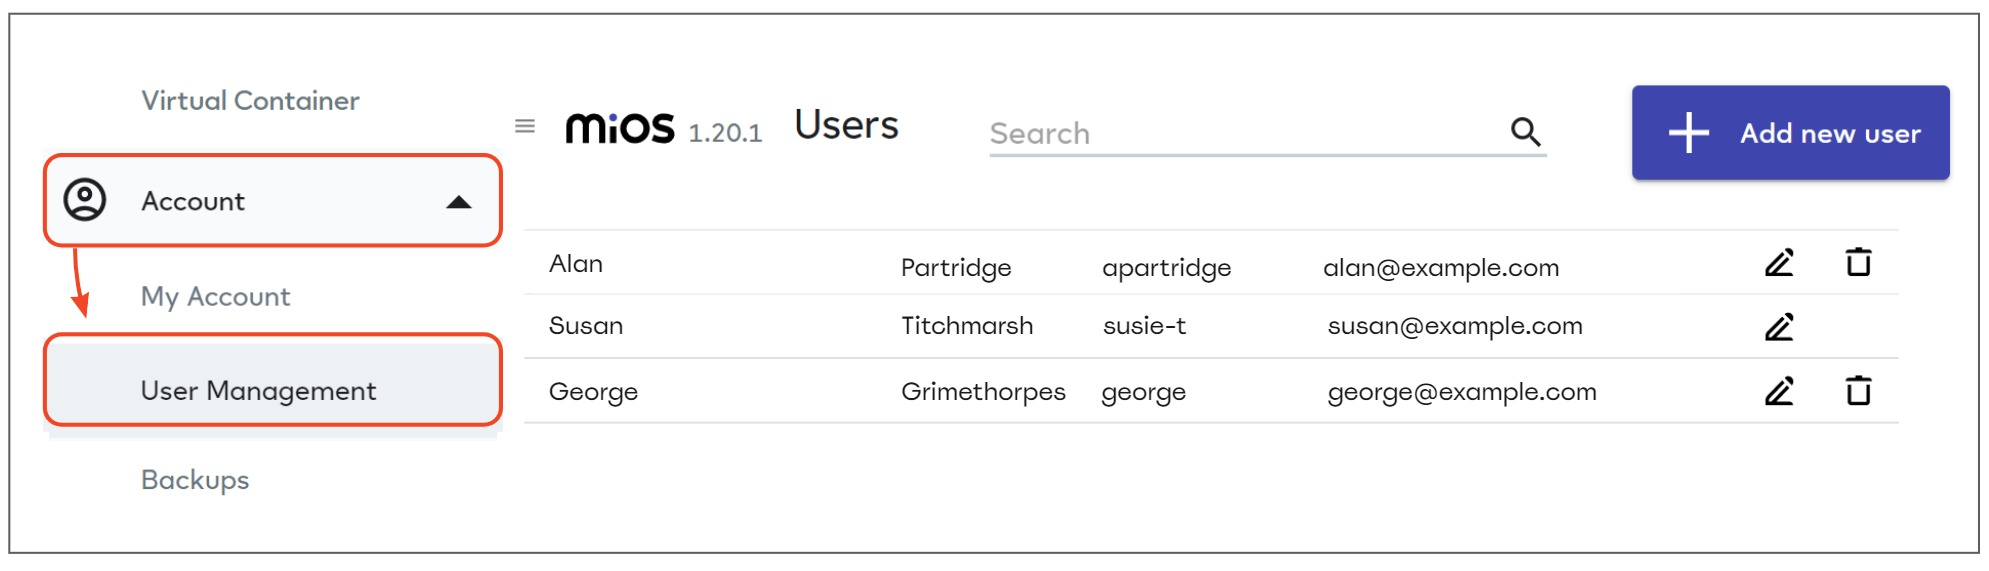
The ‘User Management’ page lets you add, remove and modify EZLogic / Vera users. Click ‘Account’ > ‘User Management’ to open the area:
Important Note – This is the first iteration of user management in EZLogic and currently has limited effectiveness in the system. We have ported over the user types from the Vera system but haven’t yet converted them into ‘meaningful’ privileges for most major EZLogic features.
In short:
- The only real difference between user types in EZLogic are that account admins are the only users that can create or edit other users. And ‘notification only’ users are not allowed to login to EZLogic at all.
- All other functionality available to admins in EZLogic is also available to basic and advanced users. This includes the ability to manage devices, controllers, meshbots and other major settings.
-
The Vera UI *does* implement effective user controls, even if you created those users in EZLogic. Notes:
- Admin users created in EZLogic can access both Ezlo hubs and Vera hubs in the Vera app.
- Advanced and basic users created in EZLogic can initially only access their assigned Ezlo hubs in the Vera app. You can assign Vera controllers to them by clicking ‘Users’ > ‘username’ > ‘Controllers’ in the Vera app.
At the moment, we advise admins to create lower-level users in EZLogic only if they intend them to use the Vera app to interact with their systems. Allowing them to access EZLogic may grant them more power than intended.
We plan to release a more effective user management mechanism in EZLogic later this year.
- Types of user
- Add, remove and edit users
- User permissions in the Vera app
- User permissions in EZLogic
- PIN Codes
Please note these descriptions apply mainly to the Vera app. See the Important Note above for more details.
Account administrator – Full control over the entire account. There must be at least one account admin for each account – typically the person who set the system up. You can set up multiple account admins if you wish. Account admins can control all settings, devices, controllers, meshbots, subscriptions and dashboards, etc. They are the only user type that can manage other user settings.
Advanced user – Same core permissions as an account admin but only on controllers to which they have been assigned. Cannot manage or create other users.
Basic User – Can operate controllers and associated devices as allowed by the account admin, but cannot change account settings, configure meshbots/scenes, or manage other users. Typically this is the level that’s assigned to most family members, household help, or employees of a small business.
Notification only recipient – Will receive notifications on specific events as determined by an account admin or advanced user. Cannot view the Vera dashboard nor access account settings, devices, meshbots/scenes or any other functionality. This is the lowest level of permissions available.
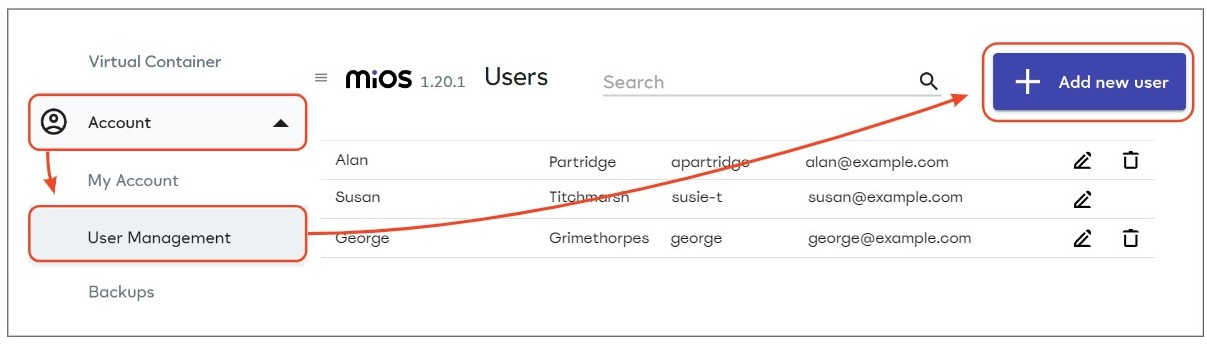
- Log into EZLogic
- Click ‘Account’ > ‘User Management’
- Click ‘Add New User’:
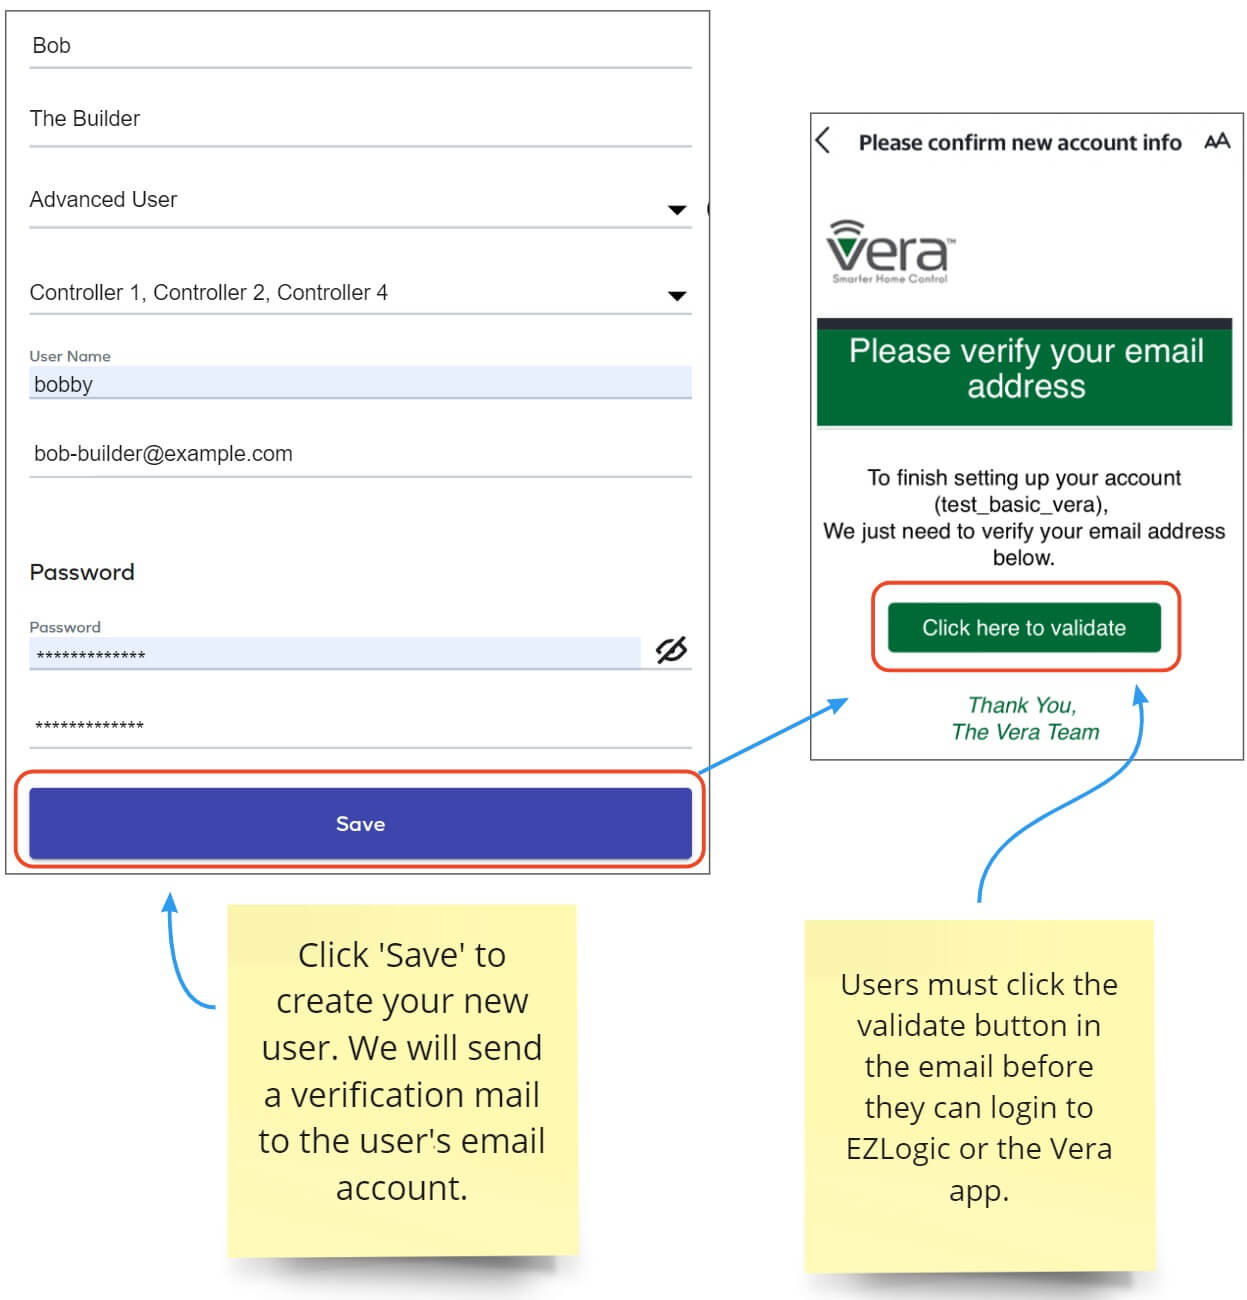
- Complete all fields in the new user form. Passwords must be at least 8 characters long and contain at least one uppercase and lowercase letter, a special character and a number:

- Click ‘Save’ to create your new user. We will send an account verification email to the email address you provided in the new user form.
- Users must click the validation link in order to login and use EZLogic or the Vera app:
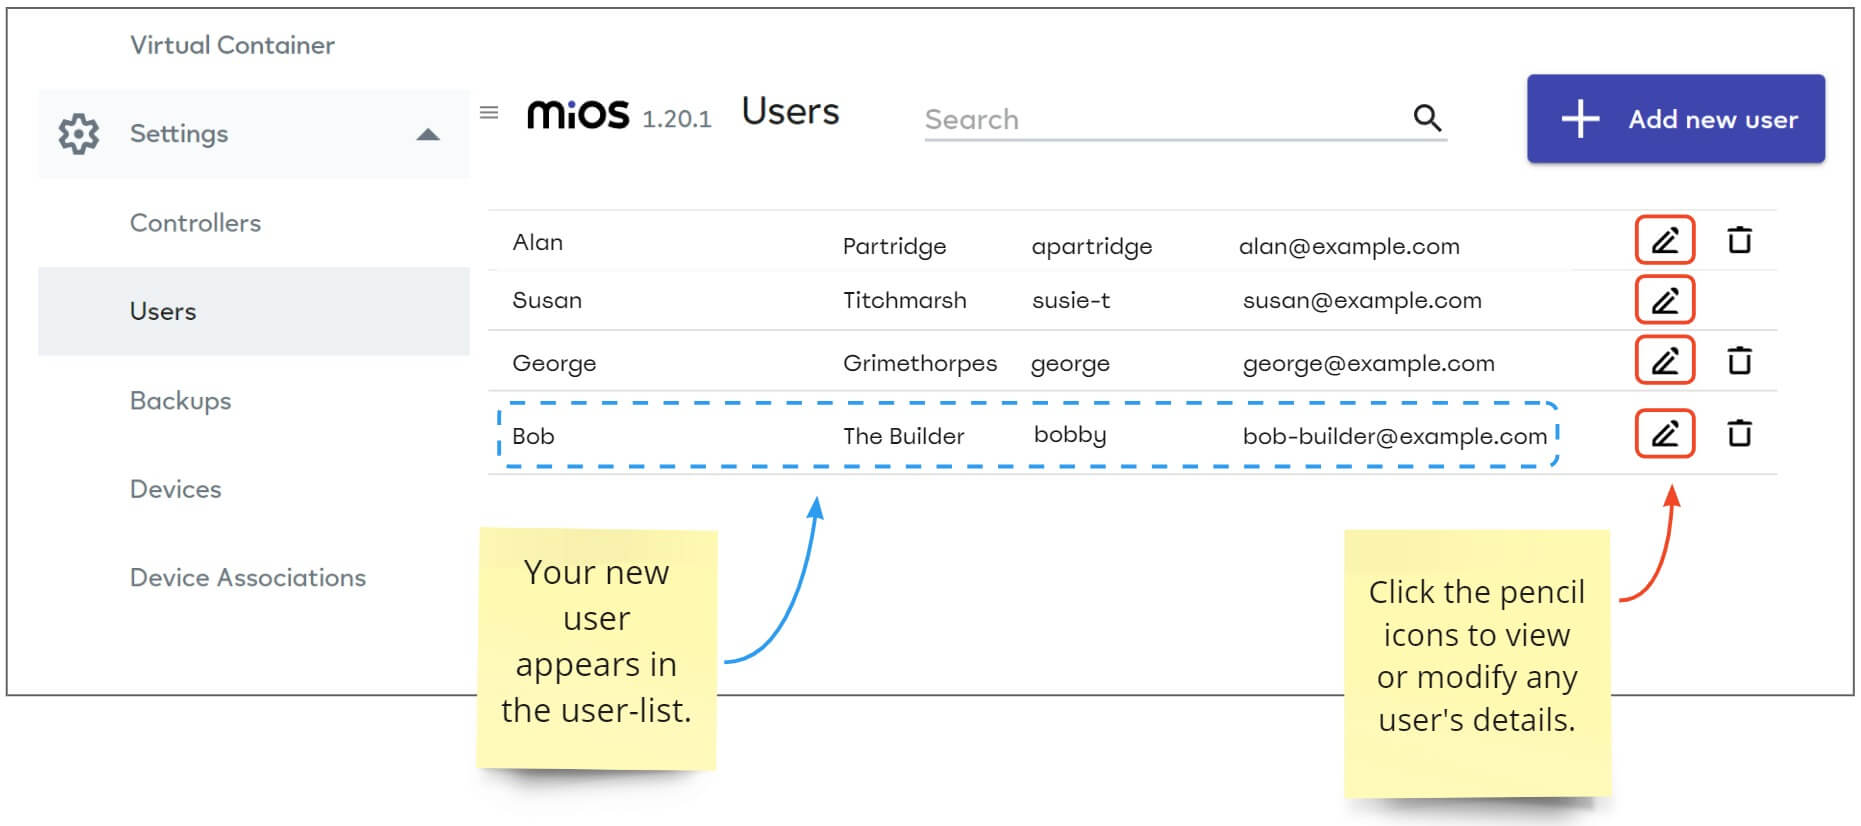
- New users appear in the list as follows:
| Account Admin | Advanced User | Basic User | Notification User | |
|---|---|---|---|---|
| Login to Vera App | ||||
| View Vera Dashboard | ||||
| Manage Own Dashboard | ||||
| Operate Devices | ||||
| Operate Meshbots/Scenes | ||||
| Create and Remove Users | ||||
| Manage User Permissions | ||||
| Manage Controller Settings | ||||
| Manage Device Settings | ||||
| Create Notifications | ||||
| Receive Notifications | ||||
| Create Meshbots/Scenes | ||||
| Modify Meshbots/Scenes | ||||
| Use EZLogic Dashboard Manager | N/A | N/A | N/A | N/A |
| Create and Manage Variables | N/A | N/A | N/A | N/A |
| Create and Manage Lua Scripts | ||||
| Create NuCAL Subscriptions | N/A | N/A | N/A | N/A |
| Install and Manage Plugins | N/A | N/A | N/A | N/A |
| Manage Virtual Containers | N/A | N/A | N/A | N/A |
| Manage Lock PIN Codes | ||||
| Change interface language | ||||
| Customize the EZLogic UI | N/A | N/A | N/A | N/A |
| Account Admin | Advanced User | Basic User | Notification User | |
|---|---|---|---|---|
| Login to EZLogic | ||||
| View EZLogic Dashboard | ||||
| Manage Own Dashboard | ||||
| Operate Devices | ||||
| Operate Meshbots/Scenes | ||||
| Create and Remove Users | ||||
| Manage User Permissions | ||||
| Manage Controller Settings | ||||
| Manage Device Settings | ||||
| Create Notifications | ||||
| Receive Notifications | ||||
| Create Meshbots/Scenes | ||||
| Modify Meshbots/Scenes | ||||
| Use EZLogic Dashboard Manager | ||||
| Create and Manage Variables | ||||
| Create and Manage Lua Scripts | ||||
| Create NuCAL Subscriptions | ||||
| Install and Manage Plugins | ||||
| Manage Virtual Containers | ||||
| Manage Lock PIN Codes | ||||
| Change interface language | ||||
| Customize the EZLogic UI |
PIN Codes
The PIN codes area lets you set access codes for physical locks that feature a keypad. Once created, you can apply the codes to your lock via a meshbot action. PIN codes must have at least 4 numbers but can be any length beyond that as supported by your lock.Create a PIN code
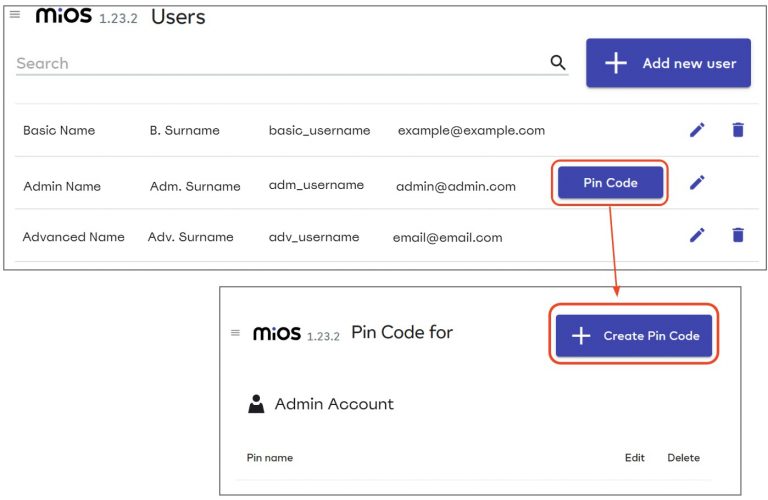
- Click ‘Account’ > ‘User Management’ to open the users area.
- Click ‘PIN Code’ in the row of the currently logged-in user.
- Click ‘Create PIN Code’:
The PIN creation screen lets you choose a name and value for the code, and the locks you want the code to apply to:
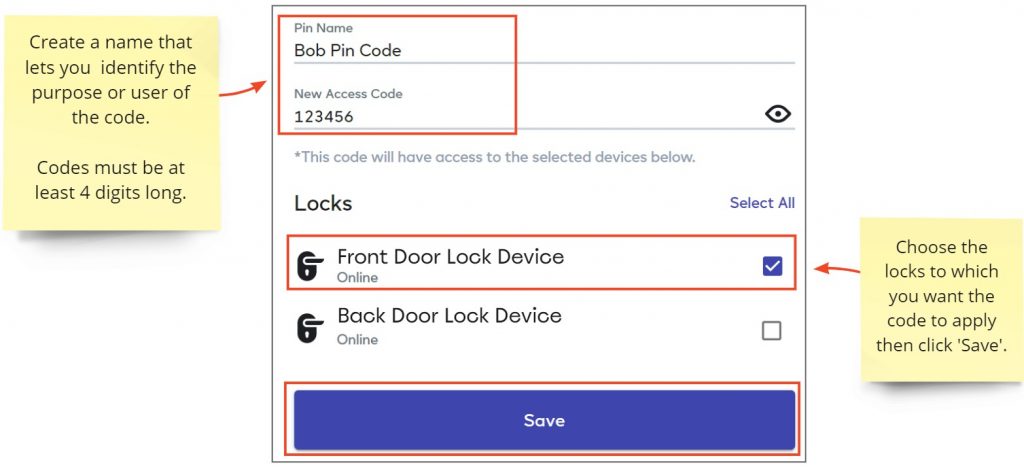
- You can create multiple codes for each lock. Each code must be unique. You will see an error message if you create two codes with the same PIN number.
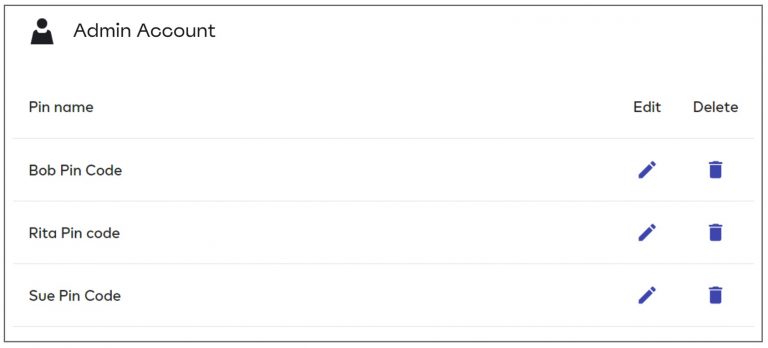
- Your created codes are listed in the PIN management area as shown below:
Apply the codes to your lock
Next, you need to create a meshbot action to implement the PIN codes. EZLogic will automatically add a new capability called ‘user_codes’ to all target lock devices.
You can create a meshbot with a standalone action and run it from the meshbot list screen. Alternatively, you can add triggers (or exceptions) to implement, for example, time-based restrictions. The lock will use the codes from the most recent meshbot that was run on the lock.
- Click ‘Meshbot Automation’ > ‘Create New Meshbot’.
- Click ‘Add Action’.
- Select ‘Device’ > ‘name_of_your_lock_device’ > ‘user_codes’.
- The values area will be auto-populated with the codes you created earlier:
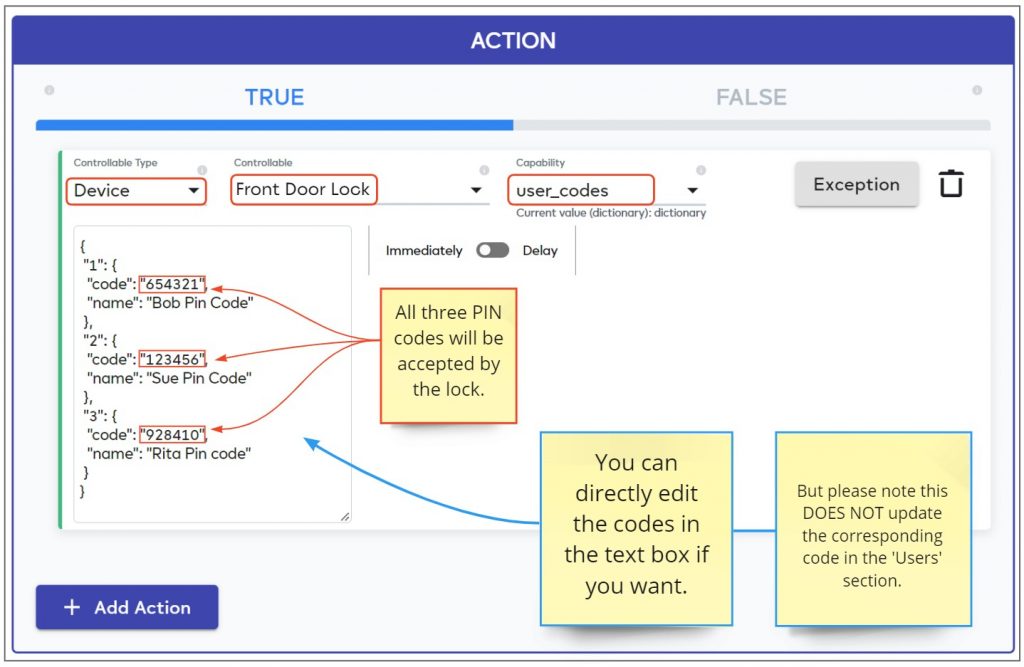
- All codes shown in the values box will be accepted as valid by the lock.
- If your meshbot has no triggers then you need to run it from the meshbot list screen to apply the codes:

Advice on editing codes
- It is the values in the meshbot action which determine the codes on the locks, not the code values in the ‘User Management’ section.
- Meshbots are NOT updated if you change the PIN codes in the ‘User Management’ area (and vice-versa). If you modify codes in the users area then you also need to manually update all meshbot actions which use those codes (if required). Otherwise they will continue to use the old codes.
- If you add new codes to the users area and want to use them in an existing meshbot, then either add them manually or delete the ‘bot and create a new one.
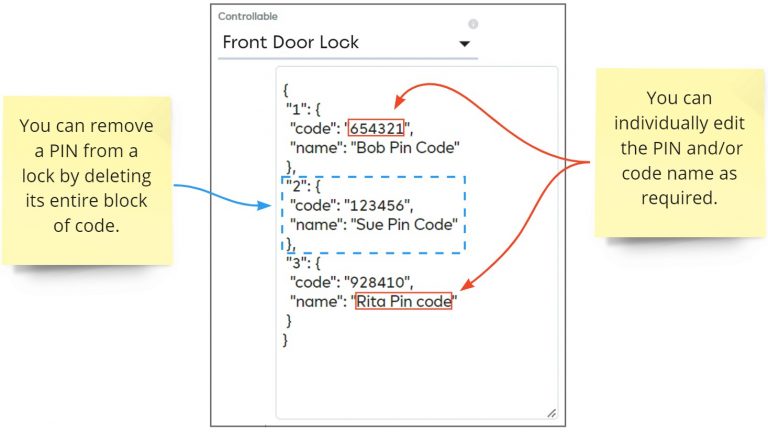
- You can directly edit the PIN code and name in the meshbot values box. The codes will be implemented on the lock the next time the meshbot runs.
- You can also remove a PIN by deleting the block of code related to it. However:
- You cannot add an entirely new PIN code in the values box.
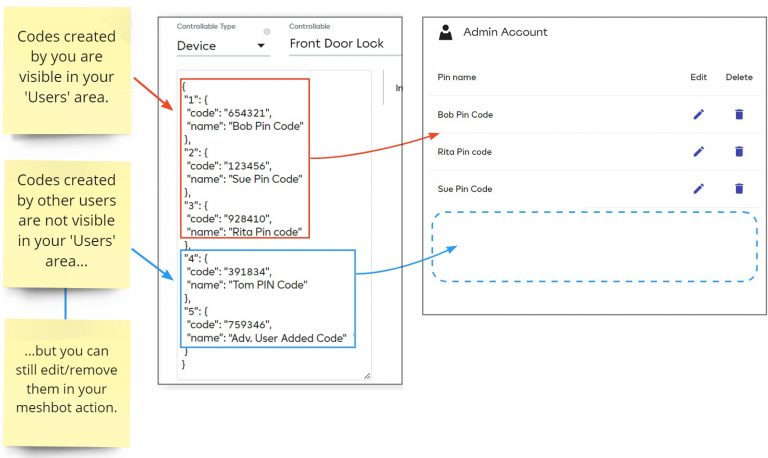
- You can add codes which already exist in the ‘User’ area.
- Codes added by other users will also appear in your meshbot, but you won’t be able to see them in ‘User Management. For example, if an advanced user also creates some codes for the lock then you will see them in the meshbot in addition to your own. You can still edit or remove such codes as required:
Example
Create different PIN codes for each of your family members. Create a special PIN for your house cleaner which gives them access to your home for two hours on Monday, Wednesday and Friday. The code expires after two hours so the cleaner cannot access your home at other times.
- Click ‘Account’ > ‘User Management’ then click the ‘PIN Code’ button.
- Create PIN codes for all family members plus one more for the house cleaner. The following example uses codes for an account owner. his wife, his daughter and the house cleaners.
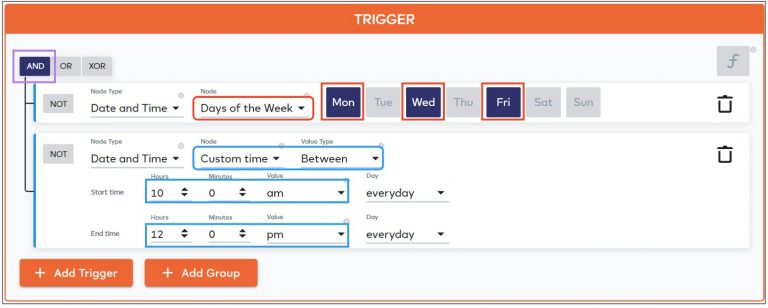
- Create a new meshbot and set up two date/time triggers connected with an ‘AND’ operator. The first trigger specifies the days of the week and the second specifies the two-hour time slot:
- Next , click ‘Add Action’ then ‘Device > ‘name_of_your_lock_device’ > ‘user_codes’.
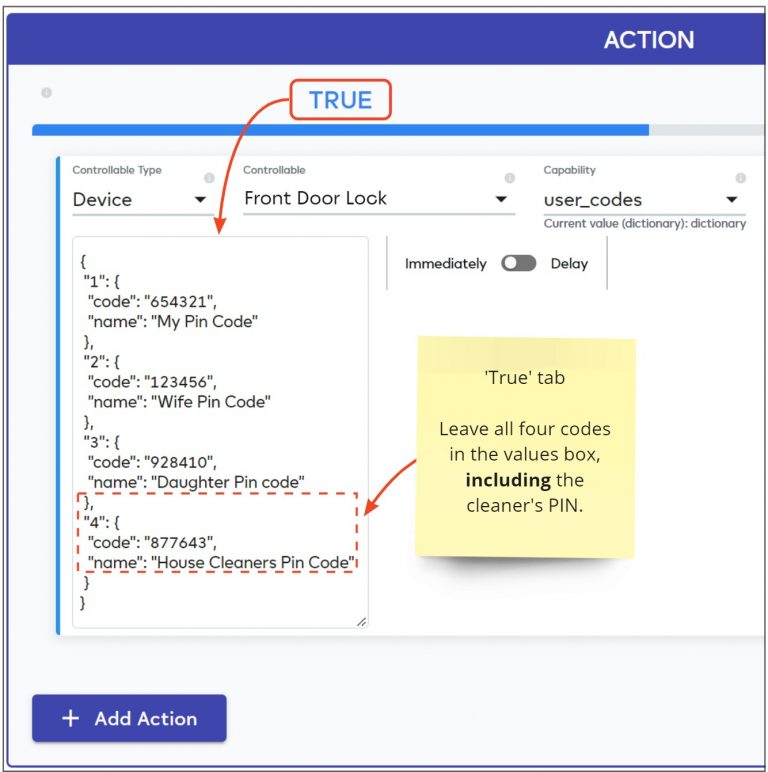
You will now set up ‘True’ and ‘False’ states to implement the PIN codes on the lock:
- ‘True’ tab – Leave all four codes intact, including the ‘House Cleaners’ PIN code. This means all four codes will be applied to the lock between at 10 AM on Monday, Wednesday and Friday, granting the cleaner’s access:
- ‘False’ tab – Click the false tab then select ‘Device > ‘name_of_your_lock_device’ > ‘user_codes’. Delete the ‘House Cleaners PIN code’ section from the values box but leave the other three codes alone:
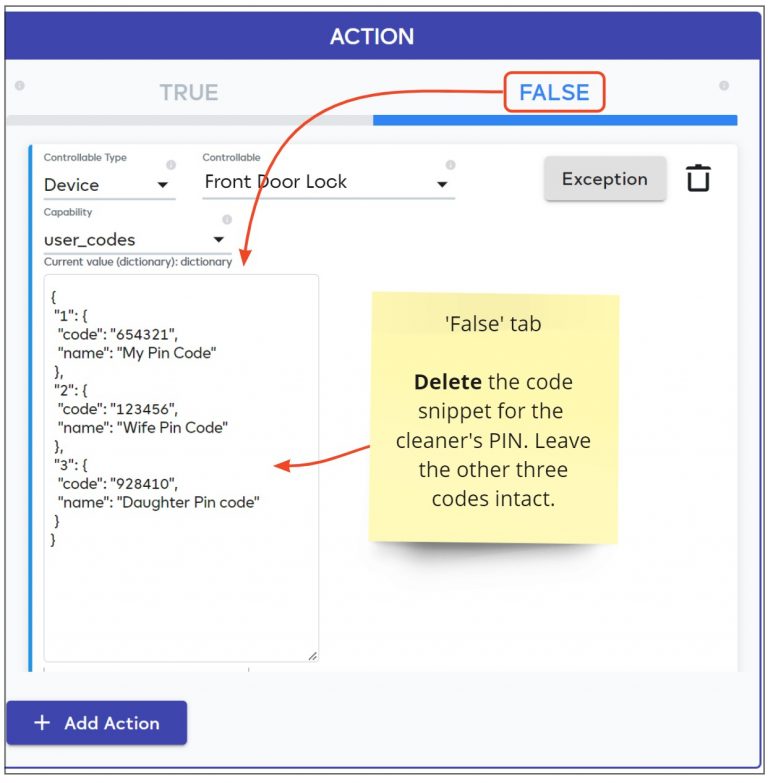
Save the meshbot.
- The meshbot will apply all four codes to the lock at 10 AM on Mondays, Wednesdays and Fridays.
- The trigger group will turn false at 12 PM on those days, activating the ‘False’ action.
- The false action will apply only the three PIN codes for your family. This removes access for the cleaners for the rest of the week, while ensuring your family’s PIN codes are still valid.
- Alternatively, you could invert the two triggers with the NOT function and swap over the codes in the ‘True’ and ‘False’ actions. This means the ‘True’ tab provides general family access while the ‘False’ tab activates the cleaner’s code.
- Inverting the trigger has the advantage that you can run the meshbot from the meshbot list without fear of activating the cleaner code:
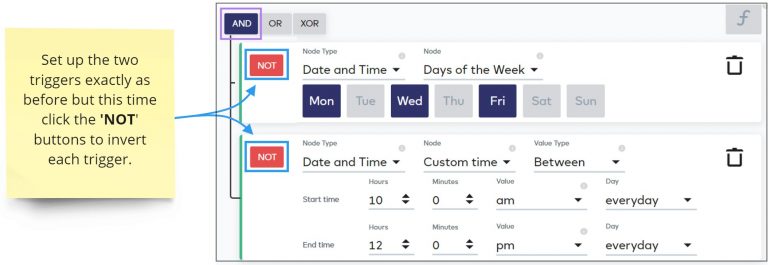
- Next, you also need to swap over the codes in the ‘True’ and ‘False’ actions explained above.
- Once done, the trigger group is true at all times that are NOT Monday, Wednesday, Friday between 10 AM and 12 PM. ONLY your three family codes are valid during these times.
- The trigger group will turn false at 10 AM on the three days, activating the ‘False’ action. The false action enables the cleaner’s code for two hours, in addition to your family codes.