C: Http request
‘Http request’ is a type of meshbot controllable which lets you fetch information or send commands to devices, servers and services.
You can send http requests as a response to a meshbot trigger becoming ‘true’. Here’s a few examples of how you might find it useful:
- Request data from a website or device. For example, to fetch the current temperature from a temperature sensor device, or to collect the value of your stocks from a website and show them in a dashboard tile.
- Implement settings on a device or service outside your Ezlo/Vera controller.
- Send text-to-speech (tts) messages to your voice assistant to inform you when a task is complete or a door/window is open etc.
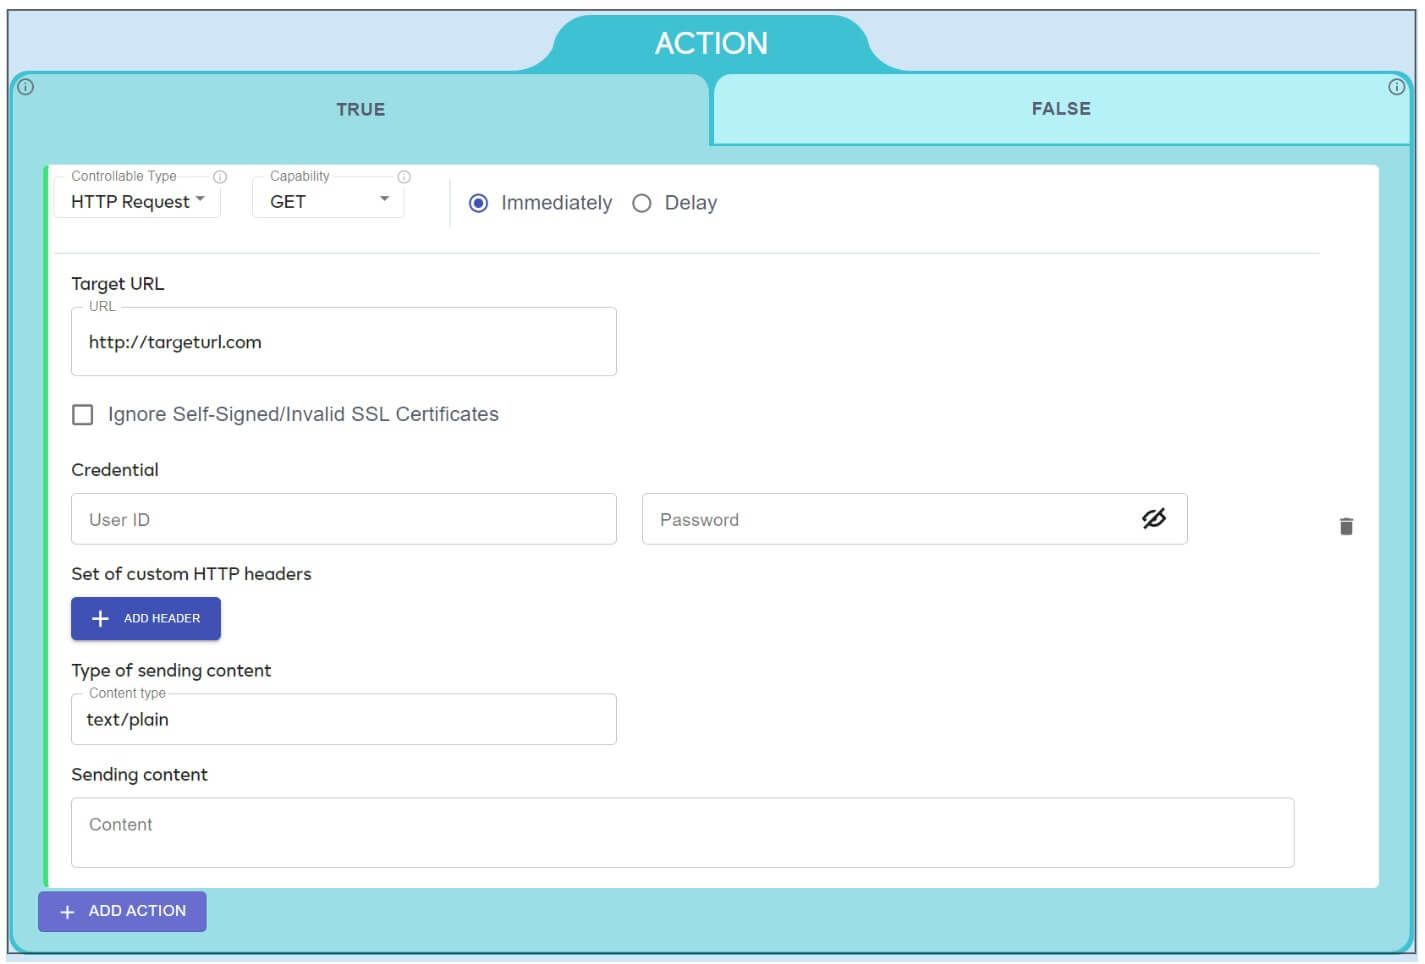
- Capabilities
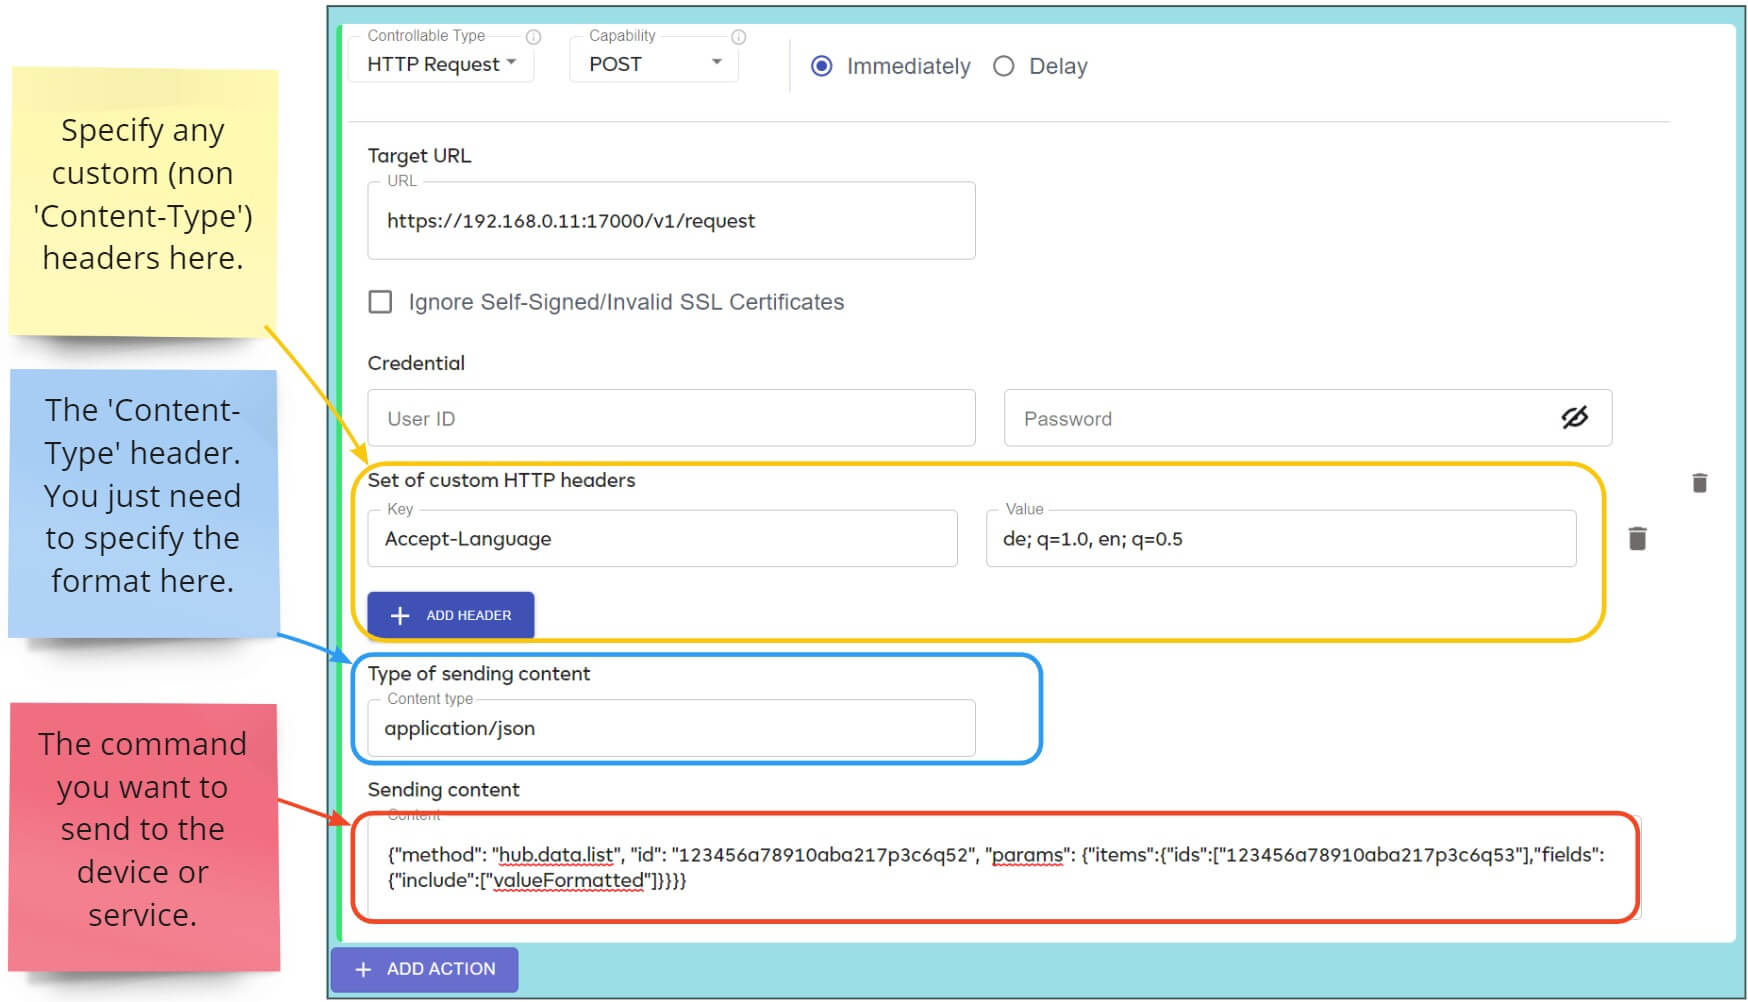
- Target URL
- Ignore Self-Signed/Invalid SSL Certificates
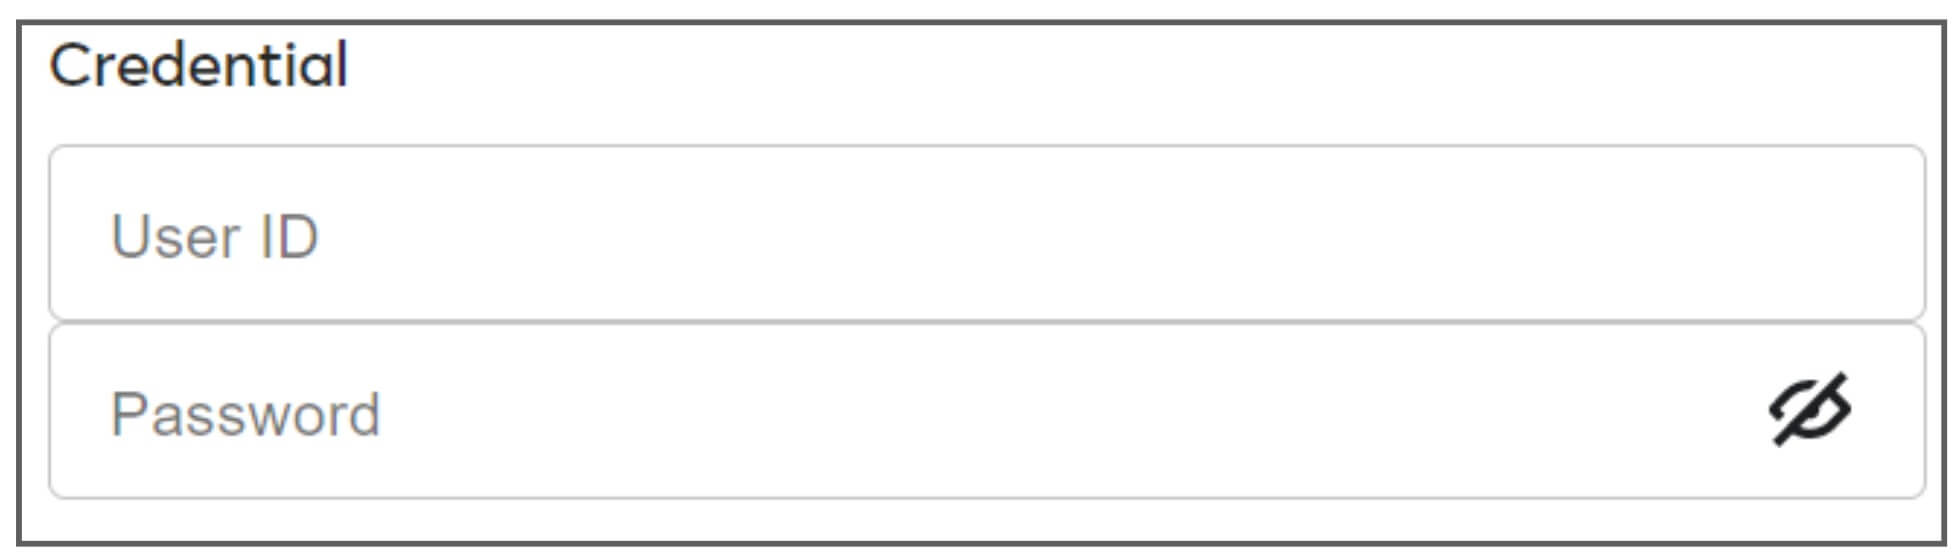
- Credentials
- Save Output
- Exceptions
- Custom HTTP headers / Type of sending request / Sending content
- Example – Get your voice assistant to speak custom notifications and alerts
The capabilities box of a http request action lets you choose the method in which your command is sent. As mentioned earlier, you may want to use https requests to retrieve information or change a setting on devices or services outside of your controller.
GET — ‘Get’ requests are usually used to read information such as a device setting or data from a website or service. Unlike ‘Post’, ‘Put’ and ‘Delete’, ‘Get’ does not modify or append to the target.
POST — ‘Post’ requests are usually used to send data and set device parameters. In terms of data transference, ‘Post’ will always create a new resource at the target location. So making two identical post requests will likely lead to duplicate resources.
PUT — ‘Put’ is usually used to update an existing resource. ‘Put’ will always update and replace the data at the URI if it already exists, whereas ‘Post’ will append to the existing data. You could therefore make multiple ‘Post’ requests to the same URI to produce an additive effect, but multiple ‘Put’ requests to the same URI will modify the existing resource..
DELETE — Removes the specified parameter or resource.
Which should I use?
This is almost entirely dependent on the entity to which you are sending the request, so you should consult their documentation to find out which method they require. Some devices and services will work with a ‘Post’ request, while others may require ‘Put’ to achieve what appears to be the same result.
A common theme you will discover when making https requests is that you have to tailor them to the entity with which you are communicating. Please check your target’s help documents and, if you are still struggling, please remember you can always post a question about it on our community forums.
This is the command that identifies your target server, device or service. In some cases the target URL will also contain parameters that modify settings or run actions on the target entity.
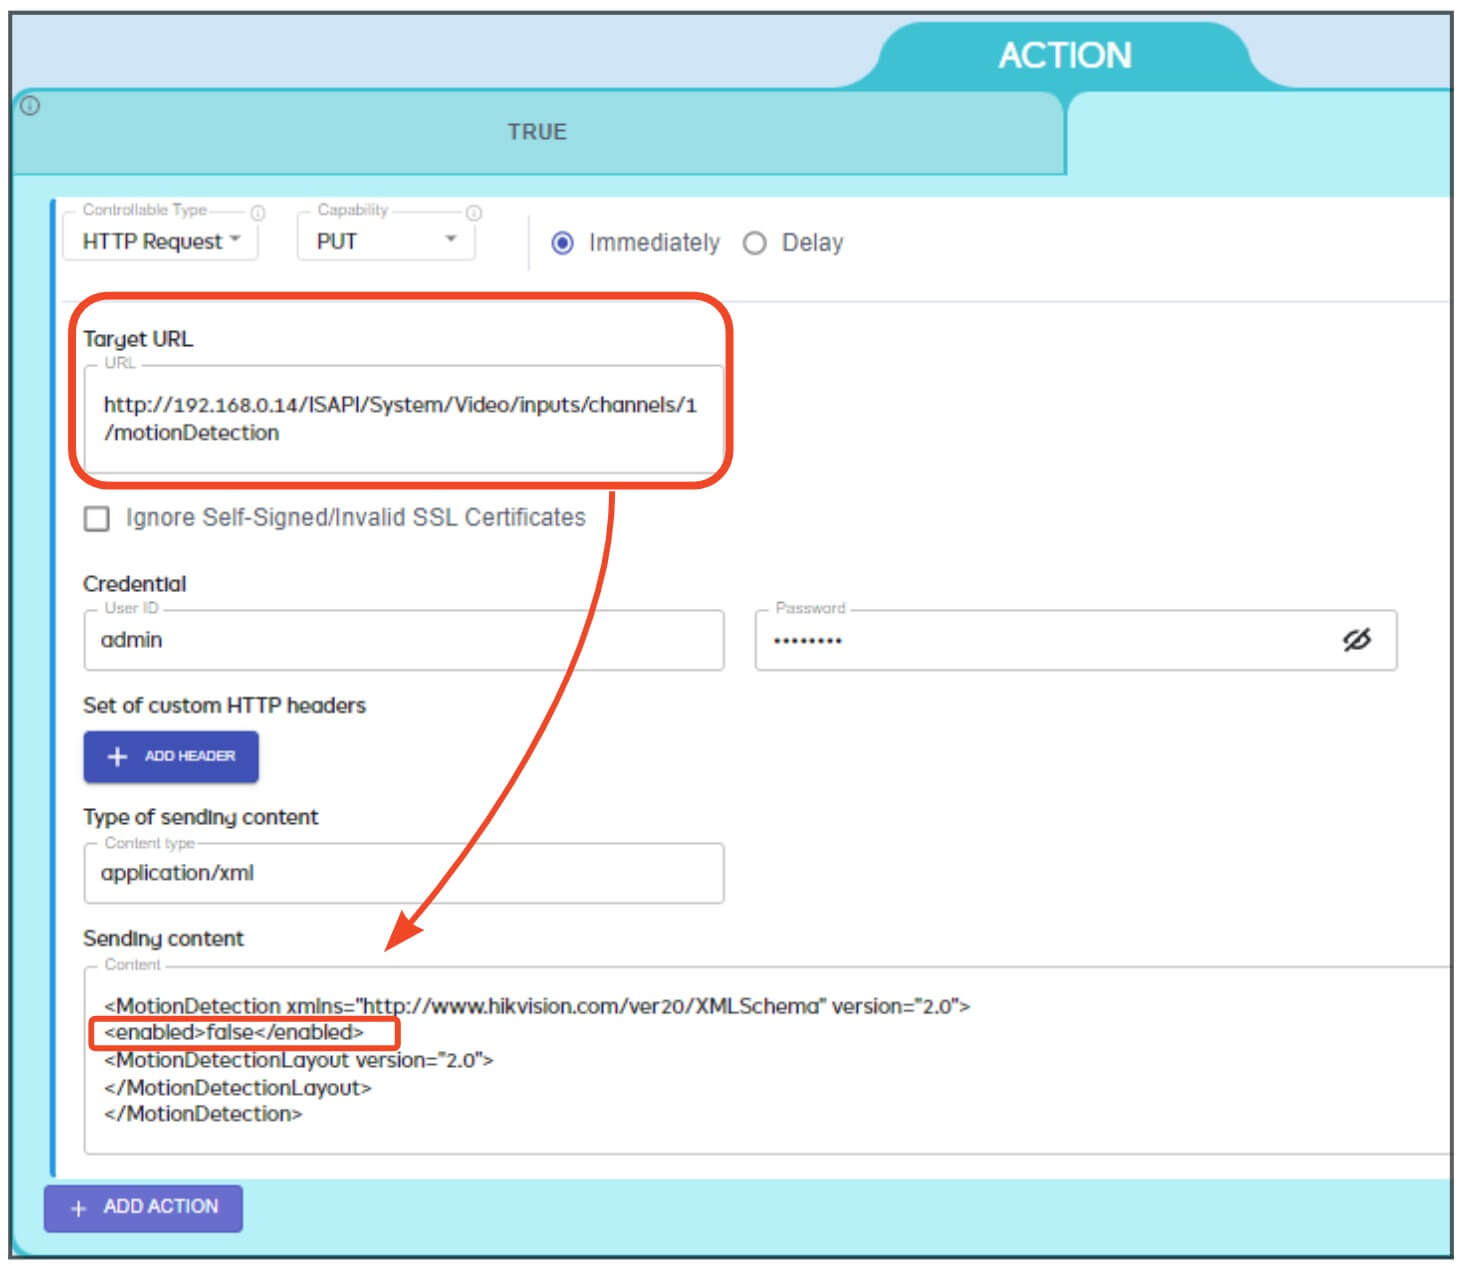
Example 1. The following URL targets the motion detection feature of a local video camera:
http://192.168.0.14/ISAPI/System/Video/Inputs/channels/1/motionDetection
In this case, the message payload in the ‘Sending Content’ box is what implements the desired setting of ‘off’:
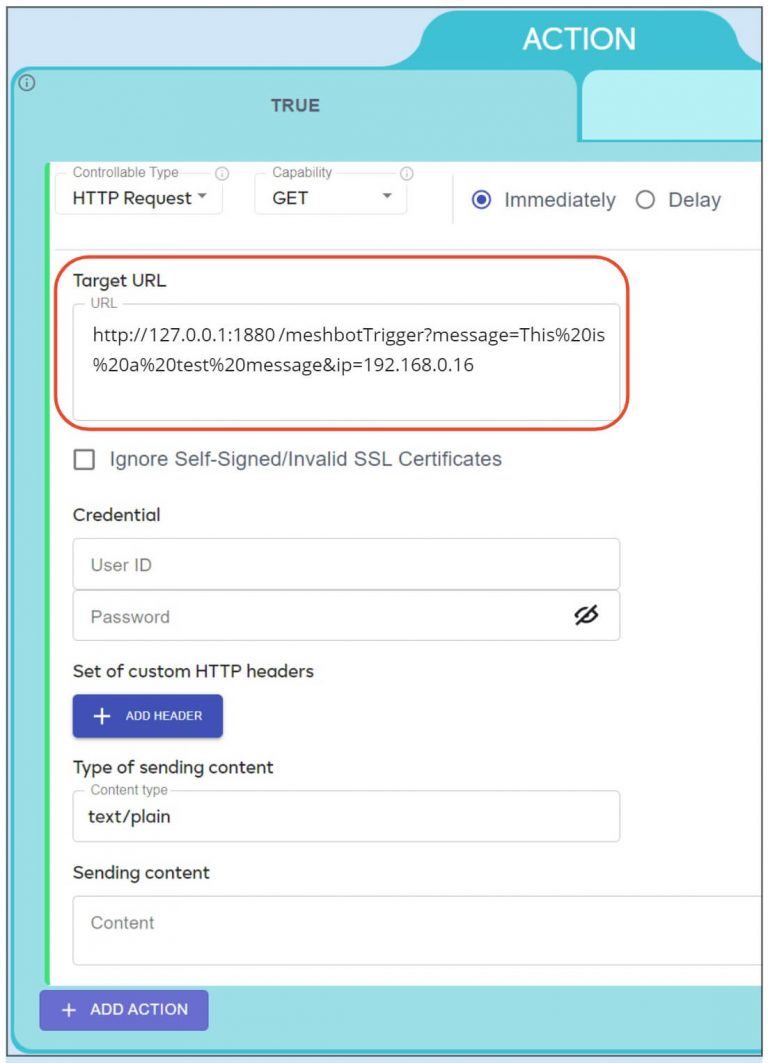
Example 2. Send a command to a Google Home speaker so it says a custom message when a meshbot completes its action:
http://127.0.0.1:1880/meshbotTrigger?message=This%20is%20a%20test%20 %20message&ip=192.168.0.16
Note here that the action (the message) is contained within the target URL itself:
You can find out how to create a custom message like the one above in our tutorial further down the page.
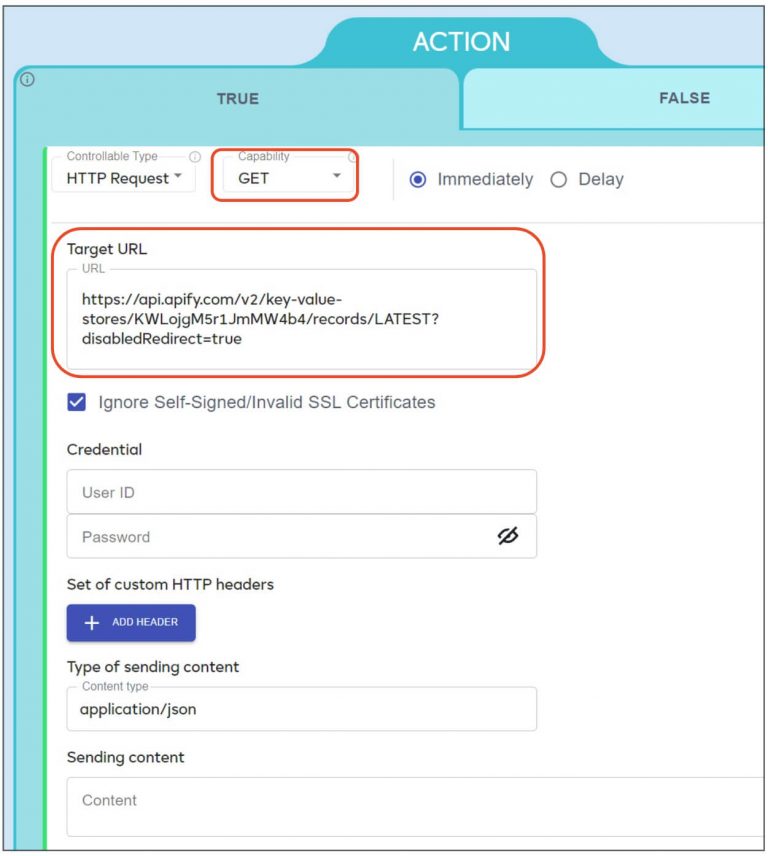
Example 3. The following target URL requests data from an external service using the service’s API. In this case we use the GET function as we simply want to retrieve data:
Notes and advice.
As you will notice throughout this document, the manner in which you construct your target URL and the request in general is very much dependent on the target device or service. Your first port of call when creating http requests should be to consult the target vendor’s documentation to find out how they handle requests. You can also post any questions you have to our community forums where a number of subject-matter experts will be happy to help you build your request.
Lets you bypass connection errors caused by problems with the SSL certificate on your target entity.
SSL certificates provide security for websites and most online communications by encrypting and digitally signing all data you exchange with the target entity. However, many browsers, services and APIs will terminate the connection if the certificate on the target is invalid or self-signed.
- Invalid — The certificate has expired, uses deprecated security protocols, or is otherwise improperly configured.
- Self-signed — The certificate is not signed by a trusted certificate authority like Sectigo, Digicert or Lets Encrypt. Browsers like Chrome and FireFox, and many online services, have a list of trusted authorities built into them. They will reject any certificate that isn’t signed by an authority on this list.
Please note that enabling this option might get your request to work but you are making the connection insecure. Insecure connections are vulnerable to a wide range of attacks such as eavesdropping, man-in-the-middle attacks, and more. Our advice is to leave this option disabled at first and test your request with full security. The ideal situation is for the target entity to update their certificate if there are connection errors. Only enable this checkbox if there is no other option and/or you are sure there is little-to-no security risk in the connection.
A service, website or LAN server may require you to provide a username and password before it will accept your requests. If your target entity requires authentication then enter the username and password here.
Http headers let you send additional information to a target server along with your http request. Some requests require you to include certain types of header to communicate with the server.
For example, ‘Content-Type’ is a header which tells the server the format of the data you are requesting. Here are some examples:
Content-Type: Image/jpeg
Content-Type: Application/json
Content-Type: Text/plain
This header also tells your system how to parse any content it receives. E.g., ‘Content-Type: image/jpeg’ tells your browser to show an image. Without the header, the browser would simply show the image data as code. ‘Content-Type: application/json’ tells a server that the data you require is in .json format.
Set of custom HTTP headers — Specify any type of header required by the target server or service. Note, don’t use this field if you are only using a single ‘Content-Type’ header – use the ‘Type of sending content’ field instead.
Type of sending content — Specify the variety of ‘Content-Type’ that you are requesting. For example, if your header is ‘Content-Type: application/json’, then you’d just enter ‘application/json’ here. If it is ‘Content-Type: video/mpeg’, then just enter ‘video/mpeg’.
Sending content — Enter the payload code that you want to send to the device or server. This is often used to execute the action that you want to implement. For example, to enable or disable a device feature, or to get a service to perform an action.
- Whether or not your request needs headers depends on the requirements of the target server. Please consult the target’s documentation to find out if the request needs custom headers. If in doubt, don’t add anything other than your target URL (and ‘sending content’ if required) then test to see if that works first.
- You can learn more about http headers and their uses on this Mozilla help page.
- Wikipedia’s list of http header fields explains the types and usage of many header fields.
- The uses of http requests are many and varied. If you have an idea, or a question about them, please post it on https://community.ezlo.com. You’ll find answers and advice from a knowledgeable and like-minded community of experts who will help you achieve your goals.
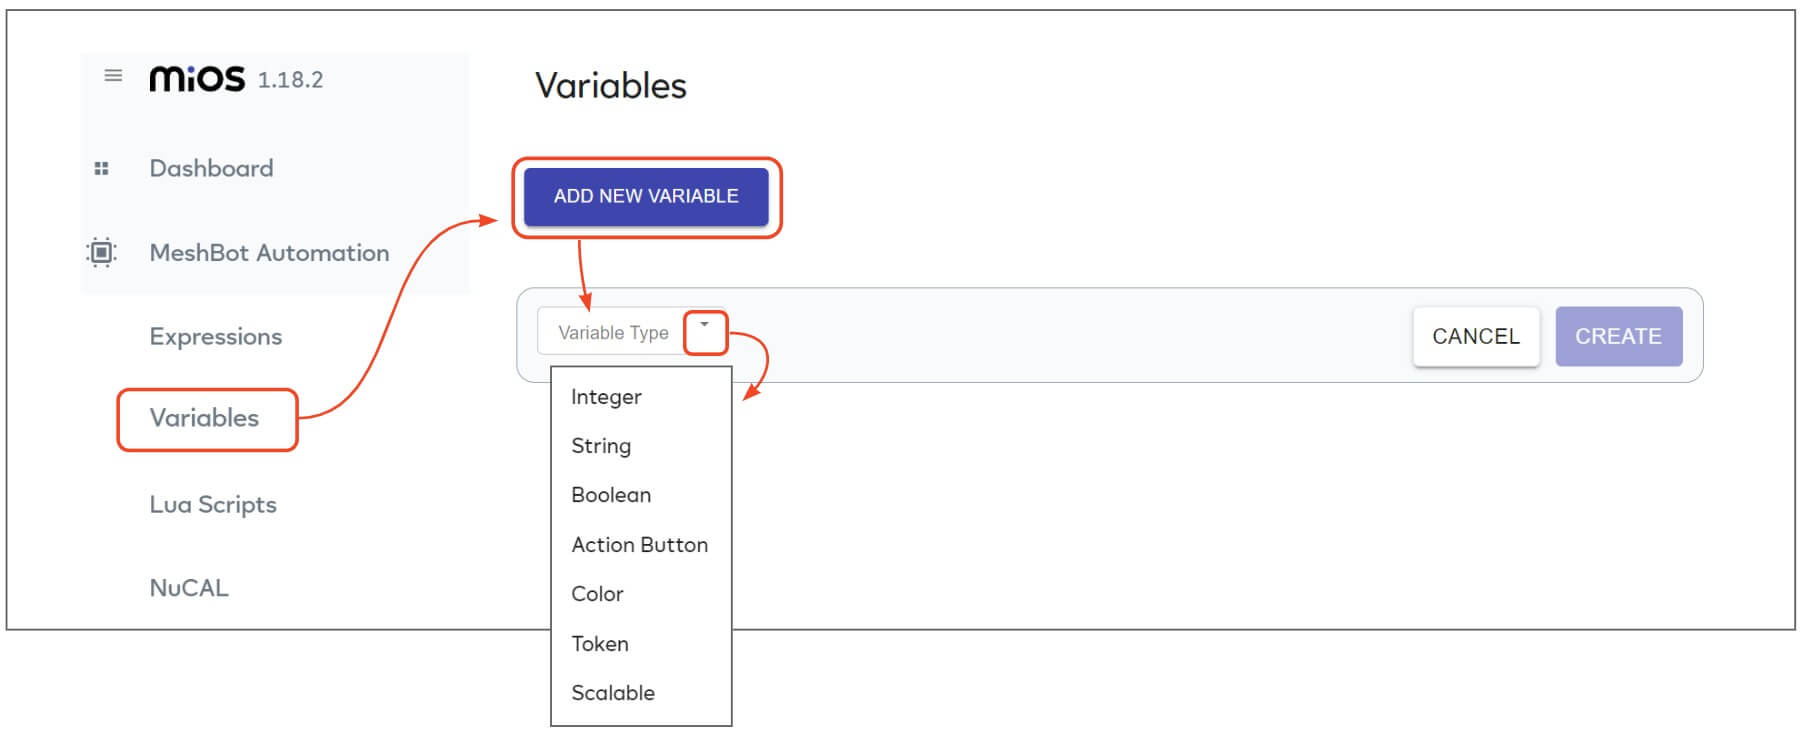
‘Save Output’ lets you create or update a variable value with the response from a http request.
For example, you could use a variable to store humidity data from a weather service and use this data in your meshbot triggers and/or a dashboard tile. Similarly, you might want to update a variable hourly with the values of your stocks, or grab the details of today’s best performing salesperson from an internal site. The options open to you are endless.
Click ‘Variables’ in the EZLogic left-hand menu to manage your variables:
- The following example shows how a variable could store the response from a request for United States population data:
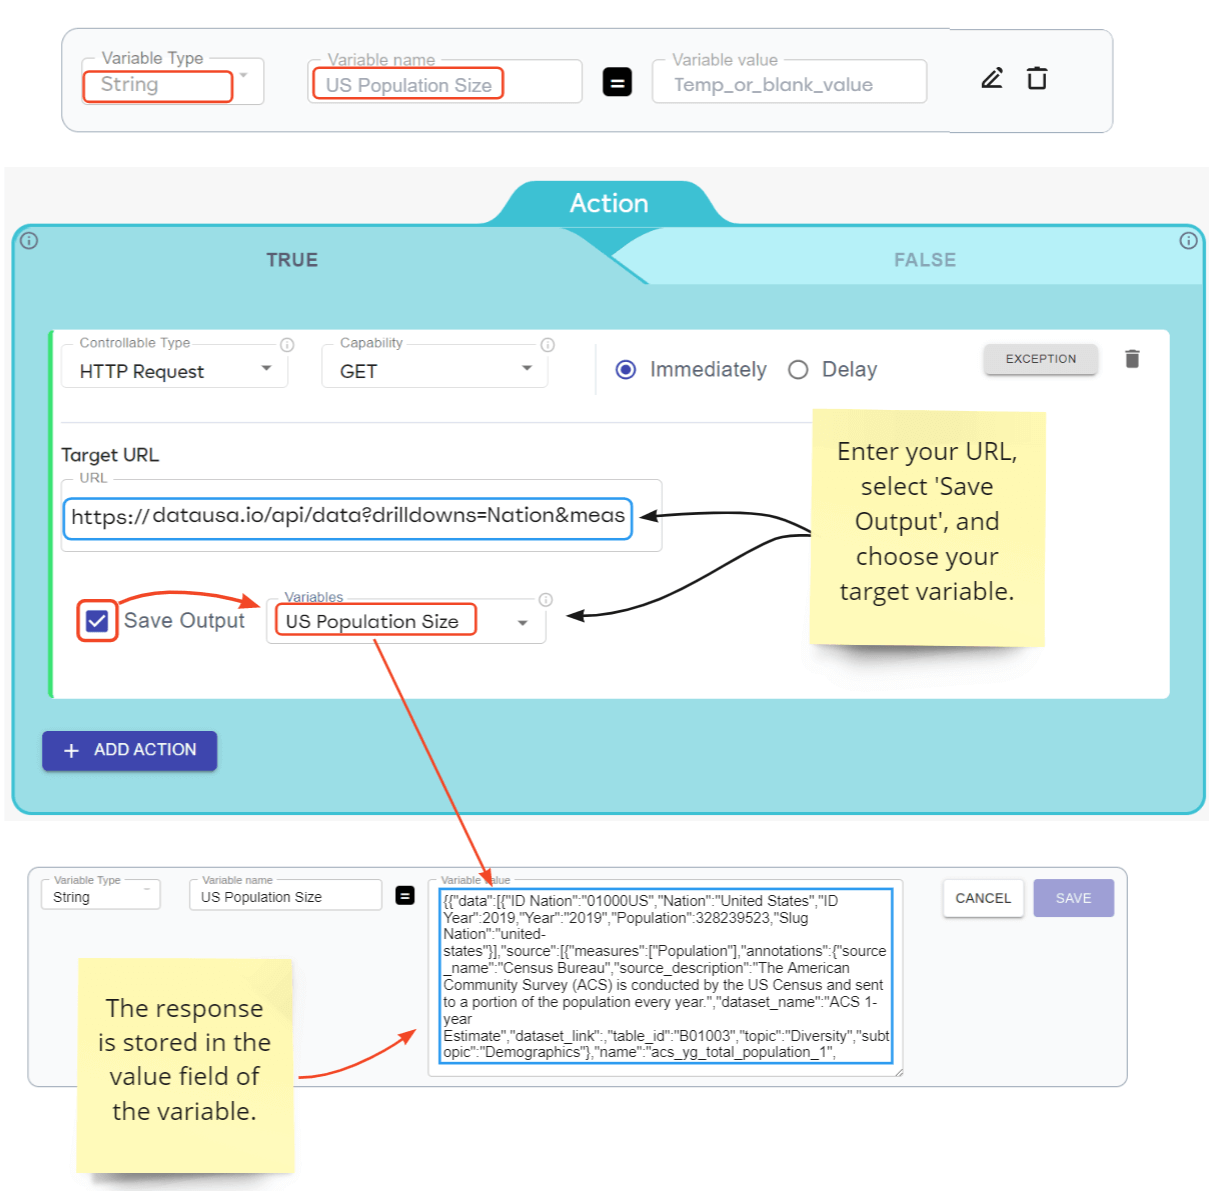
- You can then create lua scripts to extract specific data-points from the response.
- You can learn more about working with variables on the variables help page.
An exception is an additional trigger condition that you can add to specific actions in your action group.
Actions that do not have exceptions will run as normal when the main trigger group goes true. Actions that *do* have exceptions will run when the main trigger group goes true AND the exception trigger(s) go true.
See the exceptions section in the action overview page if you want to learn more
This example shows how to use the http request feature to send a text-to-speech (tts) notification to a Google Home voice assistant.
This tutorial involves the following steps:
- Install and configure Node-Red
- Import our preconfigured flow OR Set up a flow manually
- Construct your http request URL
- Create a meshbot to send the tts to your speaker
Install and configure Node-Red
Node-Red is a programming tool that lets you automate communications between devices, APIs and online services. The tool features an easy, drag-and-drop interface which lets you build communication flows in minutes.
-
Install Node.js and Node-Red on your operating system using the instructions on these pages:
- Windows
- Linux RPM based OS (RedHat, Fedora, CentOS etc)
- Raspberry Pi / Debian based OS (Ubuntu, Diet-Pi etc)
The rest of this example assumes a Windows installation.
-
Next, open the Windows command prompt and run Node-Red with the following command:
C:\Users\username>node-red - You should see a response as follows:
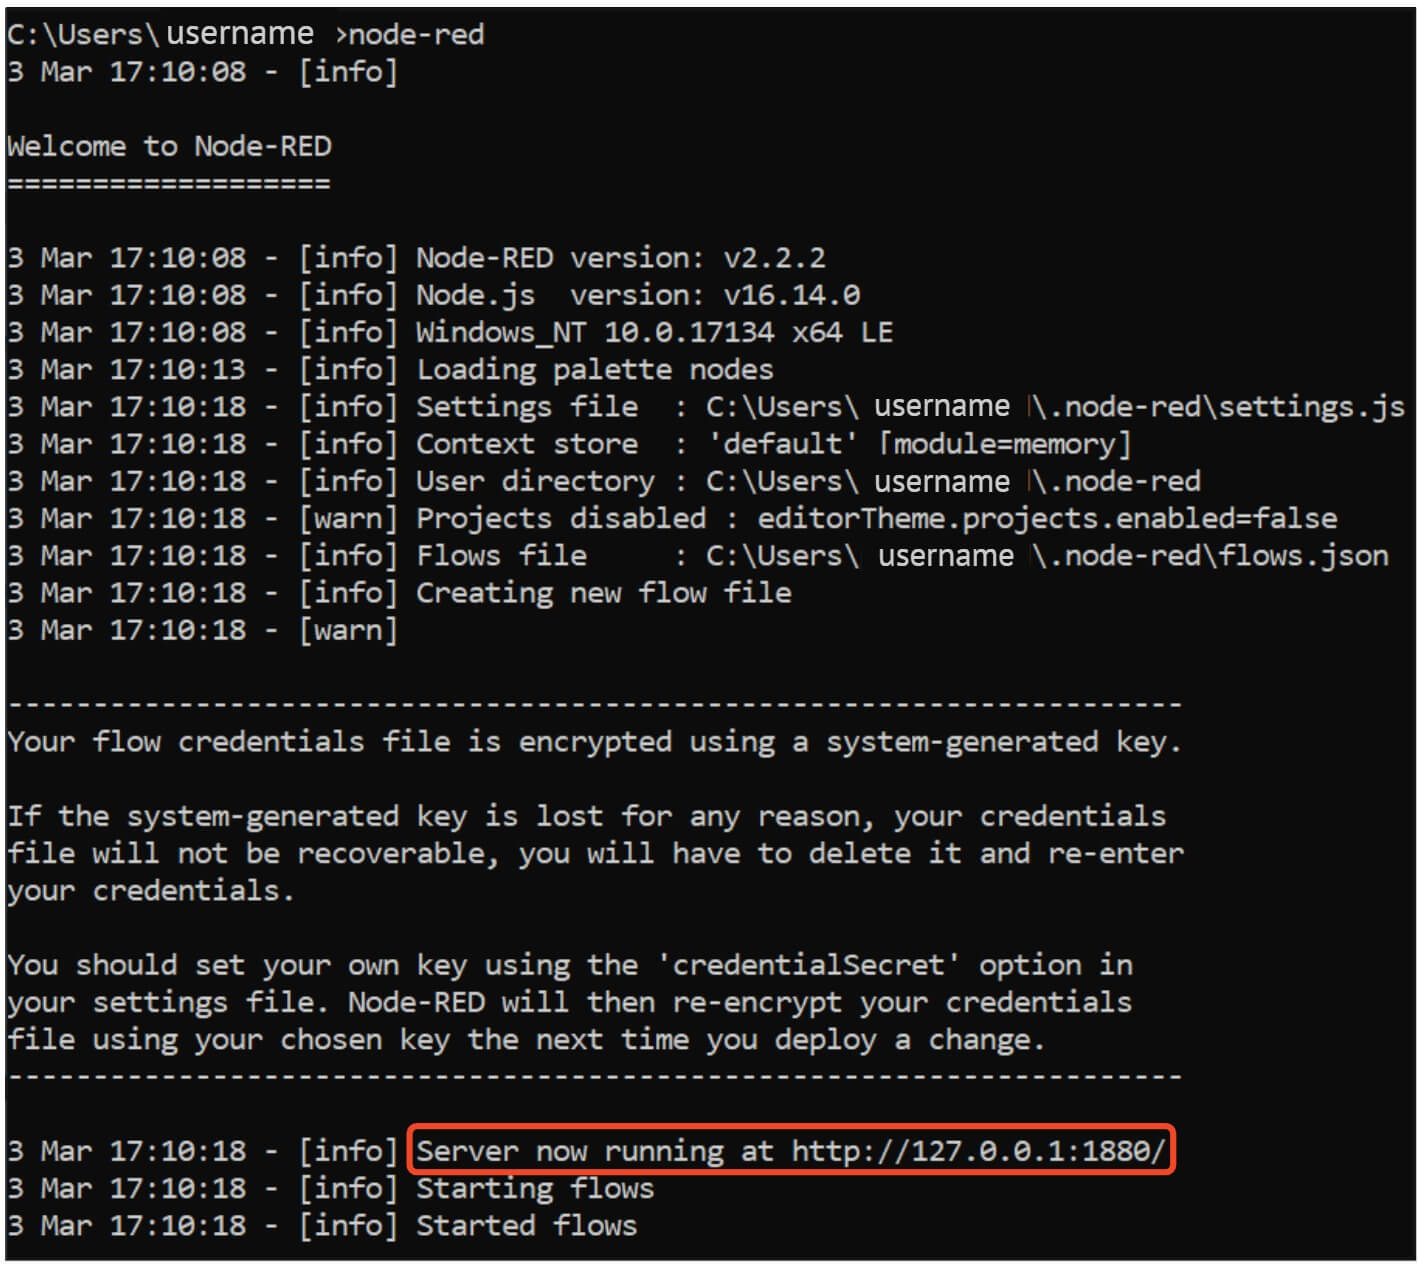
-
Node-Red starts a server on your local machine at port 1880 as shown above. You will need this URL later.
- If you are using a browser on the same computer that is running Node-RED, you can access it with the ‘127…’ url shown above: http://localhost:1880.
- If the Node-Red server is on a different computer (e.g. a Raspberry Pi), but you are using a browser on another device, you will need to use the IP address of the computer running Node-RED. For example, http://192.168.25.1:1880.
- For now, close the command prompt window. This shuts down the server but we will reopen it later.
-
Open another command prompt and install the contrib-cast node by entering the following command:
npm install node-red-contrib-cast - The contrib-cast node is needed for you to set up the tts messages in the Node-Red flow designer.
- After installing contrib-cast, open the command prompt and restart the Node-Red server with the ‘node-red’ command as explained above.
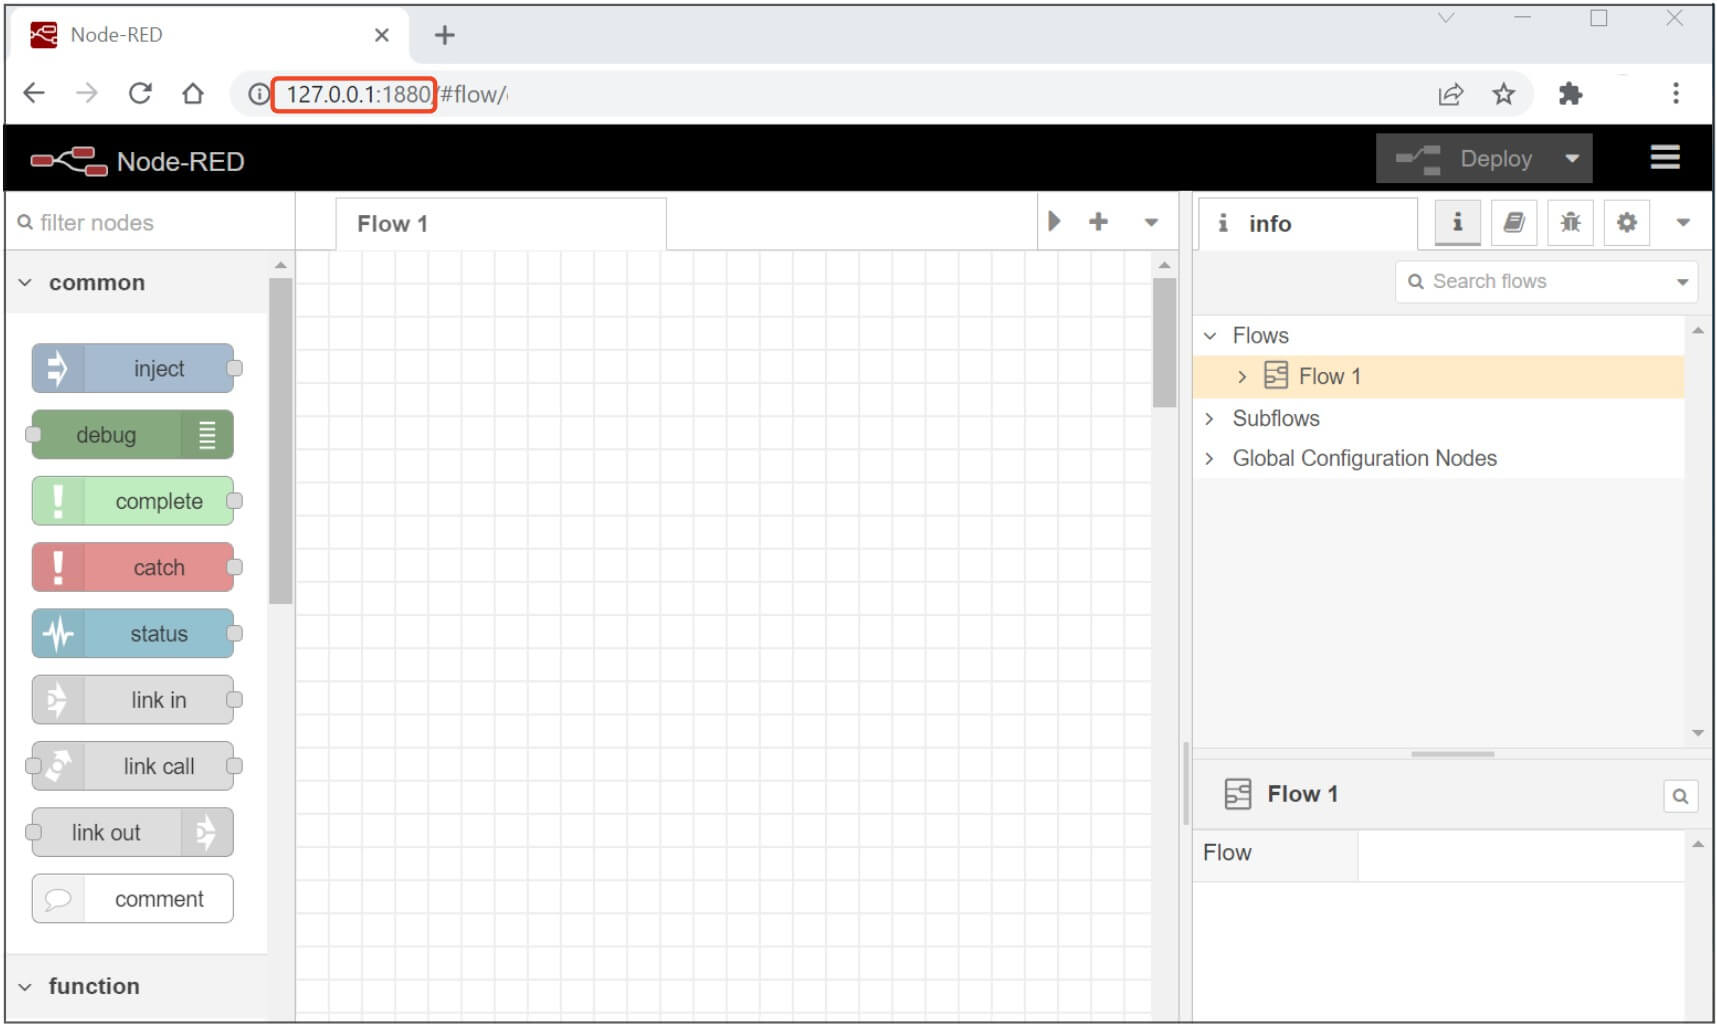
- Open your browser and paste the Node-Red server IP (http://127.0.0.1:1880/ or https://192.168.1.25:1880, etc) in the address bar to start the Node-Red flow designer:
- You next need to set up a communication flow in the Node-Red interface. You can import our preconfigured flow or set up a flow manually.
Import our preconfigured flow
Node-Red flows are saved in .json format. You can export and import flows so you can access and re- use them on different computers, or use flows created by other people.
- Download our preconfigured flow here. Extract the .json file to your local drive.
- Open your browser and access your Node-Red server IP as explained earlier.
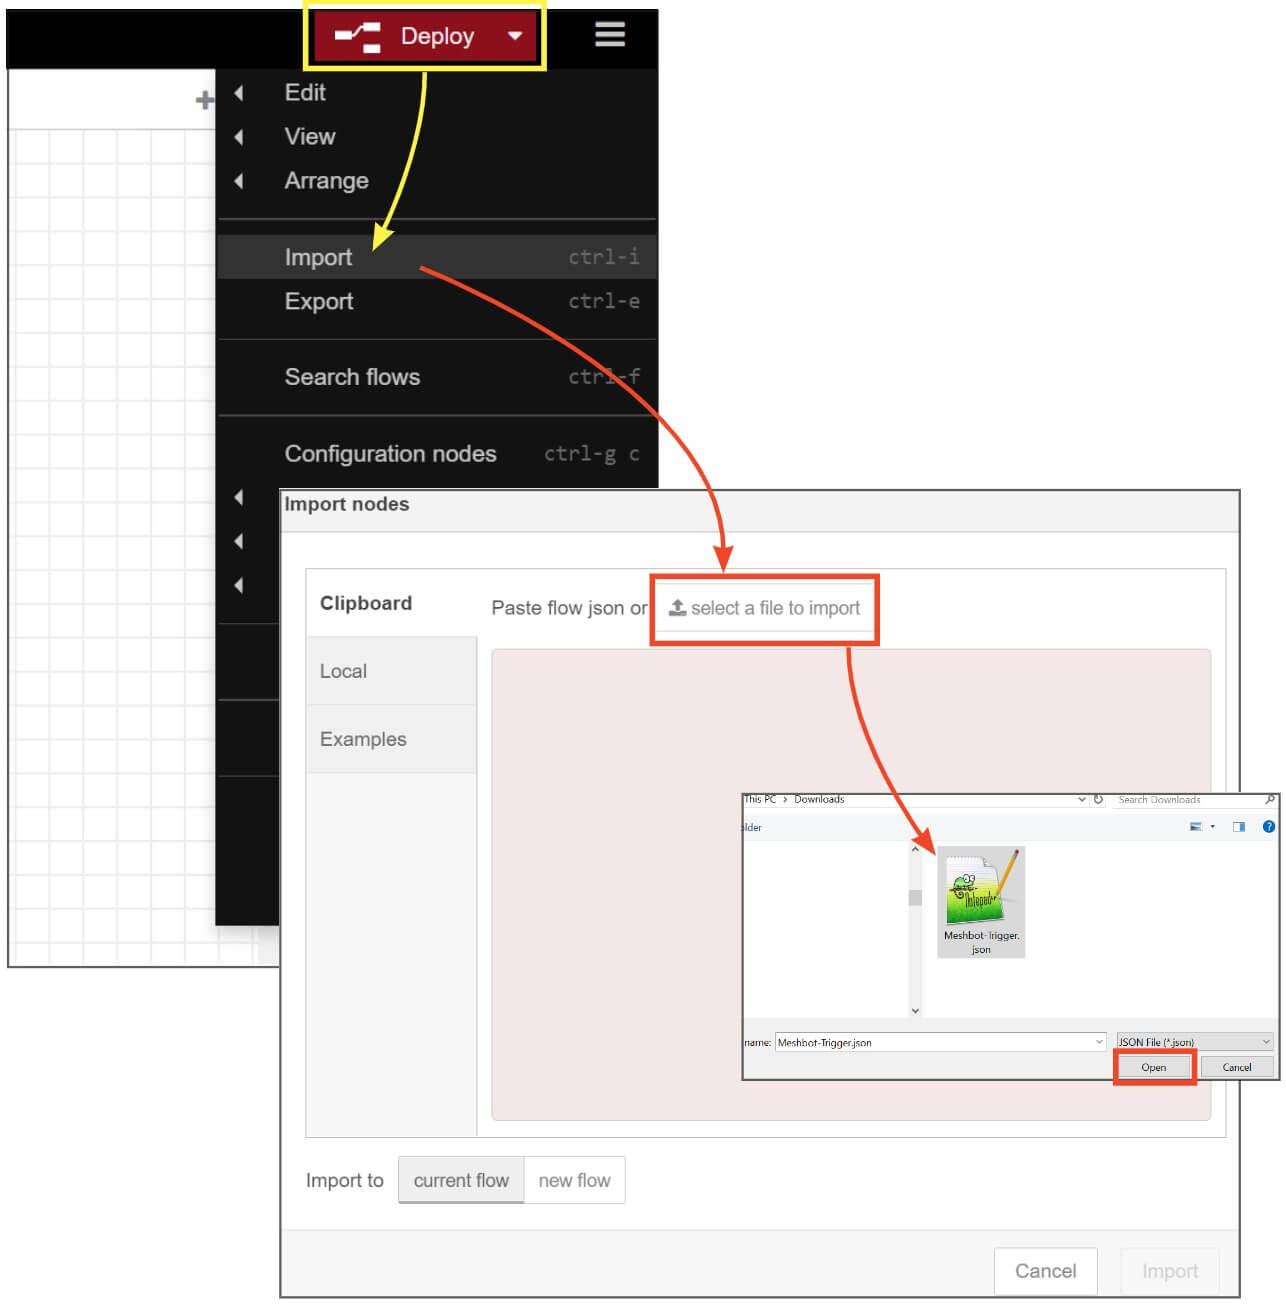
- Click the hamburger menu at top-right then select ‘Import’.
- Click ‘Select a file to import’ in the ‘Import nodes’ interface, then choose the .json file you just saved:
- Next, click the ‘Import’ button. This will create a flow in the Node-Red designer area called ‘Google-TTS-Dynamic’:
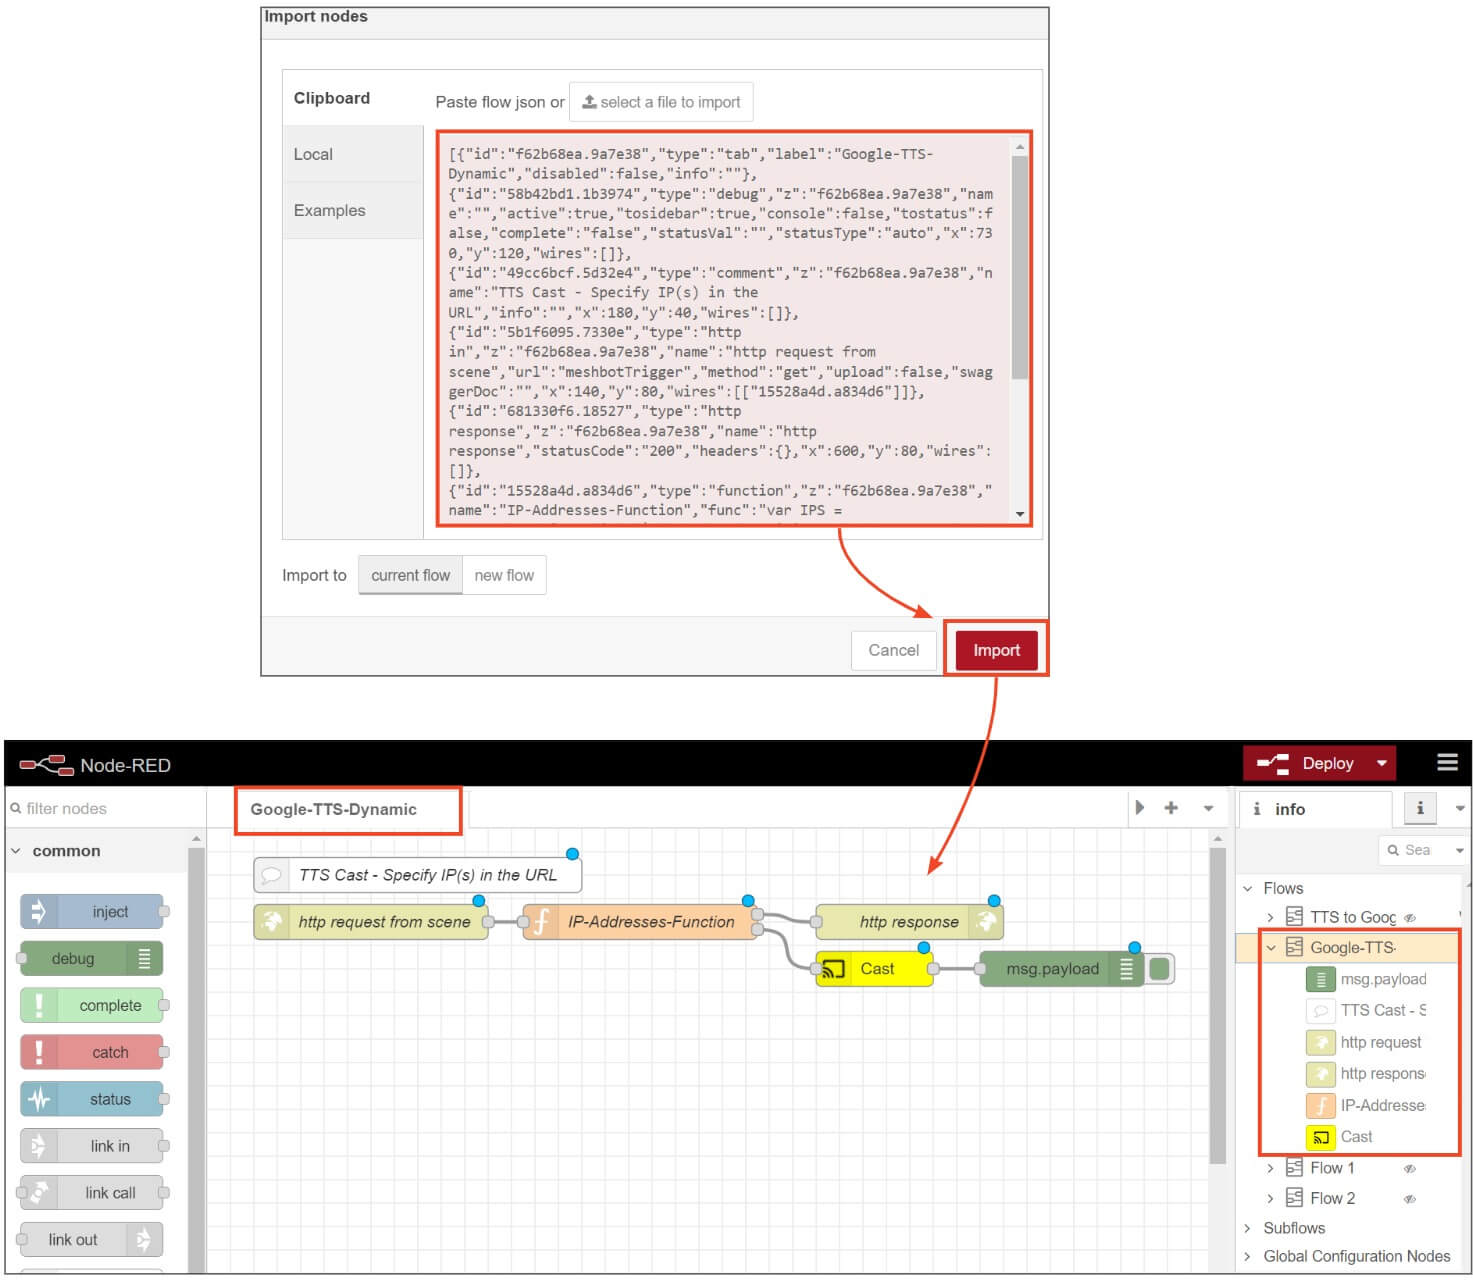
-
Your flow is now ready to use, but please make note of the following point:
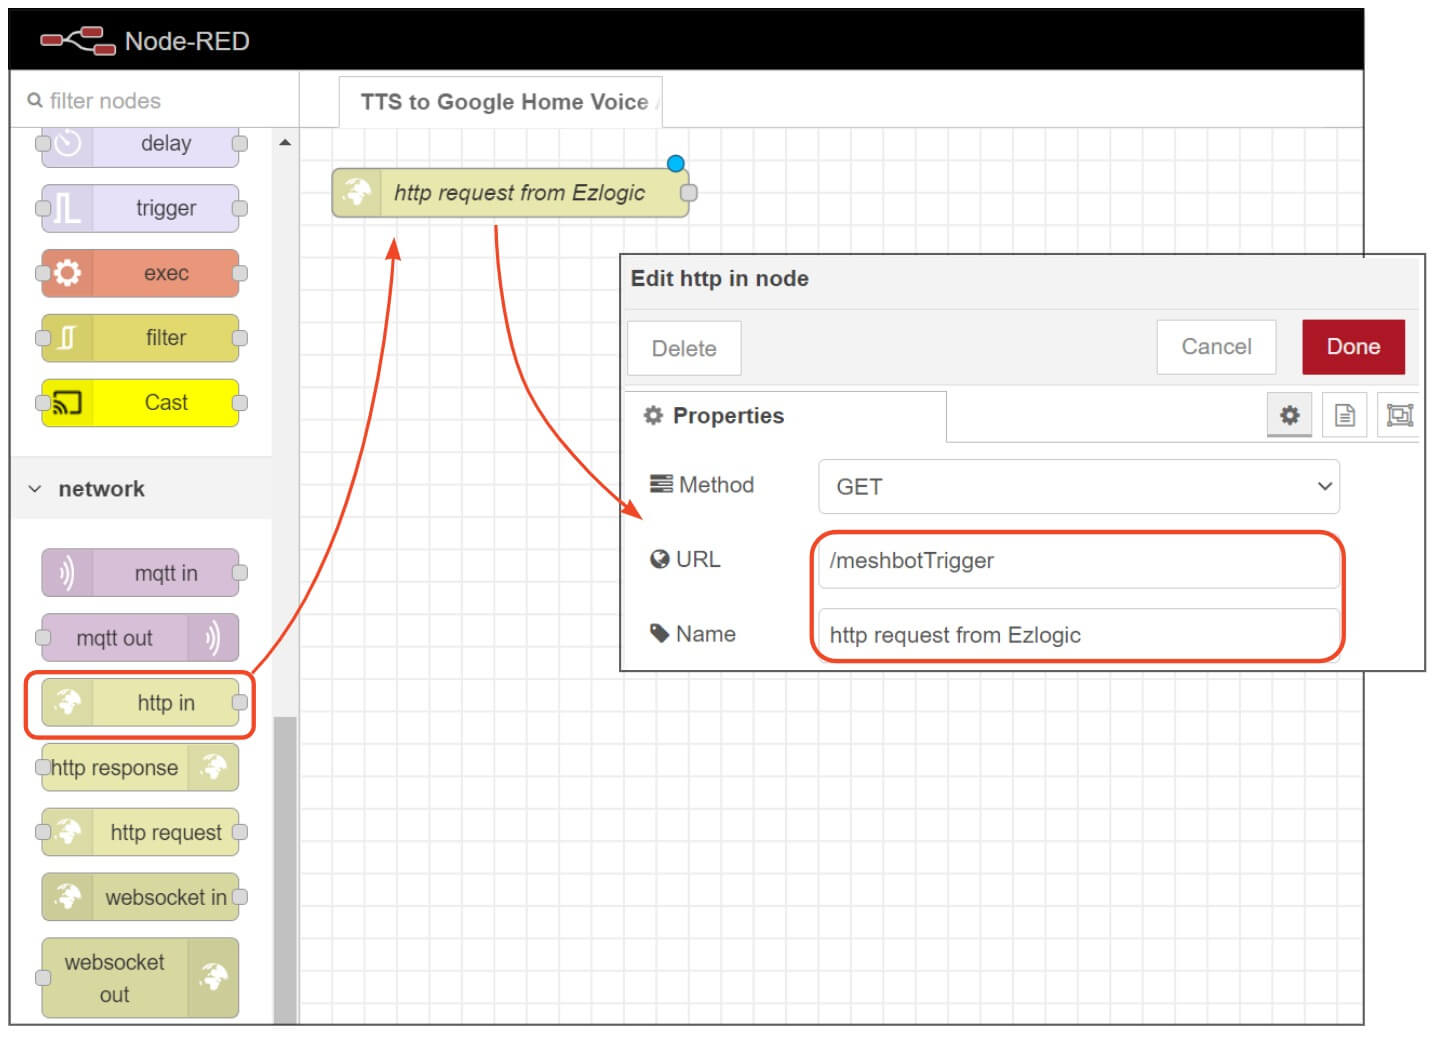
- The first node in the flow is a ‘http in’ node which has been renamed as ‘http request from scene’ for descriptive purposes.
- Double-click this node to view its properties. The ‘URL’ field should state ‘meshbotTrigger’. This is the text you need to put in your http request URL later.
- You can change this text to whatever you like, but remember to also update your http request URL if you do:
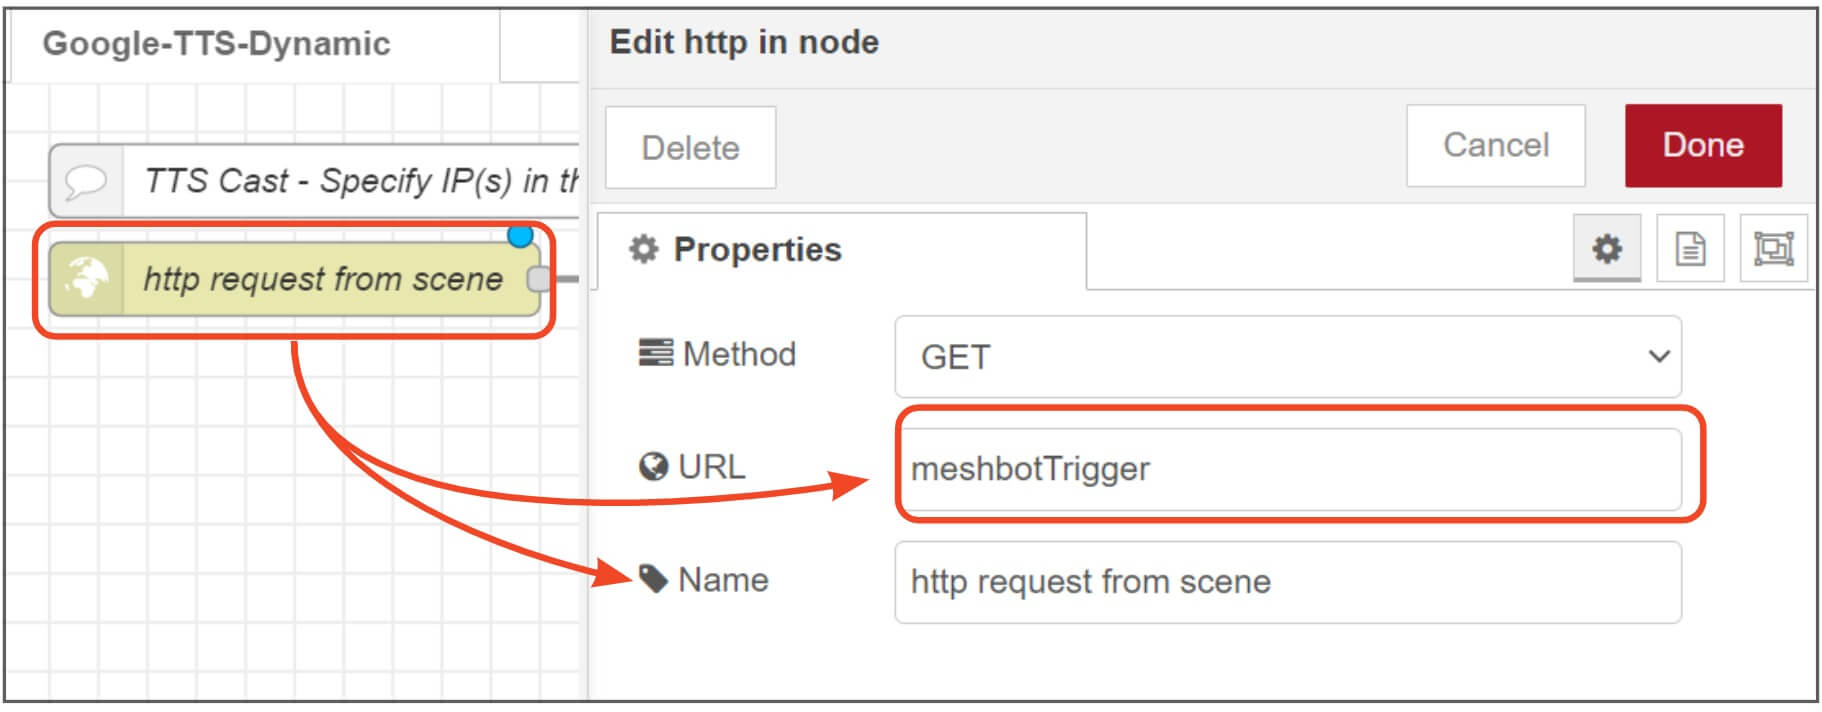
- There are no further actions you need to take, nor do you have to edit any of the other nodes. In our example we will go with the ‘meshbotTrigger’ as the URL as shown above.
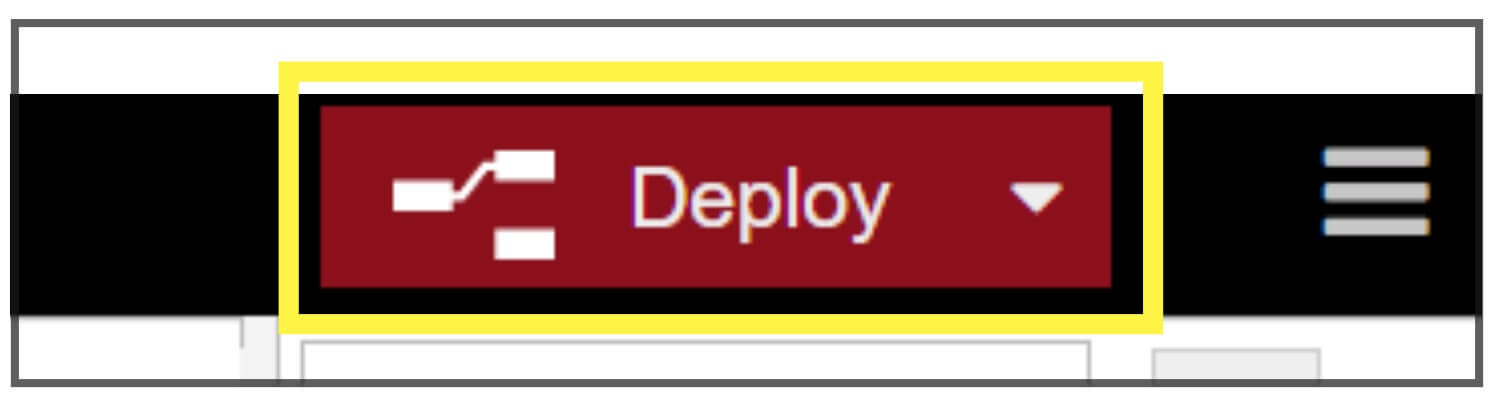
- Click ‘Deploy’ in Node-Red designer to activate your flow:
- You can now move onto your http request URL.
Set up a flow manually
If you’d rather learn more about using Node-Red, then you can build a flow that mimics our preconfigured flow as follows:
- Install Node-Red and contrib-cast, then open the Node-Red designer as explained in step 1.
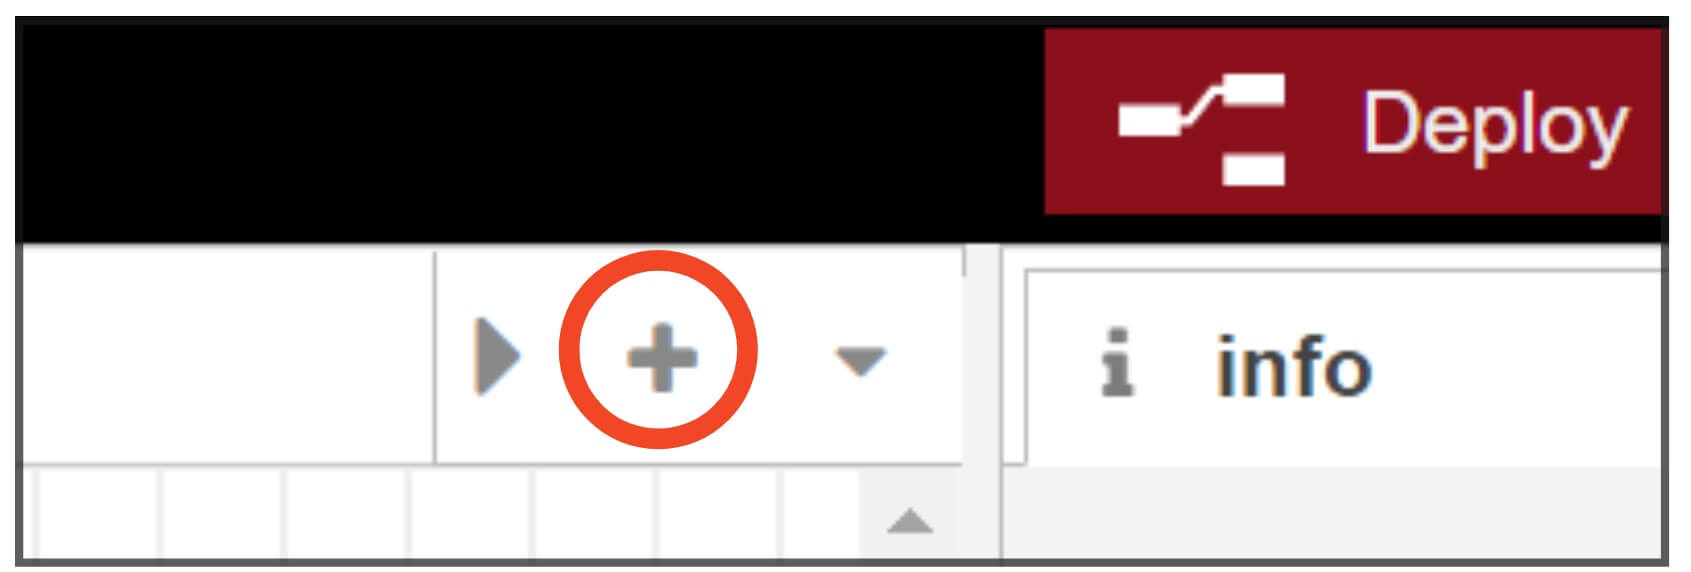
- If this is your first flow then the page will be blank for you to start building. If not, click the ‘+’ symbol at upper-right to create a new flow:
-
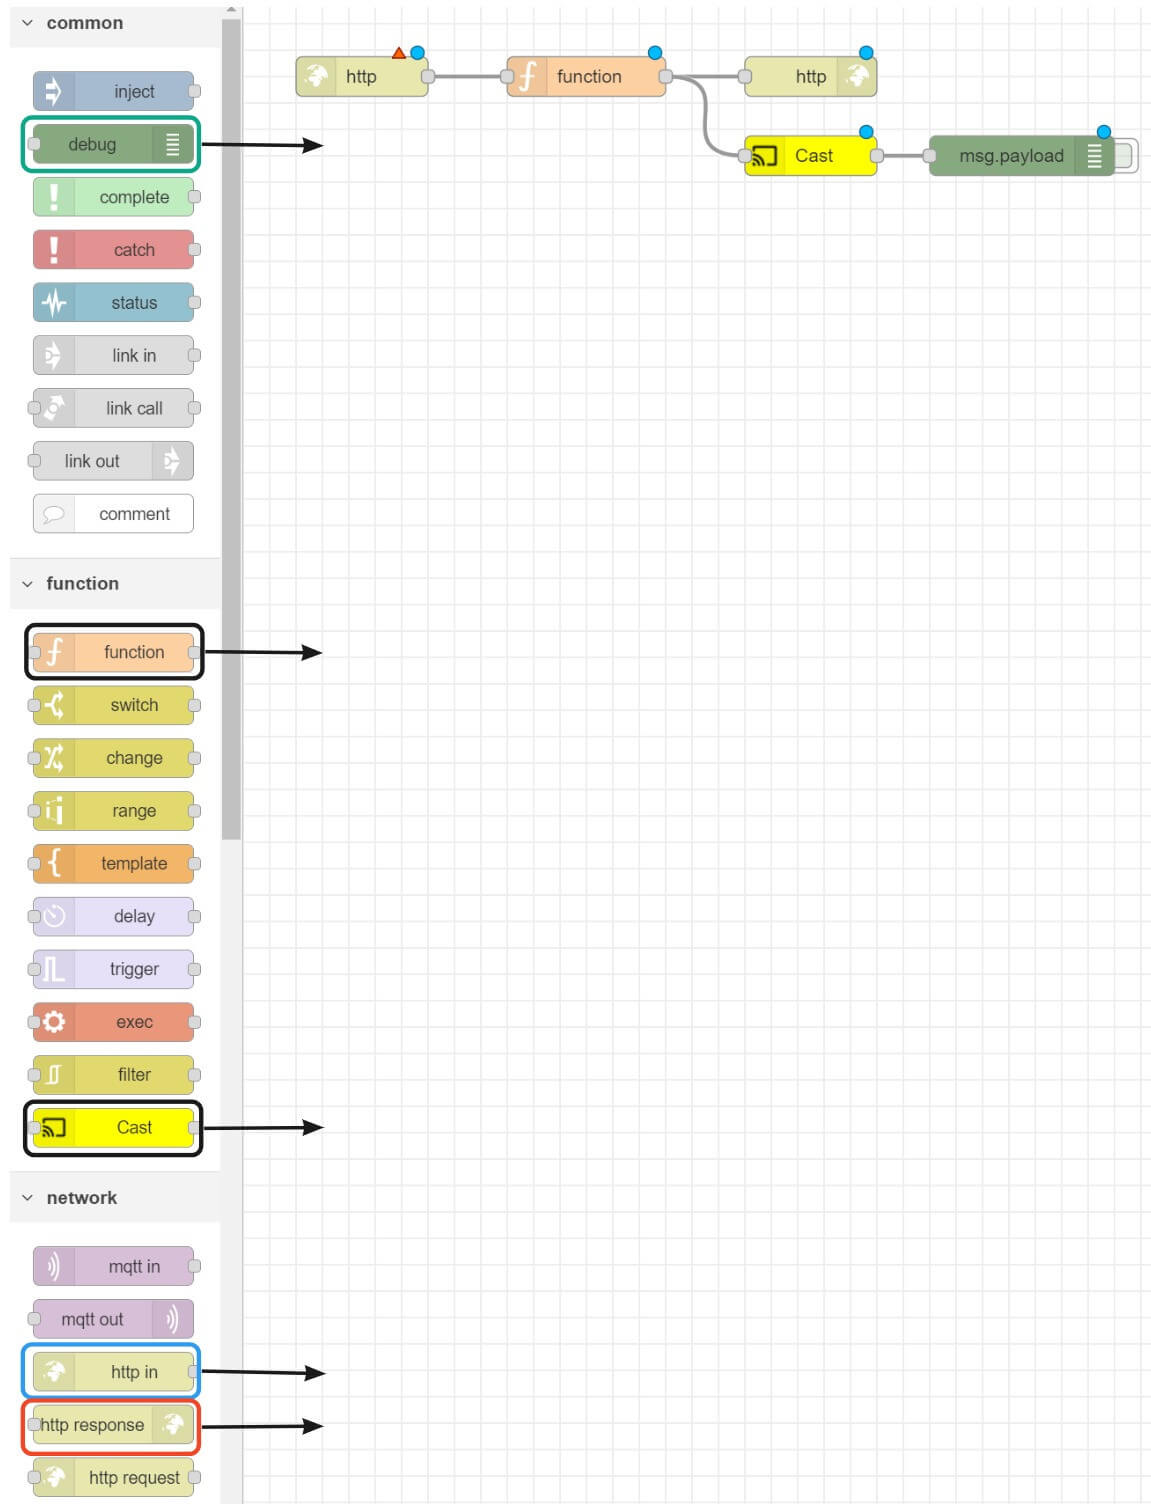
Drag one each of the following nodes from the left-hand menu into the workspace:
- debug
- function
- http in
- http response
- cast
- Drag the handles at the end of the nodes to connect them together as shown below:
-
Double-click on the ‘http in’ node and complete the ‘URL’ and ‘Name’ fields as required.
- ‘Name’ is the label of the node. Providing a descriptive name will help you and others identify its purpose in future.
- The ‘URL’ field is used by EZLogic to identify this particular Node-Red flow. You will need to add whatever label you type here into your http request URL.
-
- Click ‘Done’ to save your changes.
- Next, double-click on the ‘function’ node. Change the name of the node to a more descriptive label if required, then copy and paste this code snippet into the ‘On Message’ text field:
var IPS = msg.payload.ip.split("|");
for (var i in IPS) {
msg.payload = {"message": msg.payload.message, "ip": IPS[i], "volume": msg.payload.volume};
node.send([null, [msg]]);
}
msg.payload = "ok"; // the response message
return [msg];
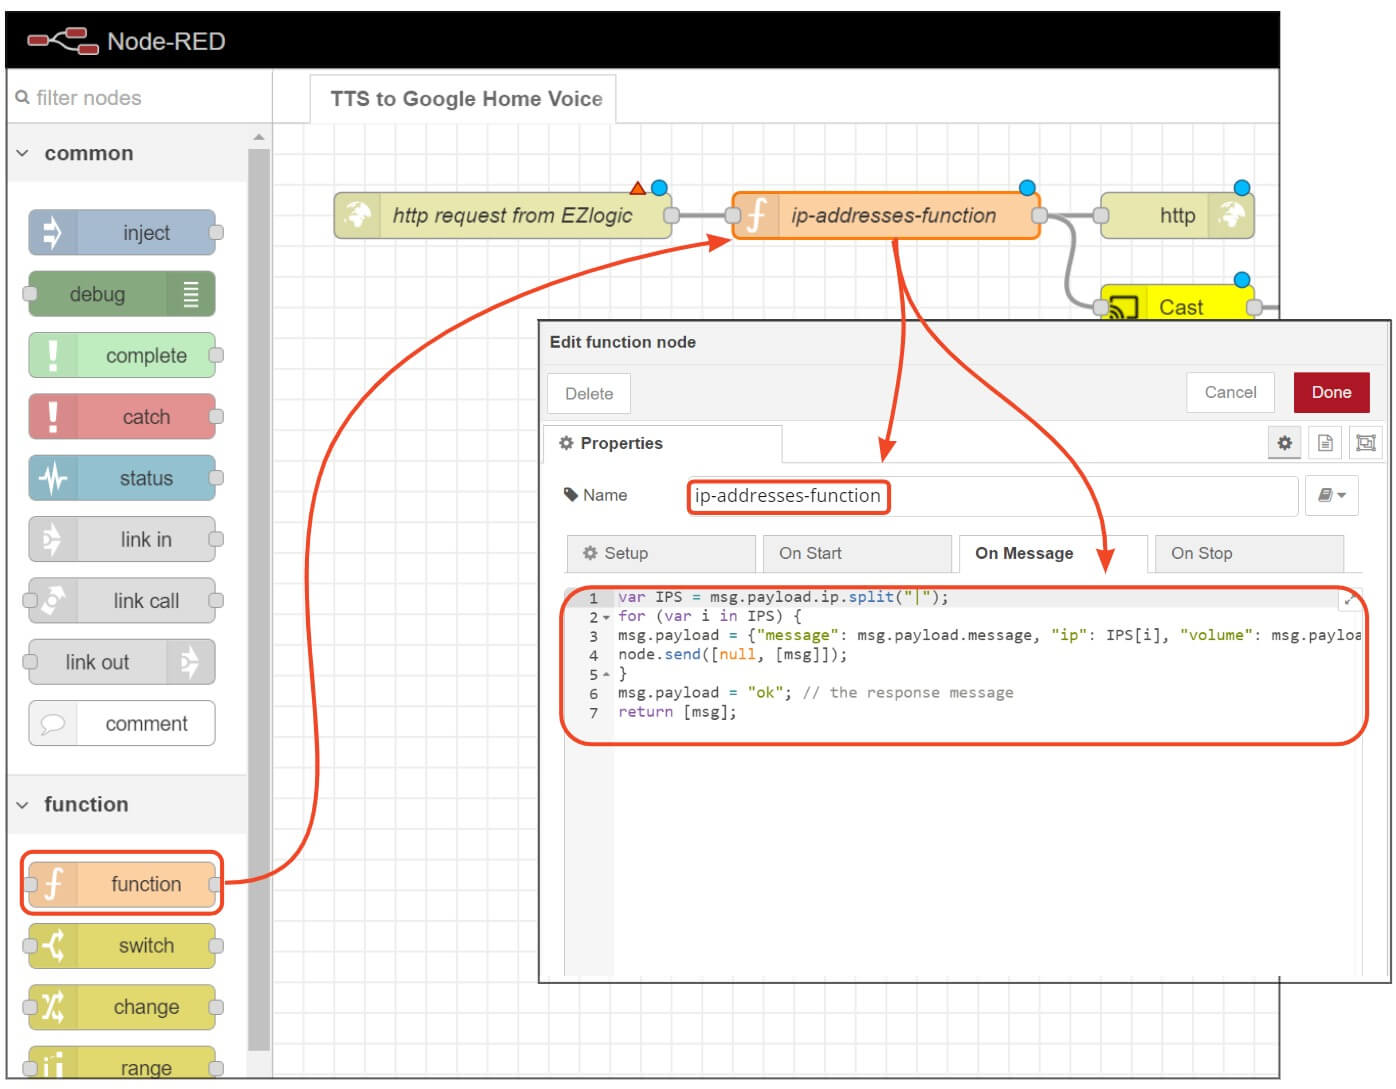
- Click ‘Done’ to save your changes.
- You can change the names of the other nodes if required, but there are no further functional modifications you need to make.
- Click ‘Deploy’ to activate the flow. You can now move onto your http request URL.
Construct your http request URL
-
The next step is to build the URL for the meshbot to send your tts to the speaker. Construct the URL in the following format:
http://node-red-ip:port/’http-in’-URL-field?message=text-of-your-voice-message&ip=ip-of-google-home-speakerIn our example, the URL above would look like this:
http://127.0.0.1:1880/meshbotTrigger?message=This%20is%20a%20test%20message&ip=192.168.0.16 - Replace 127.0.0.1 with the address of the remote device if the Node-Red server is running on a different computer. Use the same port number, 1880, in either case.
- If you changed the ‘http in’ URL field, then replace the text meshbotTrigger with your new text.
-
Replace This%20is%20a%20test%20message with the actual message that you want the speaker to say. You must replace any spaces with %20 characters or the message won’t work.
For example, ‘Night mode has been activated’ should be entered as: night%20mode%20has%20been%20activated
- Replace 192.168.0.16 with the IP address of your Google Home speaker. You can find the LAN IP of your speaker by following Google’s instructions here, or by opening the command prompt and typing ‘ipconfig /all’.
The URL above sends to one Google Home speaker at the IP address you specified. You can send to multiple speakers by separating the IP of each speaker with the pipe character – ‘ | ‘.
For example:
http://127.0.0.1:1880/meshbotTrigger?message=This%20is%20a%20test%20message&ip=192.168.0.16|192.168.0.16.17|192.168.0.18
Create a meshbot to send the tts message to the speaker
The final step is to add your http request to a meshbot action.
- Open EZLogic then click ‘Meshbot Automation’ > ‘Create New Meshbot’ > ‘Local’.
- Create your trigger item or items. See the triggers section if you need help to create a trigger.
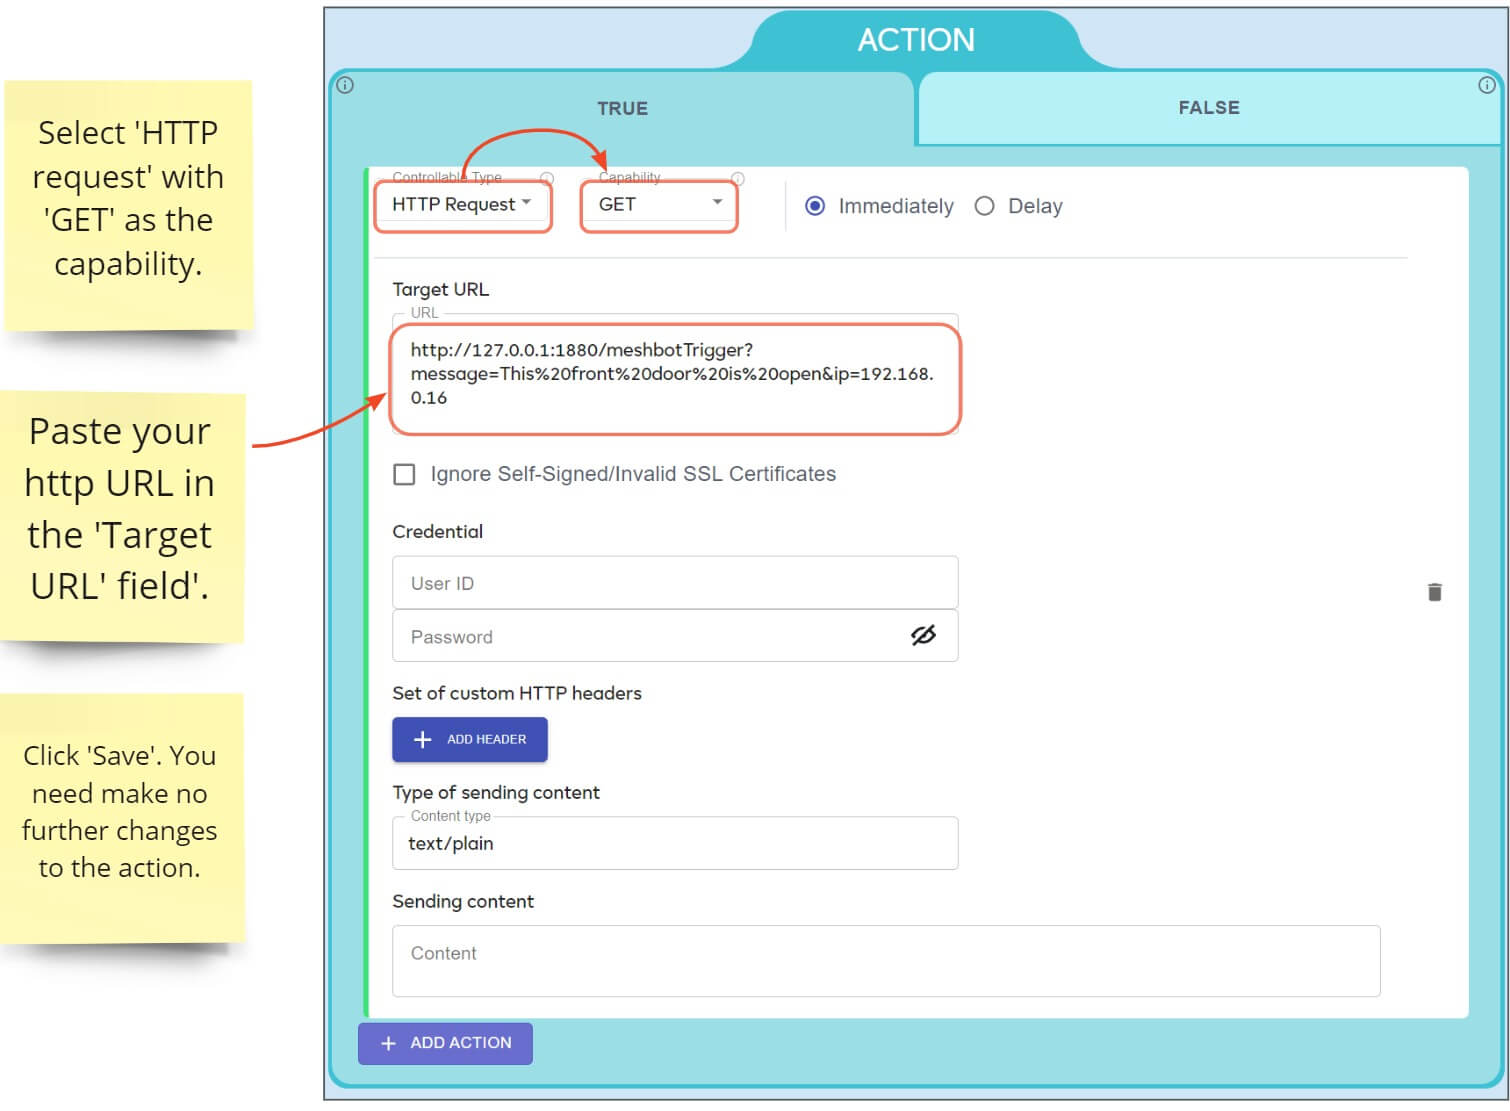
- ‘Action’ – select ‘HTTP Request’ and ‘GET’ as the capability.
- Paste your https URL into the target URL box. You needn’t modify any other settings in the action panel.
- Click ‘Save’ to activate your meshbot.
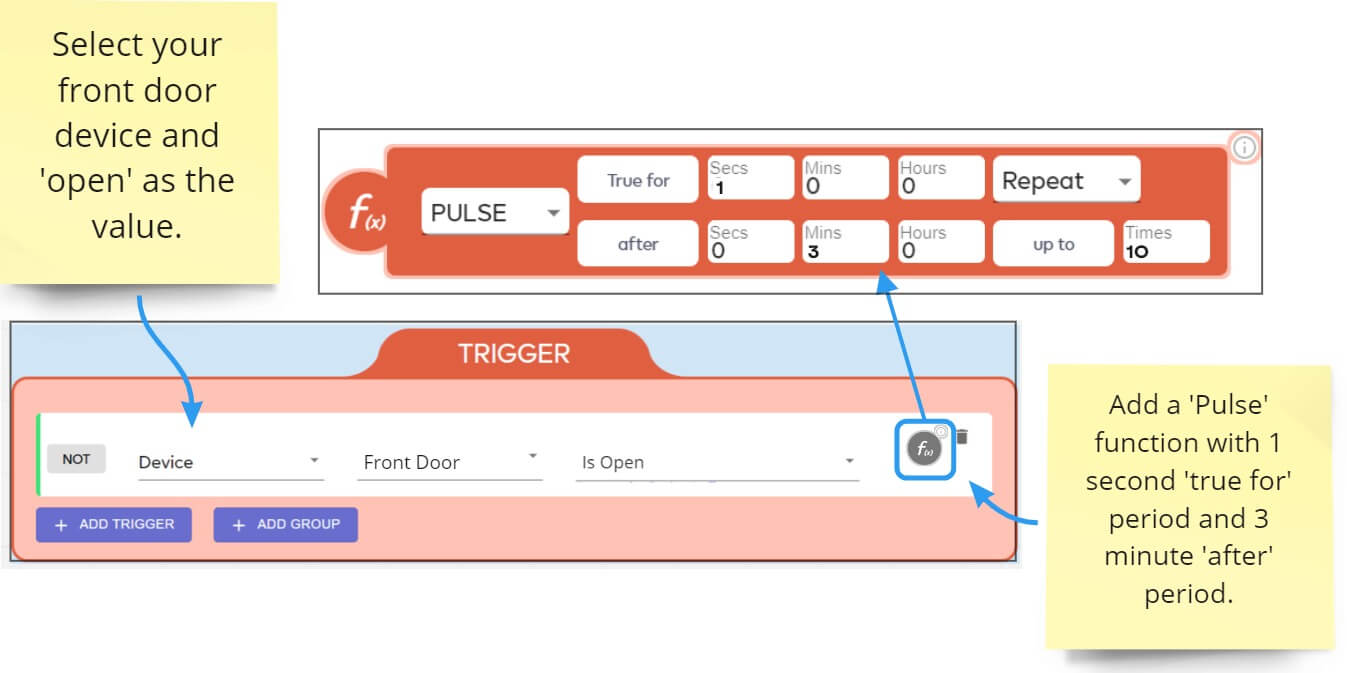
The following example explains how to create a meshbot that tells a voice assistant to issue a warning if your front door is open. It will repeat this warning every 3 minutes if the door remains open.
- Set your trigger to become true if your front door is open. Add a ‘Pulse’ function to the trigger with a one second ‘True For’ duration and a 3 minute ‘after’ duration. The ‘up to’ value lets you repeat this 3 minute cycle as often as you desire:
-
The pulse function means the tts is issued immediately when the door is opened, and repeated every 3 minutes until the door is closed (or when the ‘up to’ repetition limit is reached).
- You can read more about how the pulse function works in its dedicated help page.
- Next, set up your action to send the text-to-speech notification to your Google Home voice assistant.
- Select ‘HTTP Request’ as your controllable type, with ‘GET’ as the capability. Paste the http URL you constructed previously into the ‘Target URL box:
The meshbot described above will issue the first voice message immediately the door opens.
If you want to wait some time before sending the first message then you could add another trigger that uses the ‘FOR’ function. You might want to do this to prevent notifications when somebody is just answering the door or performing a small task:
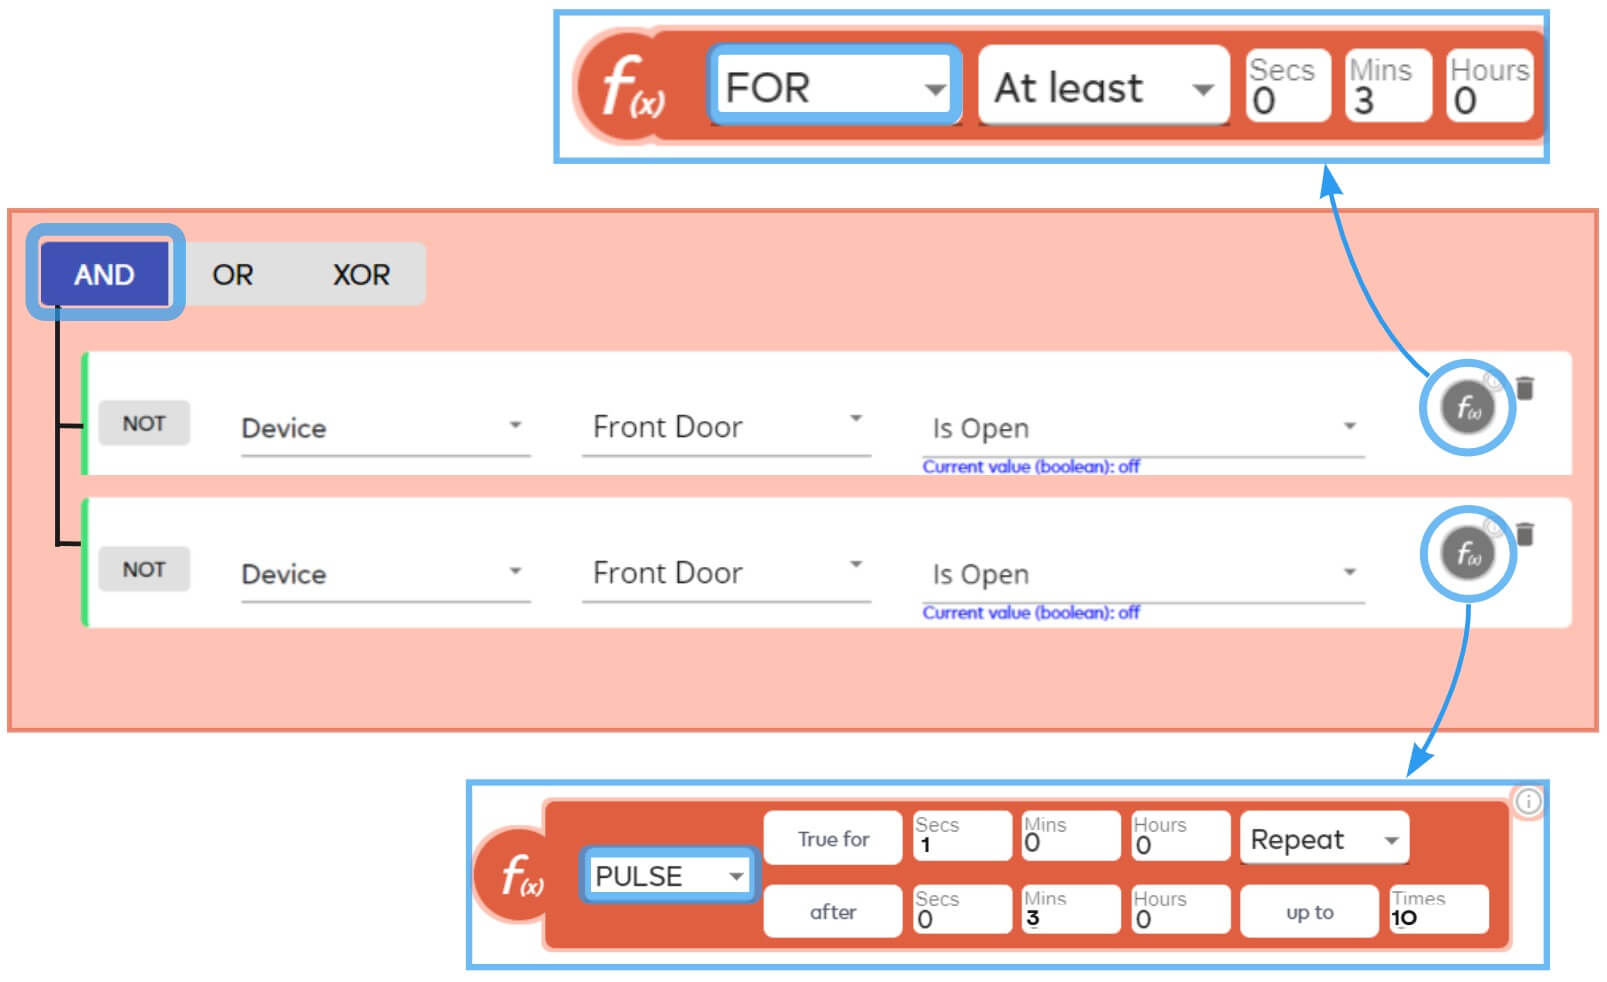
- Create a trigger which goes true if the door is open. Click the function button and add a FOR function set to 3 minutes.
- Add a second, identical, trigger which uses the PULSE option. Set this as before, with 1 second ‘true for’, 3 minutes ‘after’, and ‘up to’ as required.
- Link both triggers with the AND operator. Set up your text-to-speech action the same as previously.
- The ‘Pulse’ trigger immediately becomes true for 1 second when the door is opened. However, the trigger group is still false because the ‘For’ trigger requires that the door be open for 3 minutes. This means no tts is sent when the door is first opened.
- The ‘For’ trigger becomes true at the end of the 3 minutes IF the door is still open. The pulse trigger becomes true (again) after 3 minutes and 1 second have passed. With both triggers true, the entire group is true.
- This sends the first tts voice message to your speaker. If the door remains open then the ‘FOR’ trigger stays at true as it has been open for longer than three minutes.
- The ‘Pulse’ trigger subsequently becomes true for 1 second every 3 minutes that the door is left open. Because the ‘FOR’ trigger remains true, this turns the trigger group true again and sends out a repeat voice notification. This continues until somebody closes the door and turns the trigger group false.
Additional Tutorials
The following page contains another example using a http request action: