Date and Time
Once selected, any actions you associate with this trigger will activate at the time you specify. For example, you might create a meshbot which updates a Google spreadsheet with the latest sales figures from your team every Wednesday at 2pm. Or you could activate your night house-mode between 11pm and 6.30am every day.
- MiOS uses the ISO 8601 standard for representation of dates and times.
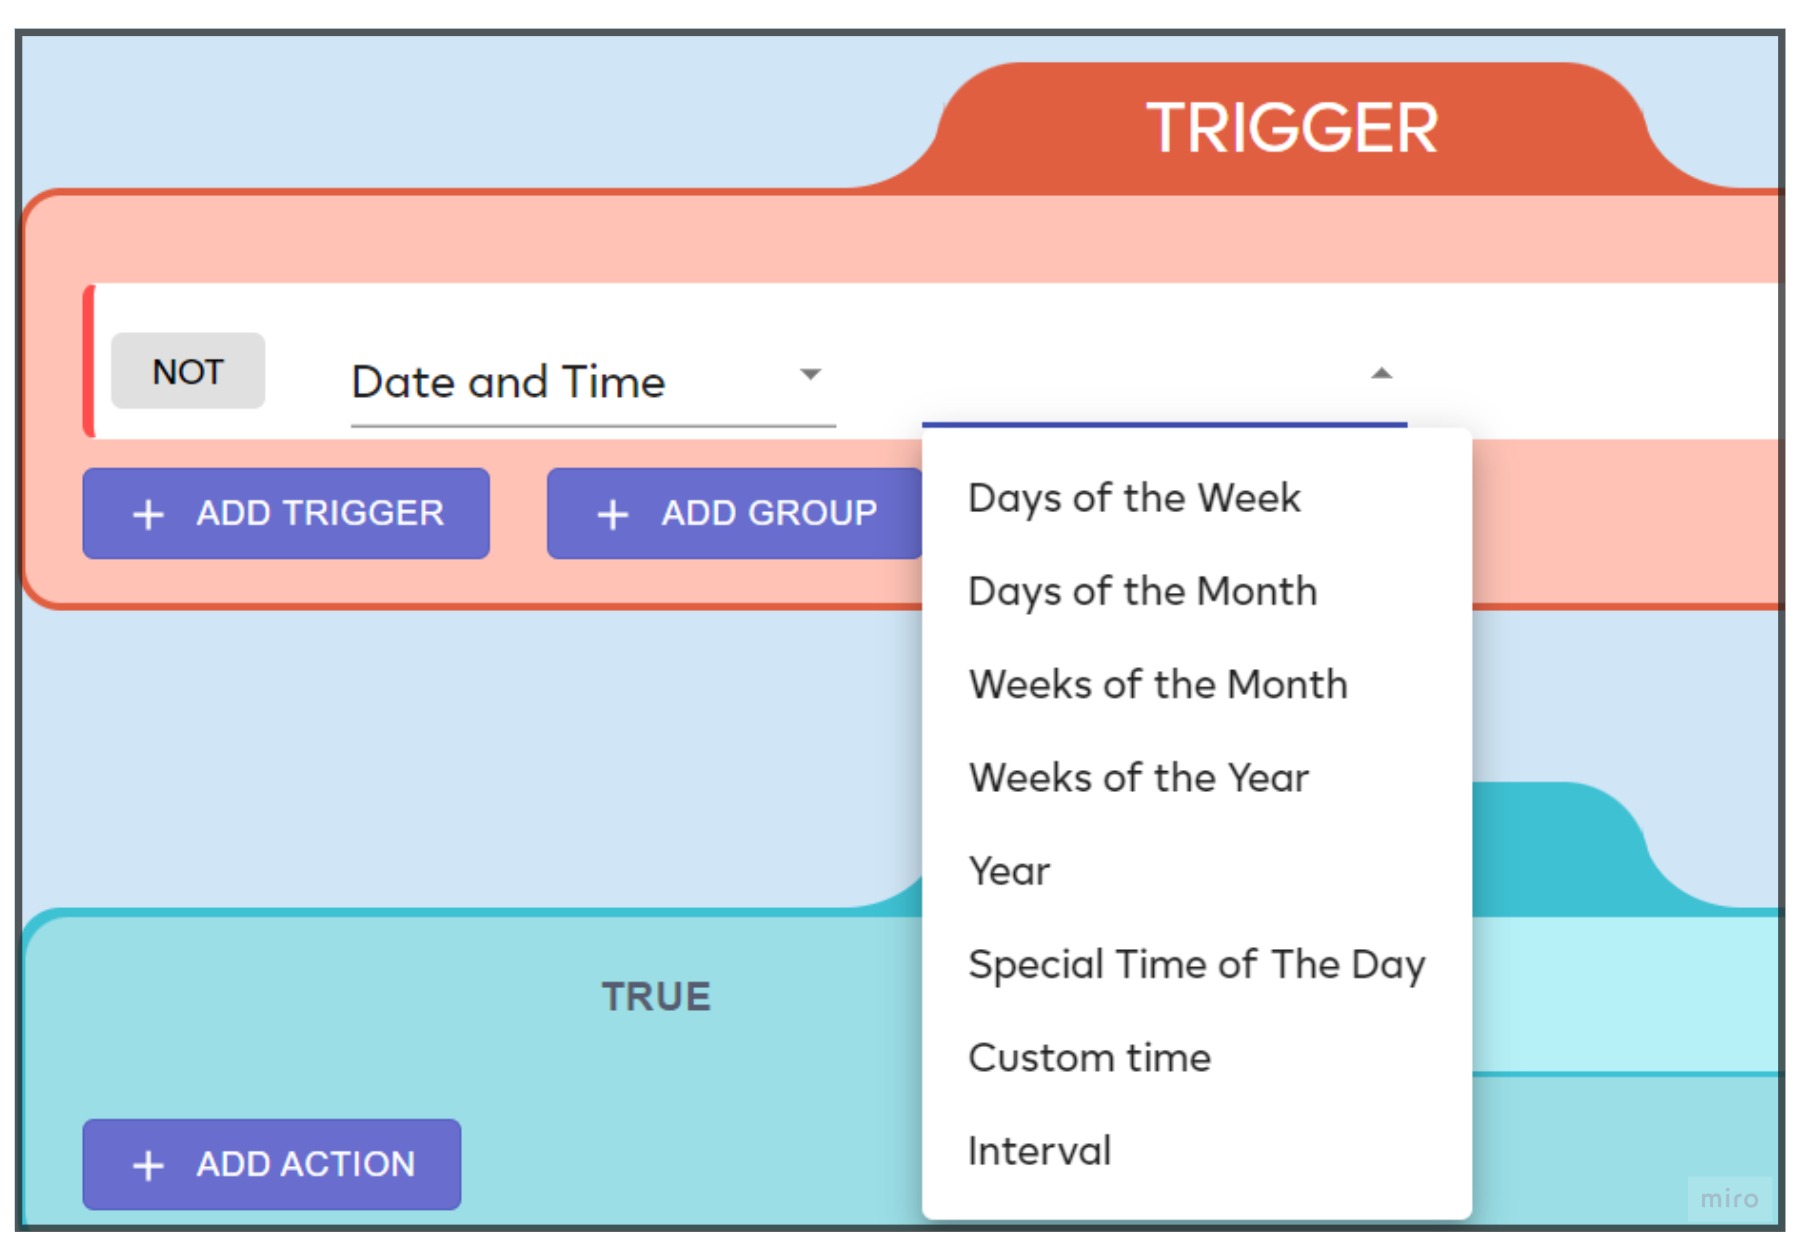
‘Date and Time’ contains the following options:
- Custom Time
- Special time of the day
- Days of the week
- Days of the month
- Weeks of the month
- Weeks of the year
- Months of the year
- Year
- Interval
- Once
- Combining Date/Time triggers
Custom Time
Activate the trigger before or after a specific time, or between two times, or at a certain time every day. You can also pick whether the trigger activates daily or only on certain dates. This trigger is useful when paired with other date-time triggers as it lets you choose an exact time.
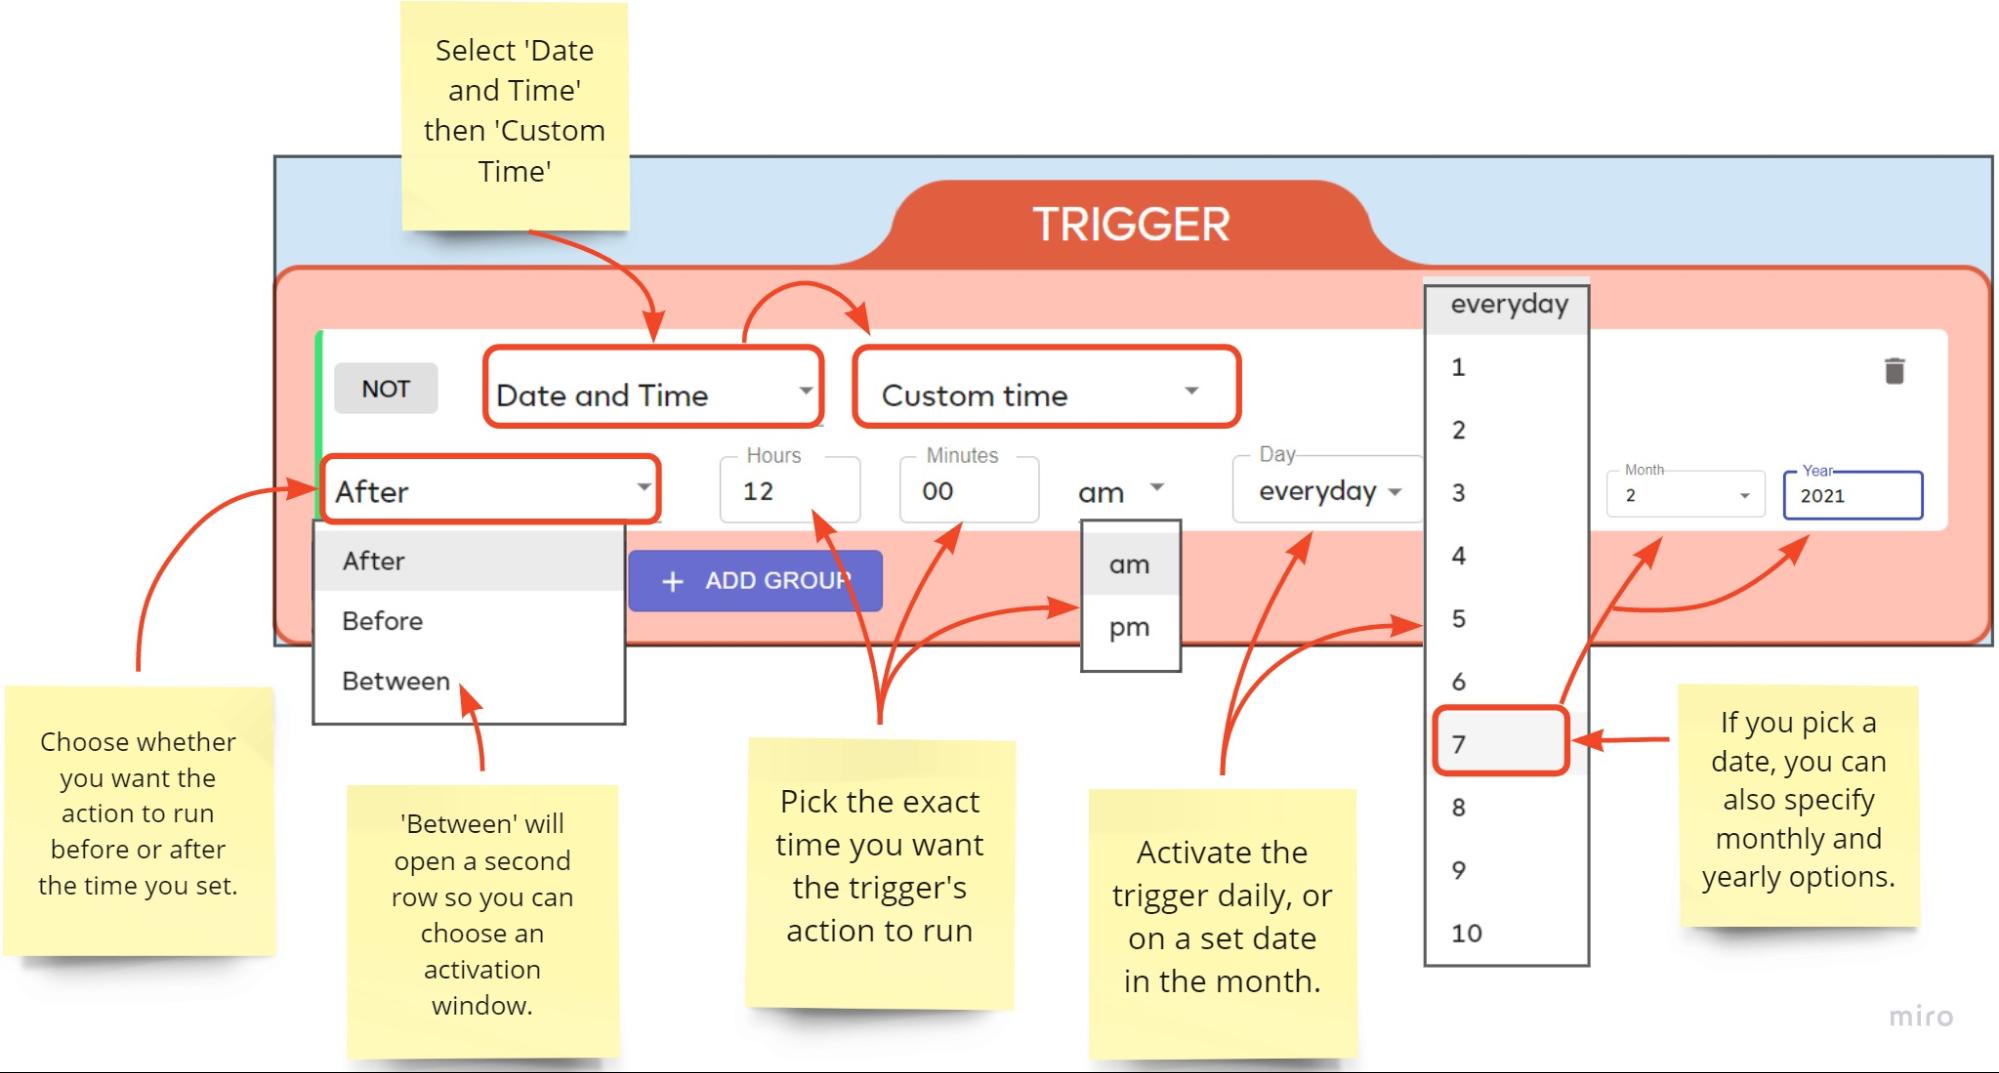
- Before – means ‘The trigger is true from midnight until the time you specify’. For example, ‘Before 8 PM’ means the trigger is true from 12.00 AM until 7.59.59 PM.
- After — means ‘The trigger is true from the time you specify until midnight’. For example, ‘After 8pm’ means the trigger is true from 8.00.01 PM until 11.59.59 PM.
- Between — The trigger is true between the two times you specify on your given days. For example, between 6 AM and 7 PM. If you set the start time before the end time then you can create a span over midnight. For example between 7 PM and 6 AM will run the trigger from 7 PM till 6 AM the following day.
- At a time of day – The trigger will become true everyday at the time you specify and remain true until midnight. Combine this trigger with a days of the week trigger if you only want it active on certain days.
In most cases, we advise users to choose ‘After’ rather than ‘At a time of day’ to safeguard against network interruptions and hardware failures. However, ‘At a time…’ is more appropriate if your action must run exclusively at a specific time and not afterwards. Let’s explain this a little further.
- If you choose ‘At a time of day’, your controller must be powered-on at the start time for the trigger to become true. If the controller is offline at the specified time then the trigger will not activate. The trigger still won’t go true when your controller comes back online either because the time slot has passed.
- If you set the same time but use ‘After’ instead, then, when your controller comes back online, EZLogic notices the time range is still valid and turns the trigger true. This means your meshbot scenes still activate as planned, albeit a little later.
As mentioned earlier, you may want to use ‘At a time…’ if you’d rather the action was not run at all if the scheduled time has passed. Take a simple example of a school lunch-time bell. If the controller is down at your set time then the bell won’t go off in either case (whether you use ‘After’ or ‘At a time…’). However, an ‘After’ trigger would make the bell go off whenever the controller came back online (maybe in the middle of the afternoon). ‘At a time…’ would not cause it to do so.
A compromise between these two is to use the ‘Between’ option. This lets you set a window of, say, 5 minutes during which it is valid to run the action.
Special time of the day
Run the trigger every day at sunrise or sunset in your location. Alternatively, you can run the trigger from 12 AM until sunrise/sunset, or from sunrise/sunset until midnight. You can offset this by a specific length of time before or after sunset/sunrise. Special times vary according to your location and the time of the year and are set by your region’s weather service.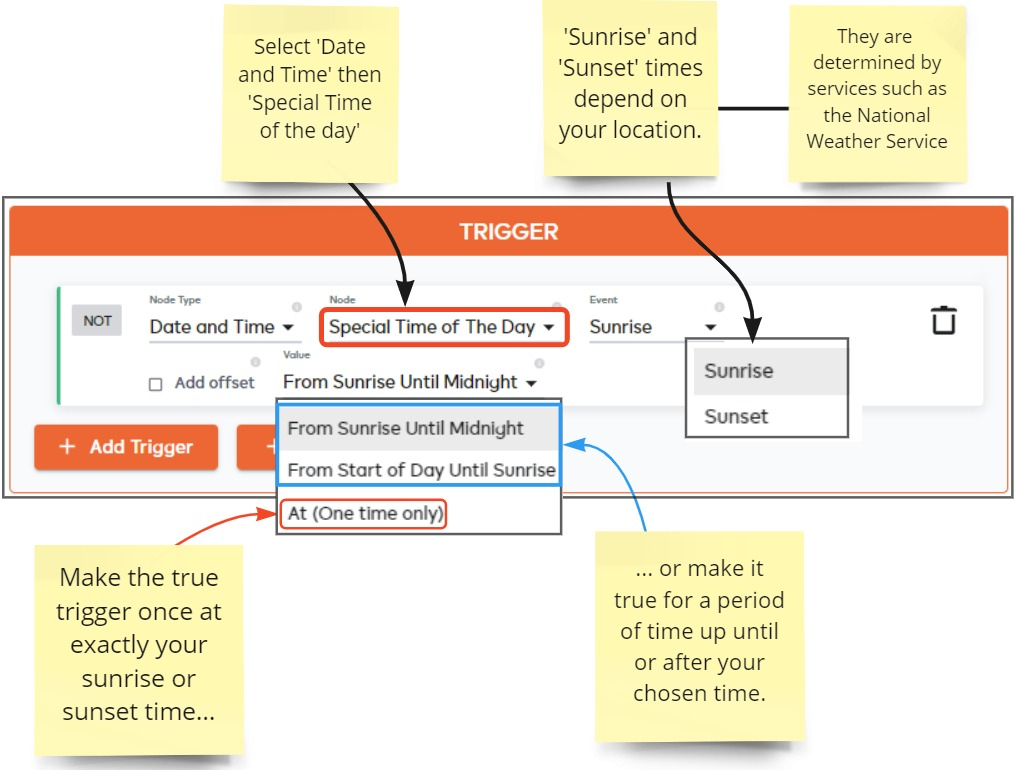
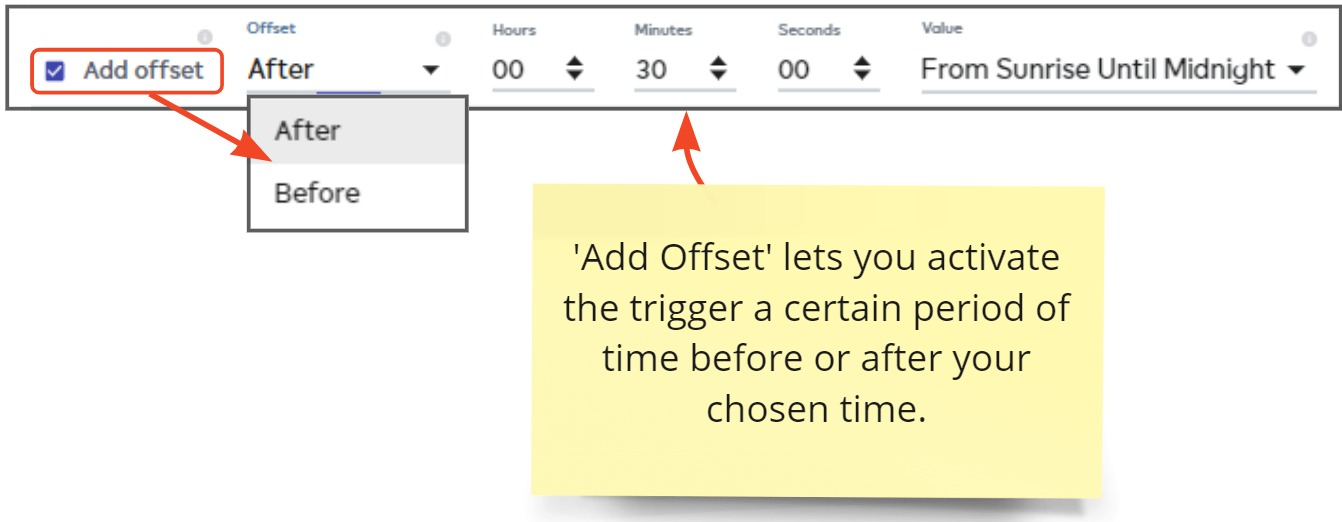
The following table shows examples of the offset features. For these examples, we assume:
- Sunrise is at 5.00 AM
- Sunset is at 7.30 PM
| SUNRISE @ 5.00 AM | ||
|---|---|---|
| Value | Offset | Trigger is True |
| Sunrise Until Midnight | None | 5:00 AM to Midnight |
| Sunrise Until Midnight | After 30 Mins | 5:30 AM to Midnight |
| Sunrise Until Midnight | Before 30 Mins | 4:30 AM to Midnight |
| Start of Day Until Sunrise | None | 12:00 AM to 5:00 AM |
| Start of Day Until Sunrise | After 1 Hour | 12:00 AM to 6:00 AM |
| Start of Day Until Sunrise | Before 1 Hour | 12:00 AM to 4:00 AM |
| At | None | 5:00 AM |
| At | After 40 Mins | 5:40 AM |
| At | Before 40 Mins | 4:20 AM |
| SUNSET @ 7.30 PM | ||
|---|---|---|
| Value | Offset | Trigger is True |
| Sunrise Until Midnight | None | 7:30 PM to Midnight |
| Sunrise Until Midnight | After 2 Hours | 9:30 PM to Midnight |
| Sunrise Until Midnight | Before 2 Hours | 5:30 PM to Midnight |
| Start of Day Until Sunset | None | 12:00 AM to 7:30 PM |
| Start of Day Until Sunset | After 40 Mins | 12:00 AM to 8:10 PM |
| Start of Day Until Sunset | Before 40 Mins | 12:00 AM to 6:50 PM |
| At | None | 7:30 PM |
| At | After 30 Mins | 8:00 PM |
| At | Before 30 Mins | 7:00 PM |
Note – ‘At (one time only)’ means EZLogic will activate your trigger once at exactly the specified time. If your controller is offline or there is a network issue at this time then your actions might not run as the time slot has passed. For this reason, we recommend most users choose one of the ‘…until…’ options as these provide a range of time during which the trigger is considered true. See Should I use ‘After’ or ‘At a time of day? if you want to read more.
Days of the week
Run the trigger on certain days of the week. You can also set specific times when the trigger becomes true on those days.
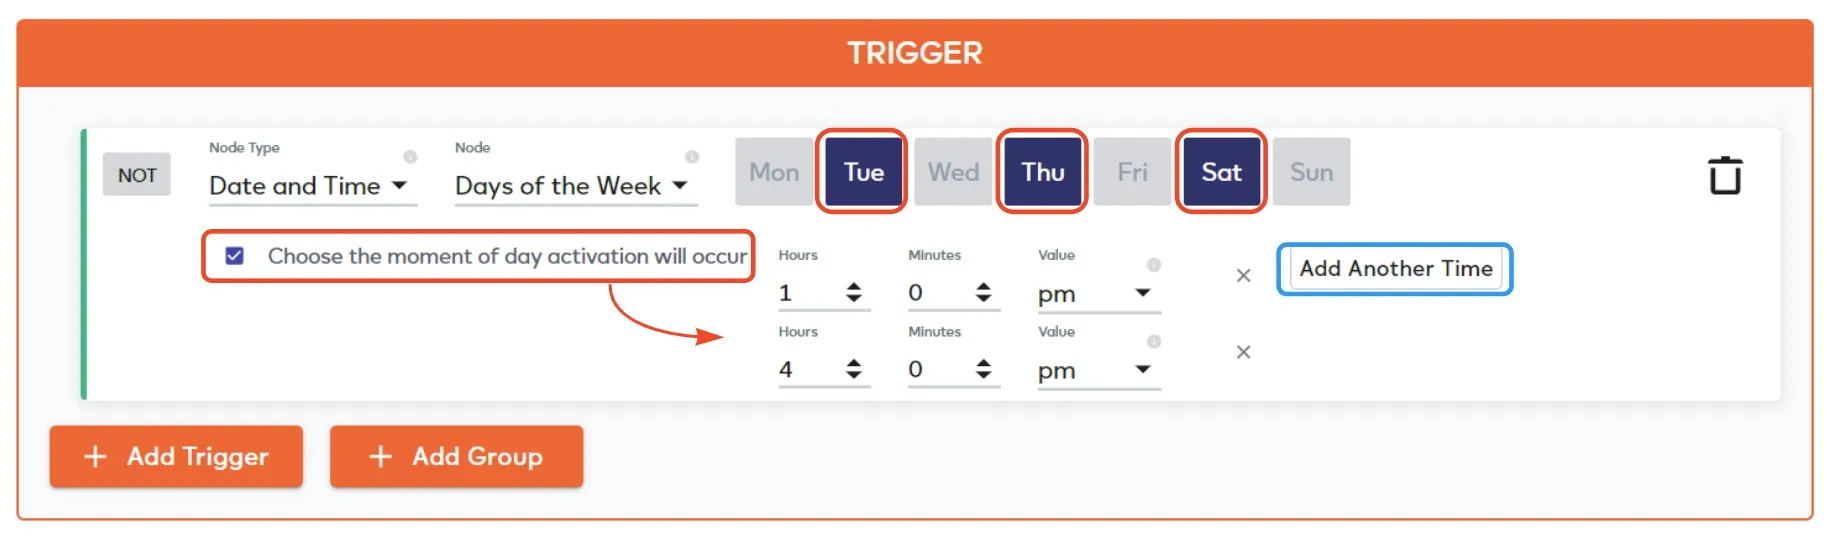
- Choose the moment… – pick the time at which the trigger should activate on the selected days. The trigger will remain true from the time you set until 11.59 PM on the selected day(s).
- Add another time – set multiple instances when the trigger should become true on the selected days. This is most useful for ‘one-off’ actions that you may want repeated at various times. For example, ‘Get my Roomba to clean my office at 6 am and 12.30 pm (lunchtime)’, or ‘Run my garden sprinkler cycle at 10 am and 3.00 pm’.
- If you disable ‘Choose the moment…’ then the trigger will be true from 12.00 AM until 11.59 PM on the selected day(s).
Days of the month
Run the trigger on certain days of the month. You can also set specific times when the trigger becomes true on those days.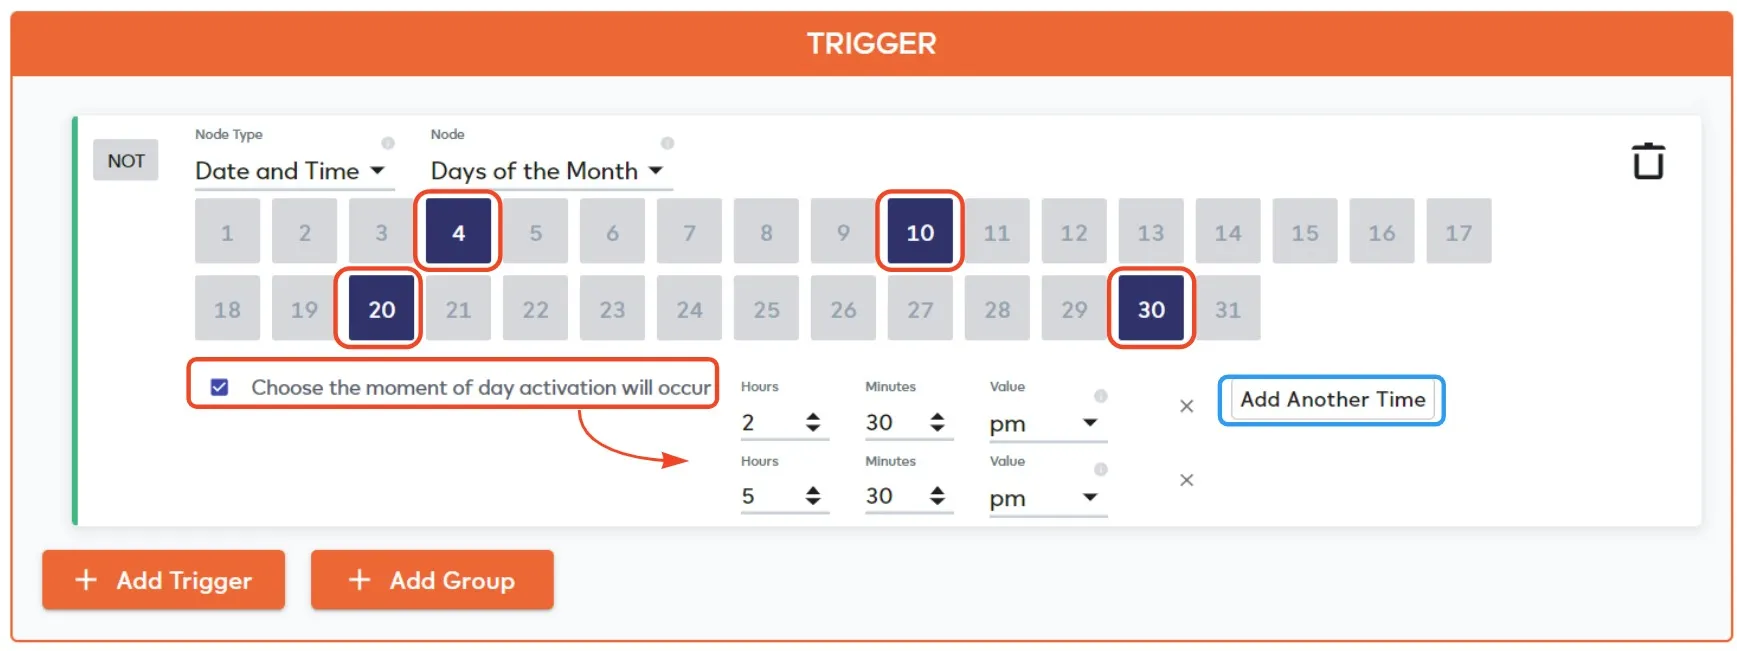
- Choose the moment… – pick the time at which the trigger should activate on the selected days. The trigger will remain true from the time you set until 11.59 PM on the selected day(s).
- Add another time – set multiple instances when the trigger should become true on the selected days. This is most useful for ‘one-off’ actions that you may want repeated at various times. For example, ‘Send reminders to the sales team that commissions must be submitted by end-of-today’, or ‘Test the smoke alarms in the kitchen at these times’.
- If you disable ‘Choose the moment…’ then the trigger will be true from 12.00 AM until 11.59 PM on the selected day(s).
Weeks of the month
Run the trigger on certain weeks of the month starting 12.00 AM on the first day through to 11.59 PM on the seventh day. Week 1 starts on the first calendar day of the month.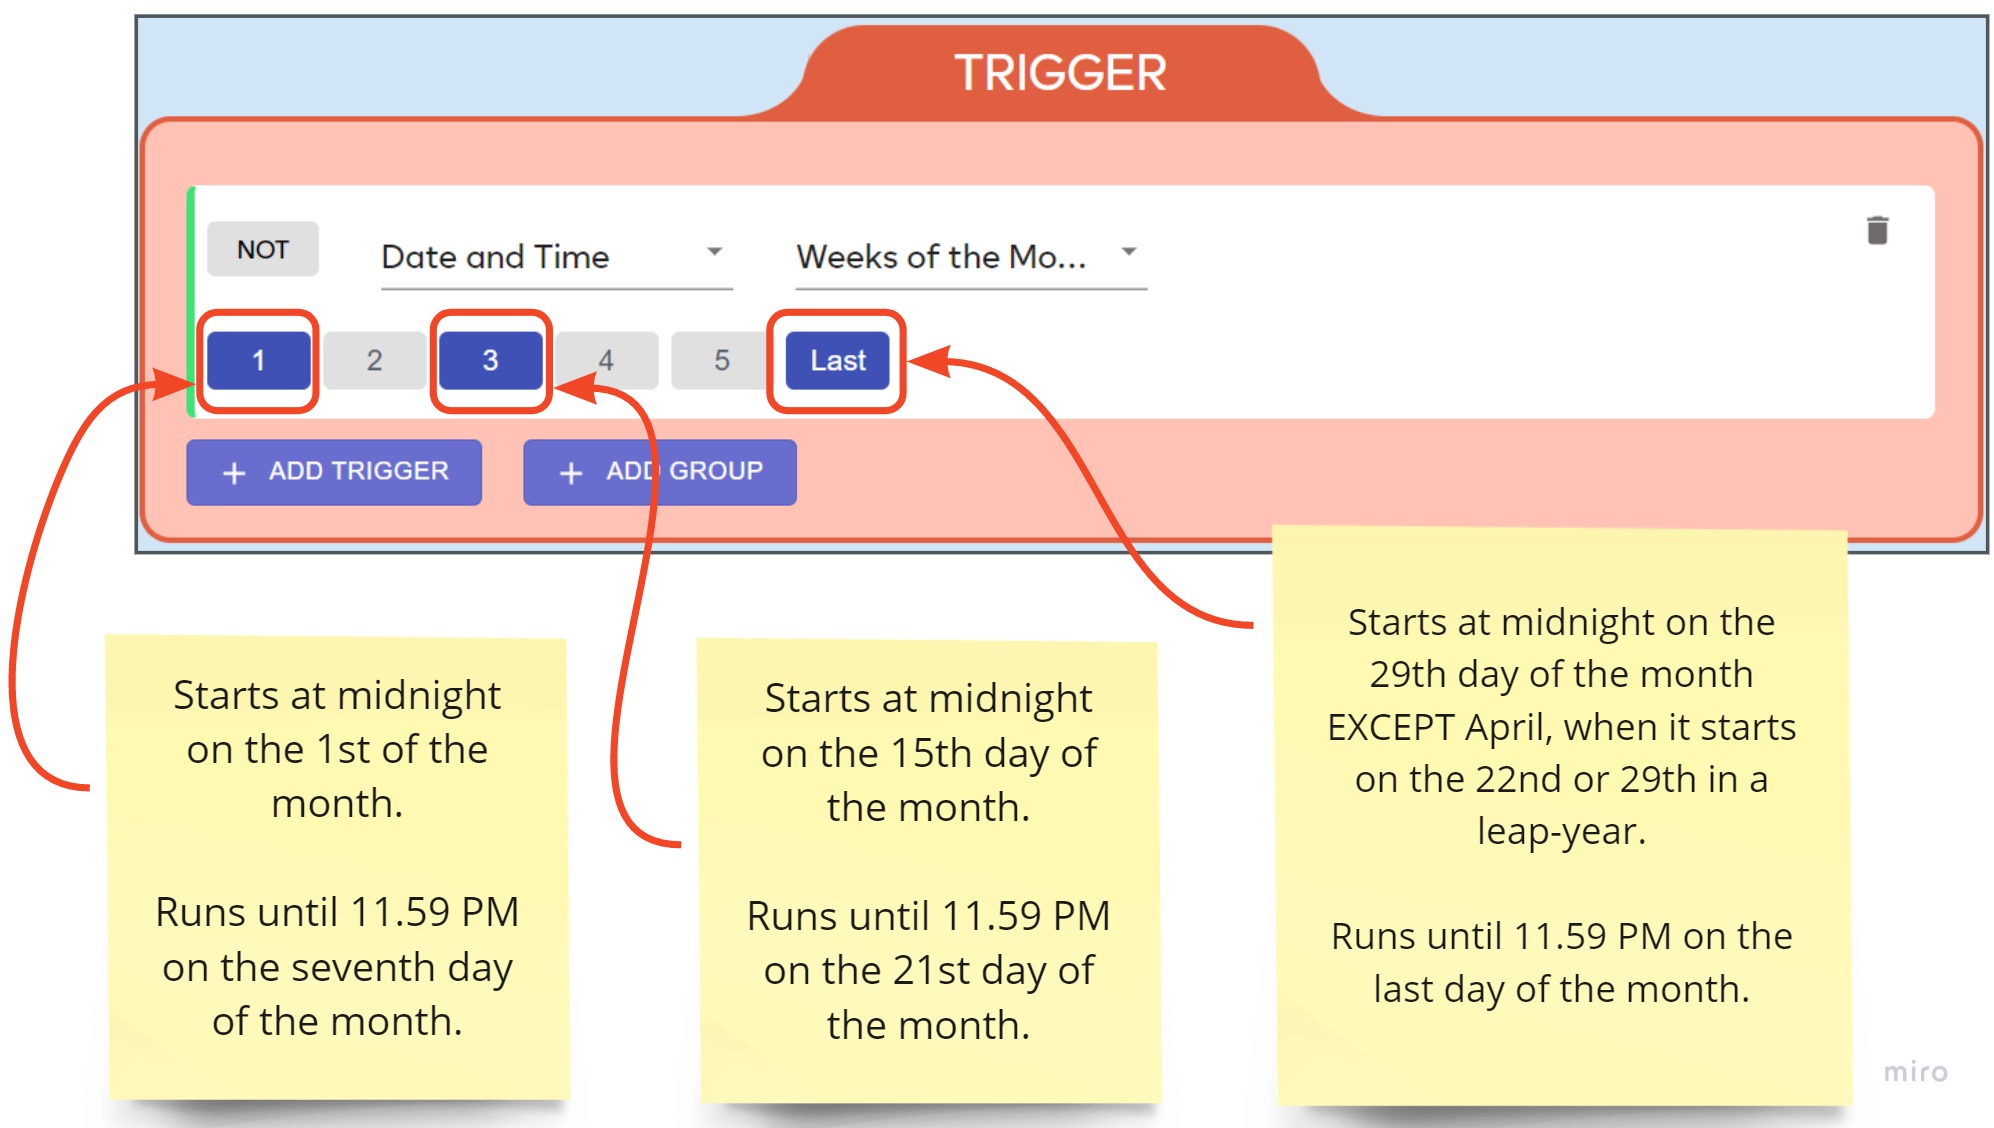
Note – ‘Weeks of the month’ runs the meshbot once per week selected. Combine this trigger with a Days of the Week and/or Custom Time trigger if you want it to run on multiple or specific days.
Weeks of the year
Run the trigger on specific weeks of the year starting 12.00 AM Monday through to 11.59 PM Sunday. This type of trigger is of particular interest when creating meshbots related to financial/taxation/payroll tasks.
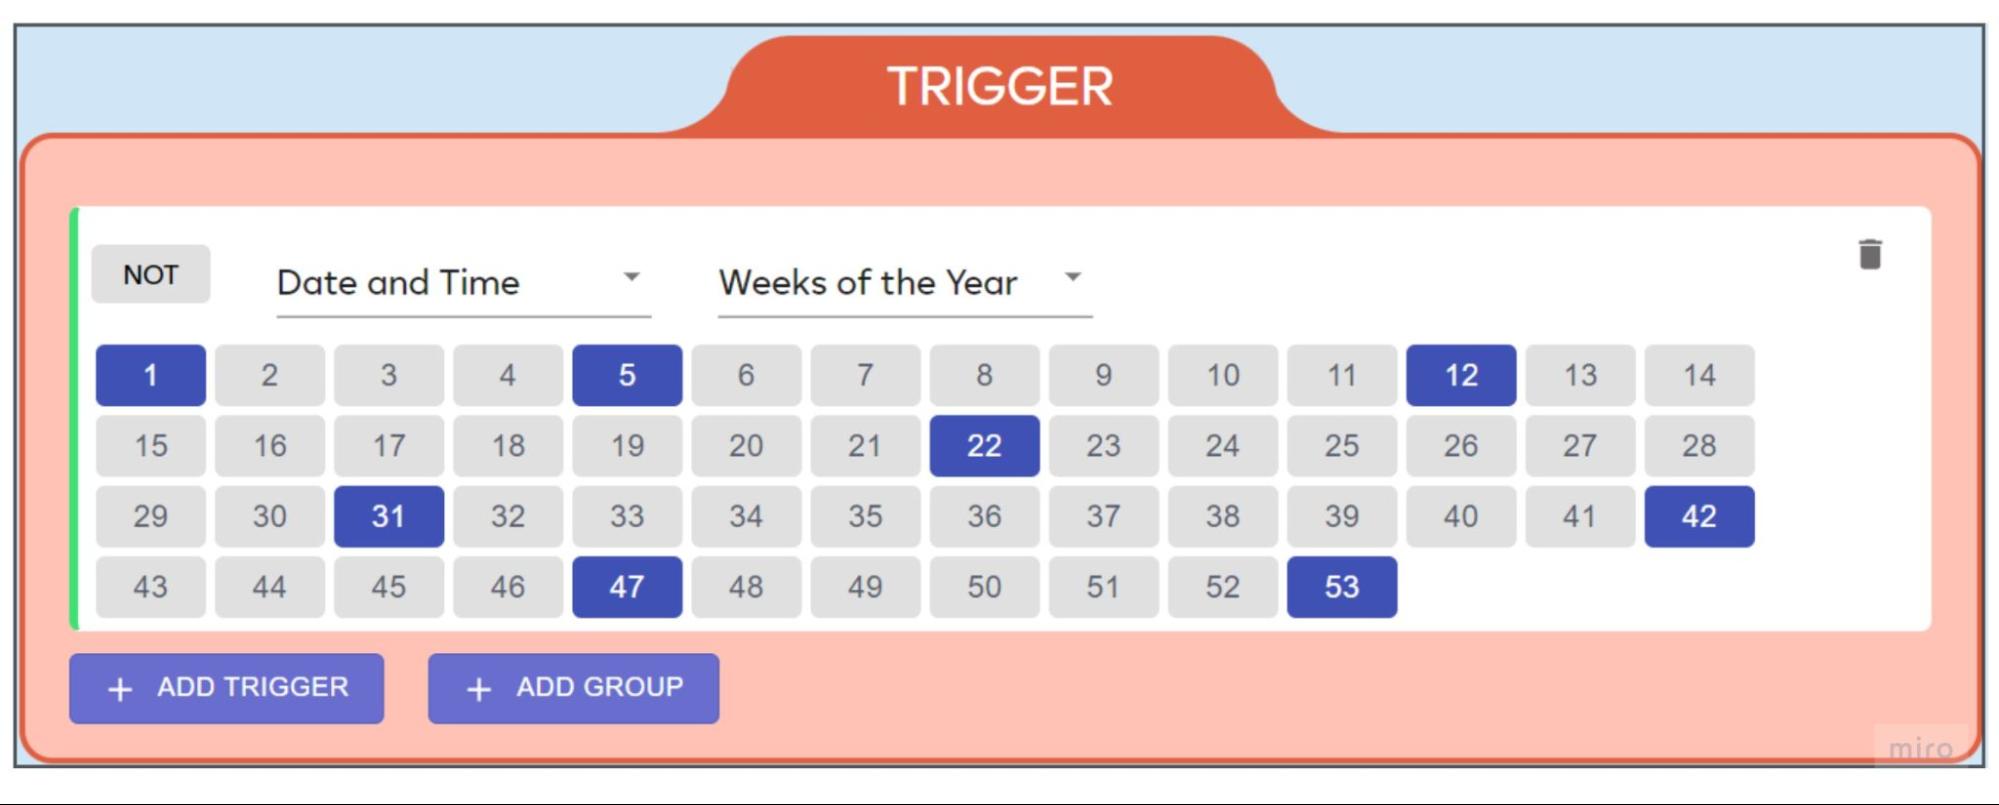
- Week 1 starts on the first Monday of the year at midnight and runs until 11.59 PM on the Sunday afterwards.
- All subsequent weeks also start at midnight Monday. So, for example, ‘Week 22’ starts on the 22nd Monday of the year.
- Some years have 53 Mondays in them, so these are classed as 53 week years.
- This happens if the year starts on a Thursday or is a leap year that starts on a Wednesday.
- You can find the exact start and end dates of any week number at https://www.epochconverter.com/weeks
Note – ‘Weeks of the year’ runs the meshbot once per week selected. Combine this trigger with a Days of the Week and/or Custom Time trigger if you want it to run on multiple or specific days.
Months of the year
(Coming soon) Run the trigger on specific months starting at 12.00 AM on the 1st of the month through to 11.59 PM on the last day of the month.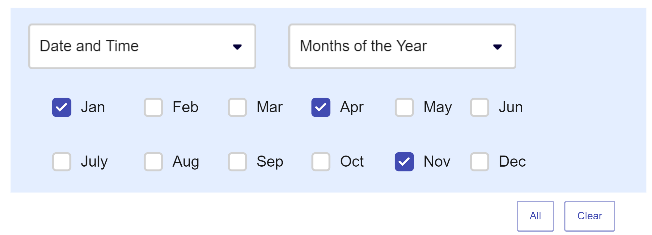
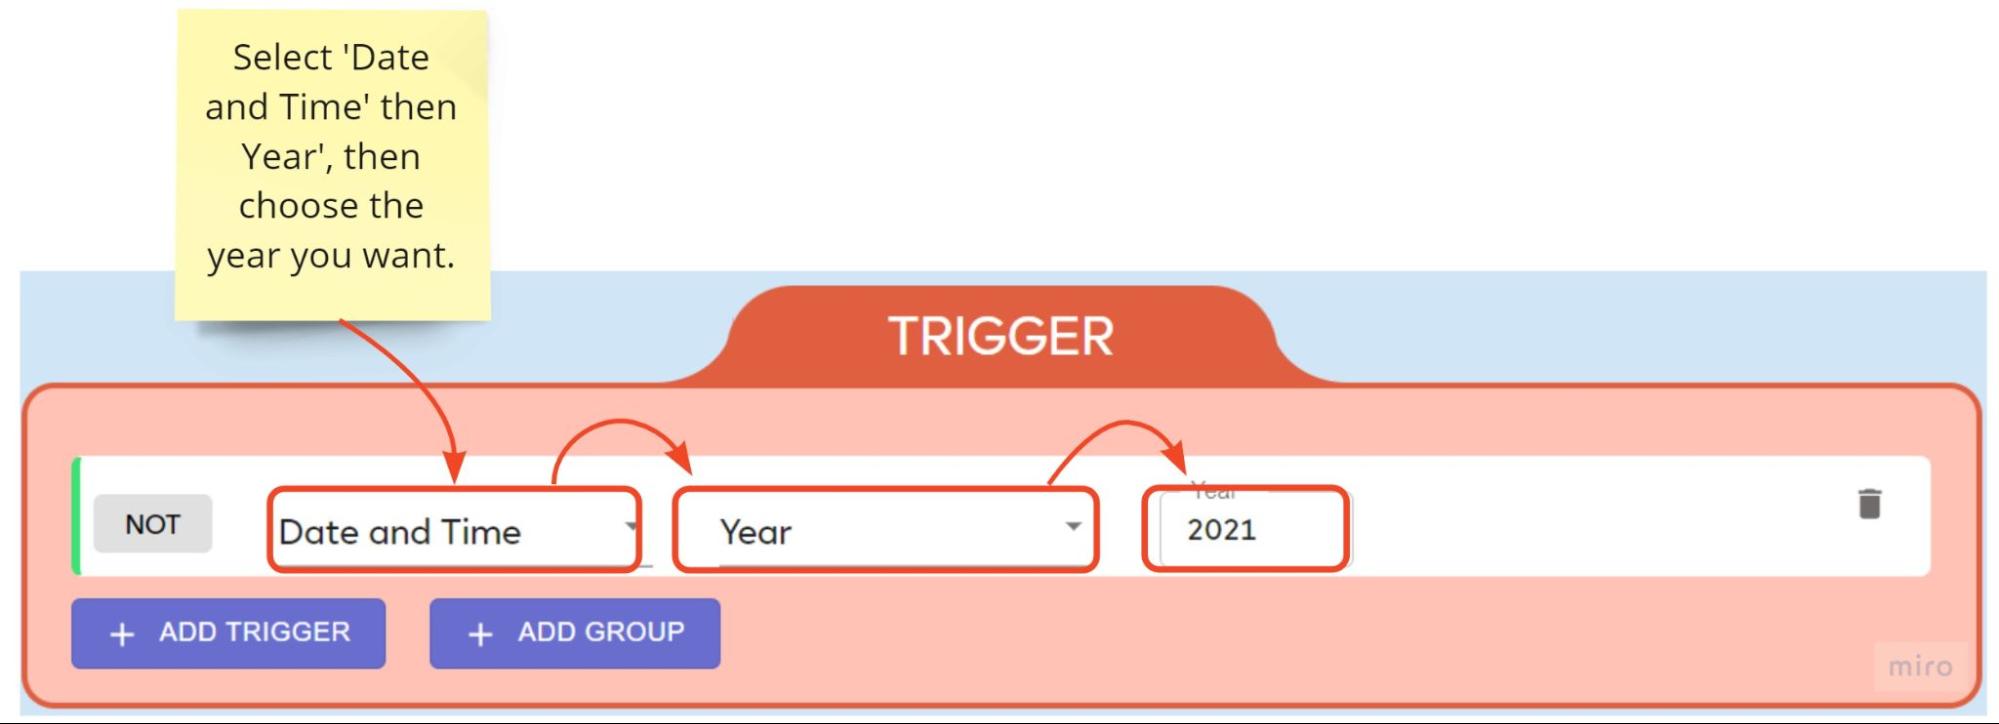
Year
Run the trigger on specific years starting at 12.00 AM on the 1st of January through to 11.59 PM on the 31st December.
Example uses:
- Use this trigger in combination with other date/time triggers for longer-term events that occur every other year or so. For example, maintenance on your heating or air conditioning systems. You could create a meshbot to send a notification to building staff to schedule the maintenance on a certain date in a specific year. Or a reminder to replace the light bulbs on a certain floor when they are nearing the manufacturers end-of-life date.
- This trigger can also be used in combination with other date/time triggers to create exceptions. For example, you have a task set to run according to a regular schedule, but don’t want it to happen in a particular year. You would use ‘NOT’
in this case.
Interval
Interval causes the meshbot to re-evaluate the rule every X seconds/minutes/hours/days as required. The trigger activates (becomes true) for a brief period at the interval you specify, and deactivates (becomes false) shortly afterwards. This lets you create ongoing/background tasks that aren’t necessarily tied to a particular date and time.
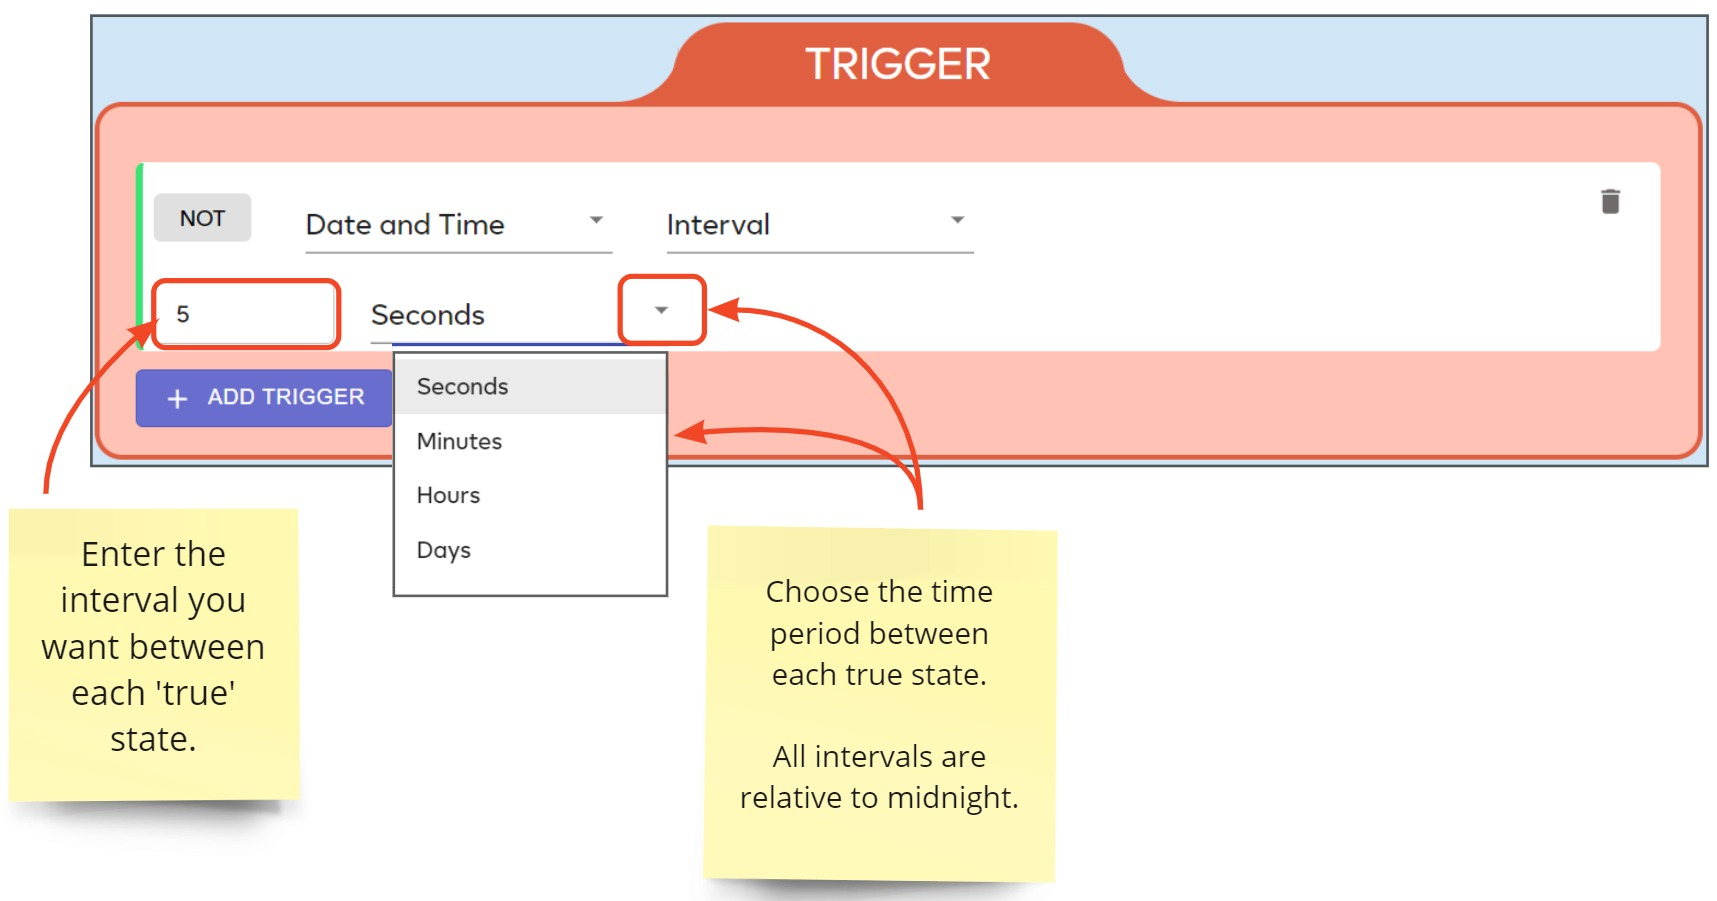
- All intervals are set relative to midnight. For example, a 30 minute timer will run at 00.00, 00.30, 01.00, 01.30 etc, and every half-hour on the half-hour thereafter.
Note – midnight is not the start time – the trigger will run from the moment you activate it, but its run is tied to the midnight-relative blocks just described. - ‘Interval’ makes the action become true for a very brief period then false again right afterwards, rather than leaving it true until told otherwise.
- ‘Interval’ vs. ‘Pulse’. If you simply want to have an action take place at regular times then you are probably better using the Pulse function instead. For example, you want Alexa to issue voice notifications every 90 seconds if a door is unlocked, but stop issuing once it is closed (i.e. the trigger becomes ‘false’).
Once
As the name suggests, ‘Once’ lets you run the trigger as a ‘one-off’ at a specific time: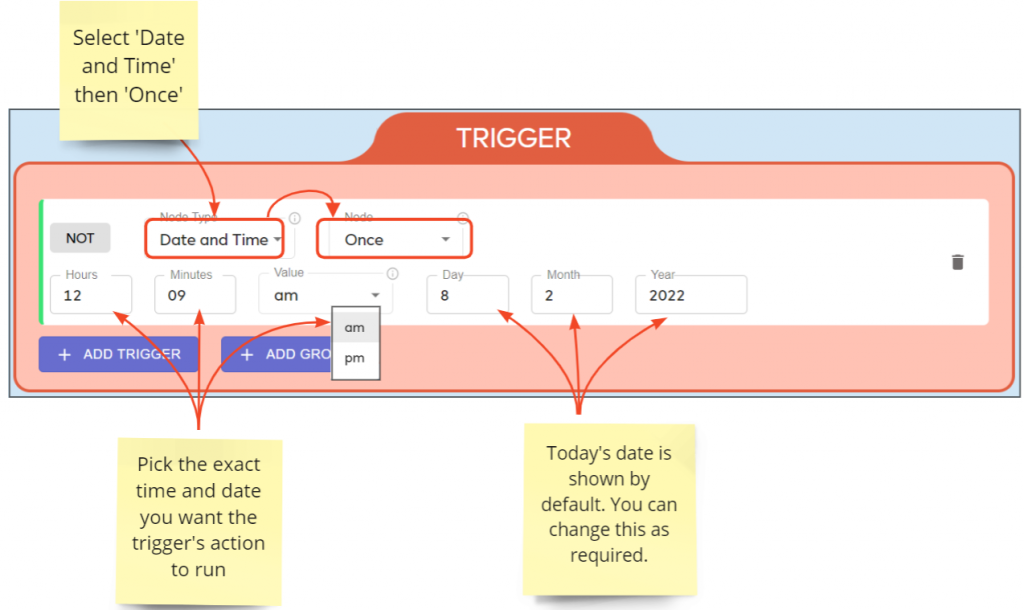
You can combine this option with other date/time triggers using an ‘AND’ or ‘OR’ operator, or simply use it to test that a meshbot works correctly. You can also use it for special occasions you have planned, or to synchronize an action with a specific event in your calendar. For example, to send out notifications to team members to start preparations for a conference that your company is attending, or to remind employees that a fire-drill is scheduled to happen the next day.
If you want to set up events that occur regularly at a set time then you are probably better using the ‘Custom Time’ option instead
Combining Triggers
- You can link date and time triggers with an ‘AND’ operator to create more targeted triggers. Both triggers must be true before the rule will proceed to the action.
- This example shows a ‘Days of the Week’ trigger linked with a ‘Custom Time’ trigger. The full trigger will become active at 8 PM on Fridays and Saturdays:
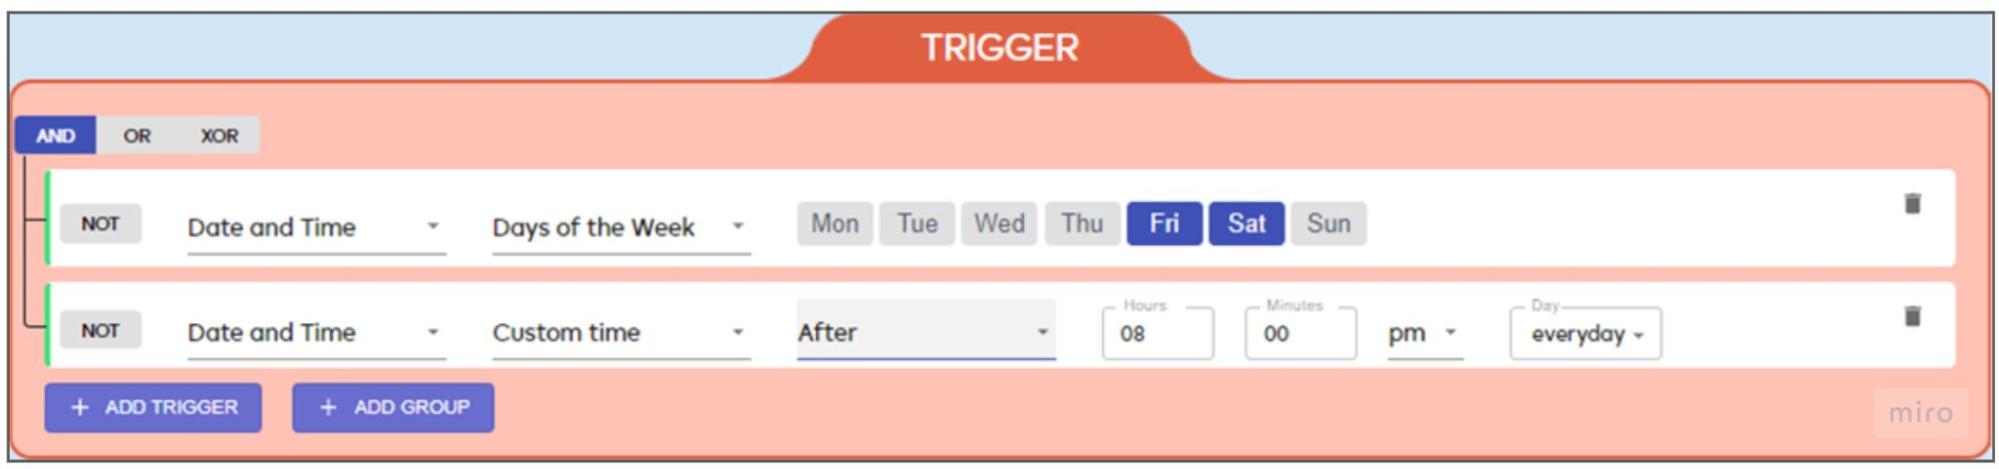
Other operators / logic gates you can use to link triggers include ‘OR’ and ‘XOR’. See ‘Operators’ for more details on these.