Ezlo Ping and WOL Plugin
The Ping and Wake-On-LAN (WOL) plugin lets you monitor the on/off status of local devices and wake them from sleep or hibernation.
Ping – Send periodic requests to test whether a device is reachable (‘on’) or unreachable (‘off’). You can trigger notifications or other meshbot actions based on the on/off status of the target device.
WOL – Send a ‘magic packet’ command to wake (turn on) local devices that are asleep or in hibernation. Simply add the device’s IP and MAC address to the plugin to start using it in meshbot actions. The target device must support the Wake on LAN feature.
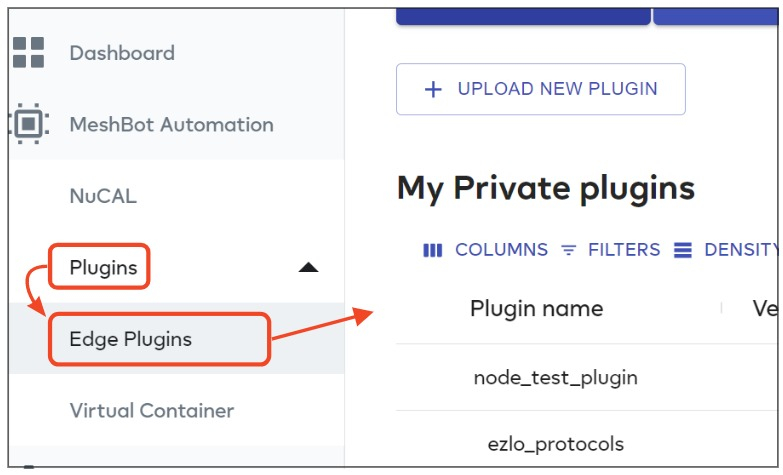
- Login to EZLogic then click ‘Plugins’ > ‘Edge Plugins’ in the left-hand menu:
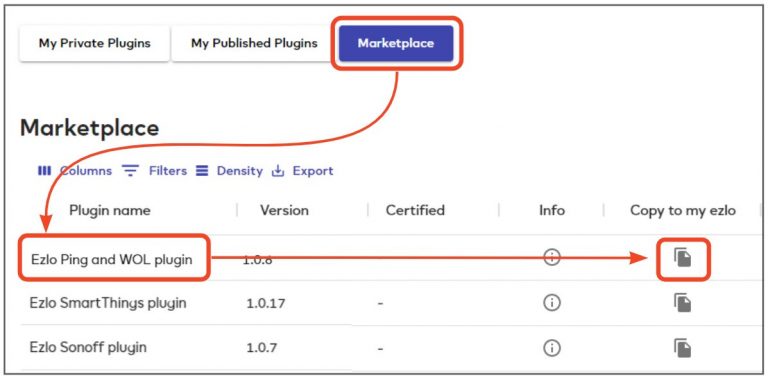
- Click ‘Marketplace’, locate the Ping and WOL plugin row then click ‘Copy to my Ezlo’:
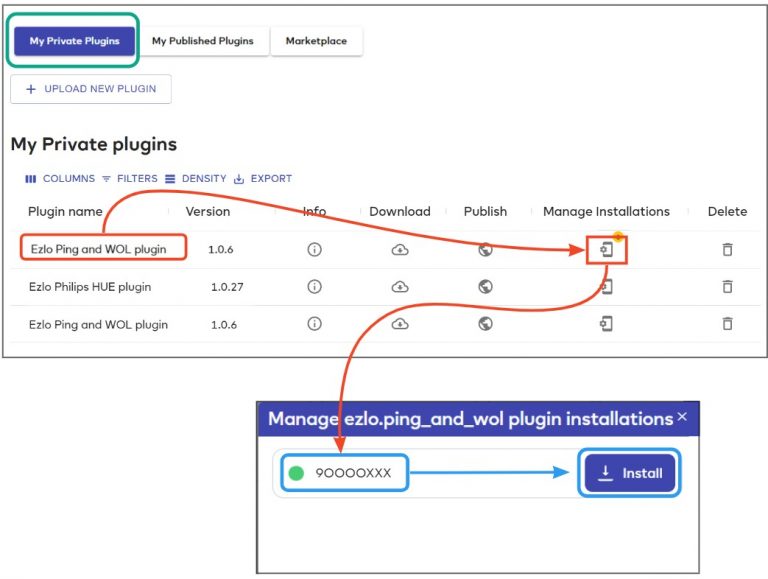
- Next, click the ‘My Private Plugins’ button along the top of the screen.
- Locate the Ping and WOL plugin row then click ‘Manage Installations’.
- Choose the hub from which you want to issue commands to your target entities then click ‘Install’:
- After installation, click the ‘Manage Installations’ icon again then click the ‘Configure’ button next to your chosen controller:
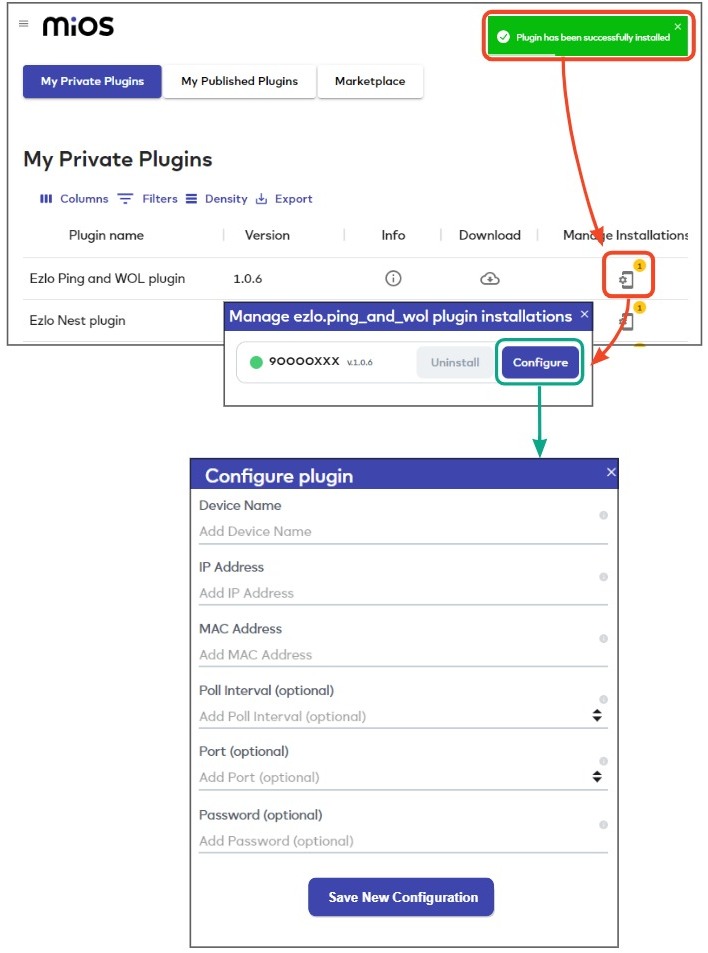
Completing this form will create a virtual device that can monitor and wake one PC. You can repeat this process to create more devices to control other PCs. Complete the fields as follows:
- Device Name – Choose a name that will help you easily identify your Ping and WOL plugin device. A good starting point is to include the name of your target entity and possibly the purpose of the device. For example, you might create devices to wake-up different PCs in your home or office:
Office PC – Ping & WOL plugin
Home PC – Ping & WOL plugin
Kodi HTPC – Ping & WOL plugin
- You can always rename your devices later in the ‘Devices’ area if you decide you need a better name.
- You can create additional devices by simply repeating the configuration procedure.
- IP Address – Enter the local IP address of your target device. Tools such as the Advanced IP scanner and Fing can help you find the IP address if you need help.
- MAC Address – Enter the MAC address of your target device. Again, tools such as the Advanced IP scanner and Fing can help you find the MAC address if you need help.
- Poll Interval – Optional. Leaving this field blank will implement the default interval of 60 seconds. The poll interval is how often the plugin device contacts your physical device to request its on/off status. This status is used to update the dashboard tile for the device and activate any meshbot triggers which are monitoring its on/off state.
- Port – Optional. Specify a port number for your target server if required. Ports 7 or 9 are only for if you are using port forwarding on your router. If you are just using the plugin on your local network then the port number does not matter (you can leave the port field blank).
- Password – Optional. Enter a password if you know your target server requires authentication before it will allow the plugin to connect.
Click ‘Save new configuration’ to create your new plugin device.
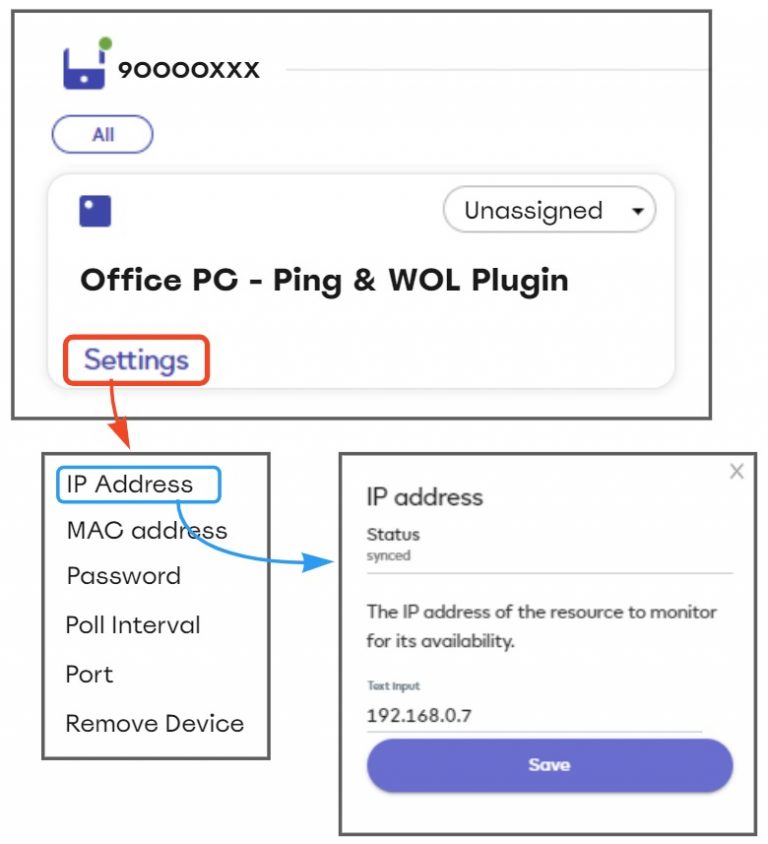
- You can view and edit your new device in the devices area. You can modify the device name, IP / MAC address and other details as required:
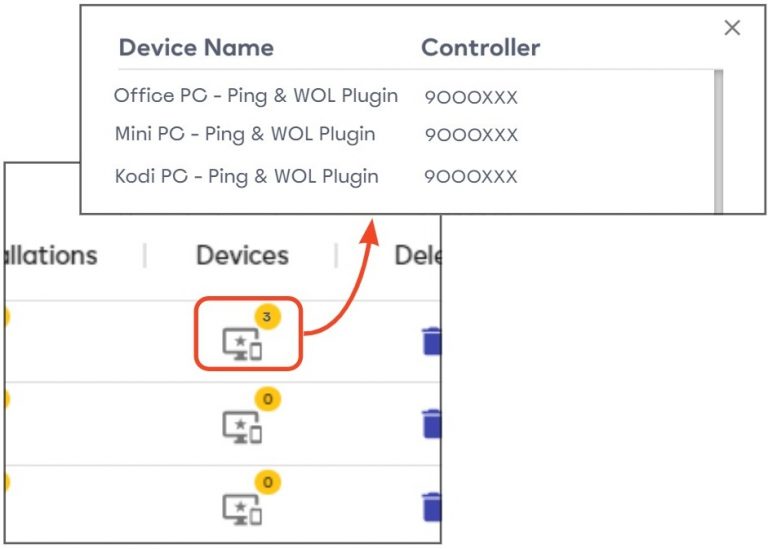
- To add more devices, just click ‘Manage Installations’ > ‘Configure’ again and repeat the configuration process.
- Click the ‘Devices’ icon in the Ping & WOL plugin row to view all devices that you have created:
After completing the setup process, you can control your Ping & WOL devices via our mobile apps, the dynamic dashboard, and in meshbot triggers and actions.
Create a device shutdown meshbot
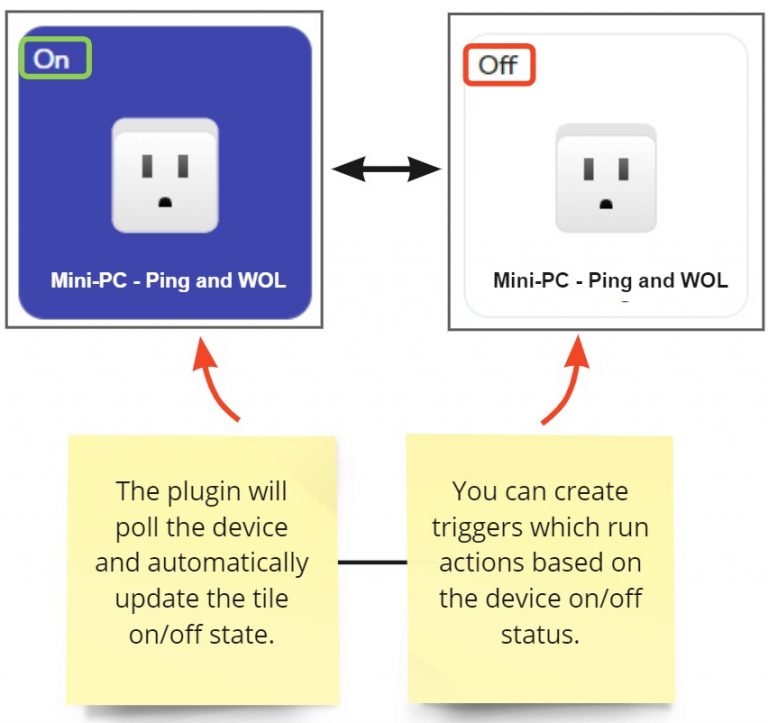
Dashboard tiles
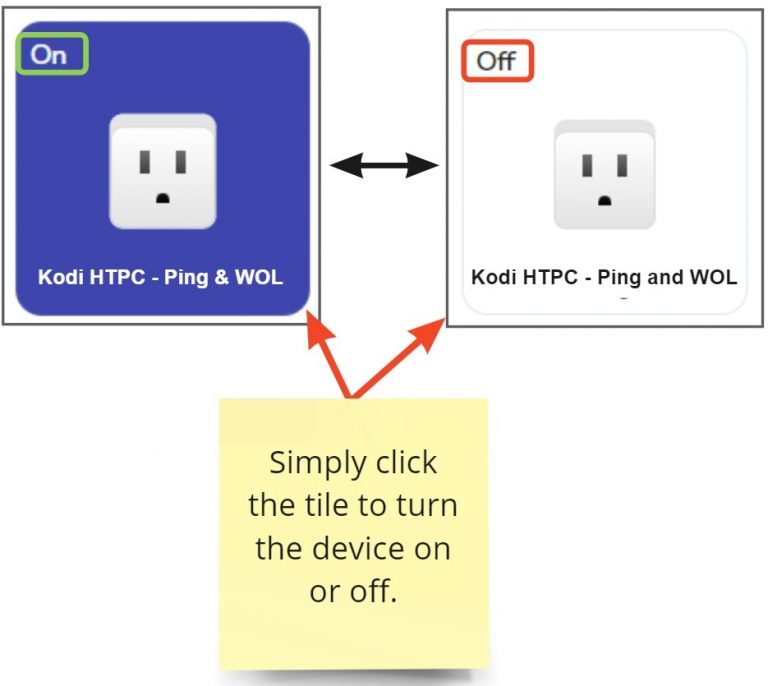
Each device you create using the plugin is represented by a tile on the dynamic dashboard. The ‘ping’ part of the plugin automatically polls your physical device and updates the tile status accordingly:
Notes
- Clicking the device tile lets you toggle it between on or off. However, the native functionality of the plugin only lets you wake devices from an ‘off’ state – it does not let you shut them down.
- So if you click the device tile to ‘off’ it will simply revert back to ‘on’ after the next polling cycle. This is because the plugin did not actually shut down the device. The next ping will report that the device is ‘on’ and update the tile accordingly.
- You can only shut down a device via the tile if you set up a separate meshbot which sends a shutdown command to the device. Click here to see an example of how to do this.
Meshbot Triggers
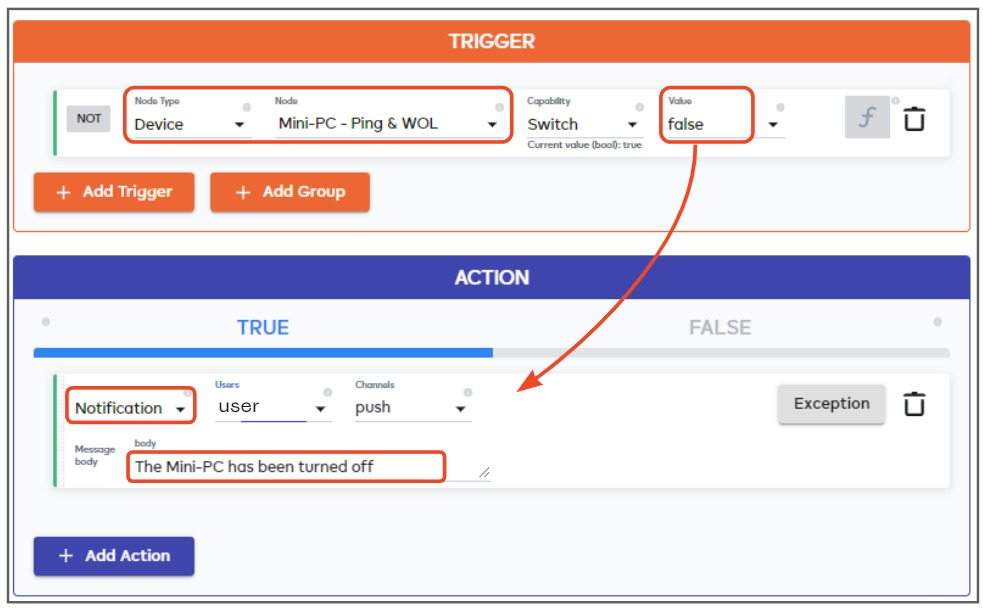
You can create meshbots which use the on/off status of your Ping & WOL devices to trigger meshbot actions. The ‘True’ value represents a device state of ‘On’, while ‘False’ means ‘Off’.
For example, you could create a simple meshbot to notify you when one of your devices is turned on or off:
Meshbot Actions
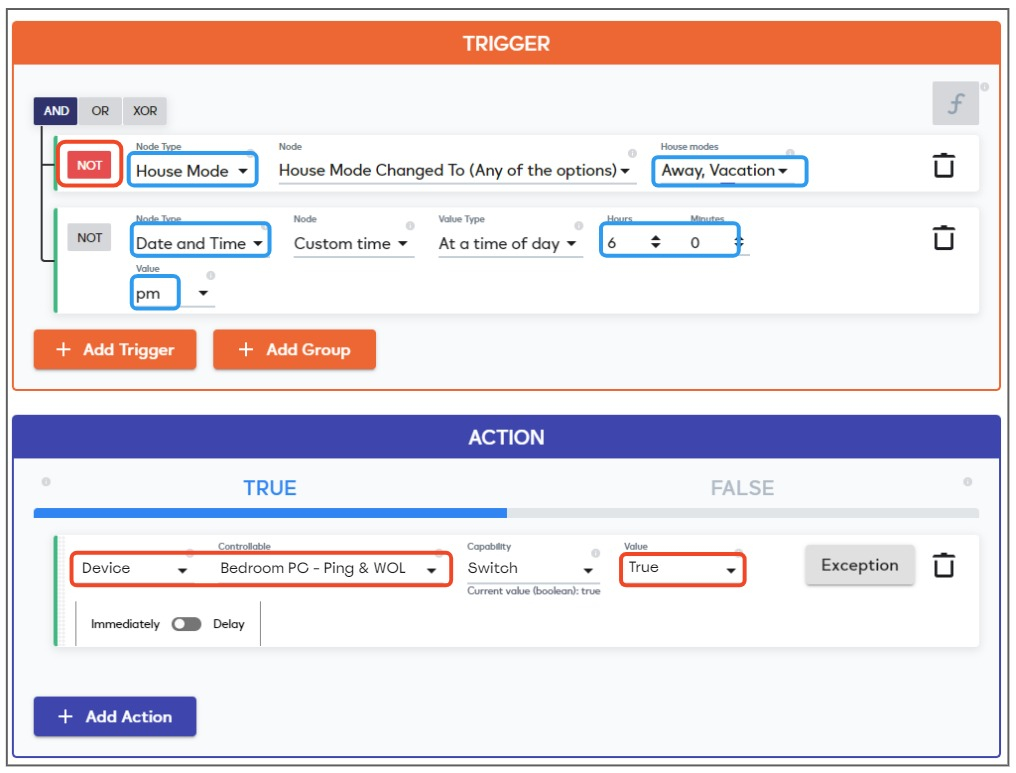
You can turn your target devices on or off by adding them to a meshbot action. Here are just a few examples of how you could use this in your home automations:
- Automatically start your devices at specific times, or when your house is in a certain house mode.
- Start your devices with a voice command to your home assistant, or by tapping a switch on your mobile phone.
- Boot up your PC when you first switch on your bedroom lights after getting home from work.
- Start up a Home Theater PC (HTPC) as part of a wider evening/relaxation scene.
- Assign a button on a remote control or scene controller to start or shutdown your PCs.
- Turn your devices on when geofencing detects that you are a certain distance from home.
Create a device shutdown meshbot
The Ping & WOL plugin alone is capable of waking a device from sleep/hibernation but cannot shutdown a device. See the device tile notes if you want a little more information on this. You can create a work-around by setting up a separate meshbot which sends an ‘off’ command to the physical device if you turn it off via its device tile.
- This example shows how to create a Lua script which sends a Curl command to turn a Kodi HTPC off.
- With some research, you should be able to find similar commands to shut down Windows and Linux PCs.
Step 1 – Create the Lua script
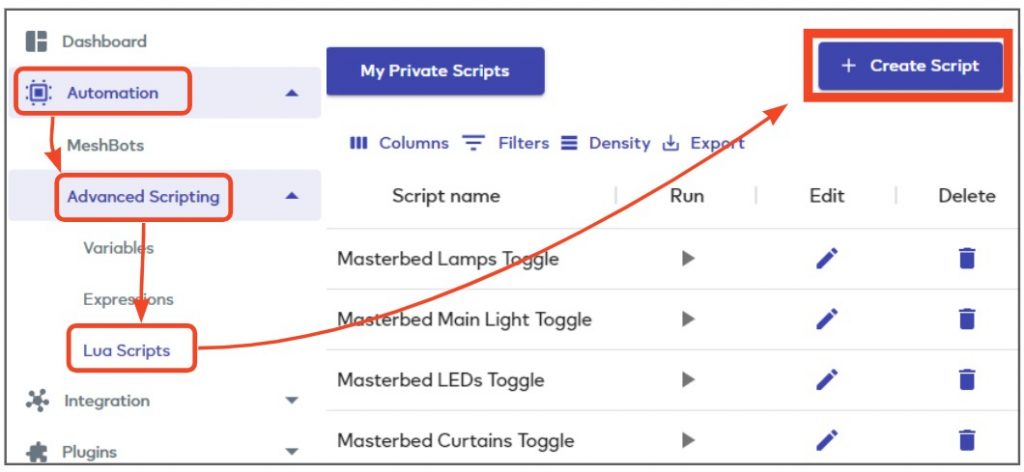
- Open EZLogic then click ‘Automation’ > ‘Advanced Scripting’ > ‘Lua Scripts’.
- Click the ‘+ Create Script’ button at top-right:
-
- Provide a descriptive name for your script. E.g. ‘Shut down my PC’. You will use this name to identify the script when you create your meshbot later on.
- Copy and paste the following command into the ‘Lua Code’ field:
-
- Replace ‘username:password’ with the UN/PW of your target device.
- Replace ‘192.168.0.3’ with the actual local IP of your target device.
- Click ‘Save Script’:

Note – The colored text in the screenshot above is for illustration purposes only.
Step 2 – Create shutdown meshbot
- Open EZLogic then click ‘Automation’ > ‘Meshbots’ > ‘Create New Meshbot’.
- Select ‘Local’ in the meshbot type selection window:

- Give the meshbot an appropriate name then create a trigger which activates if your target PC is ‘Off’ (‘switch’ = ‘false’).
- Add a new action and select ‘Lua Script’ > ‘Select existing Script’ as the controllable type and node respectively.
- Select the ‘Shut Down My PC’ script that you saved earlier in the last drop-down menu. The script will automatically appear in the ‘Lua Code’ field:

- Click ‘Save’ to save your new meshbot. You can now use the dashboard tiles and the mobile app to turn the target PC on or off: