Create your first Meshbot (tutorial)
- See ‘Login to EZlogic’ if you don’t yet have access to EZlogic.
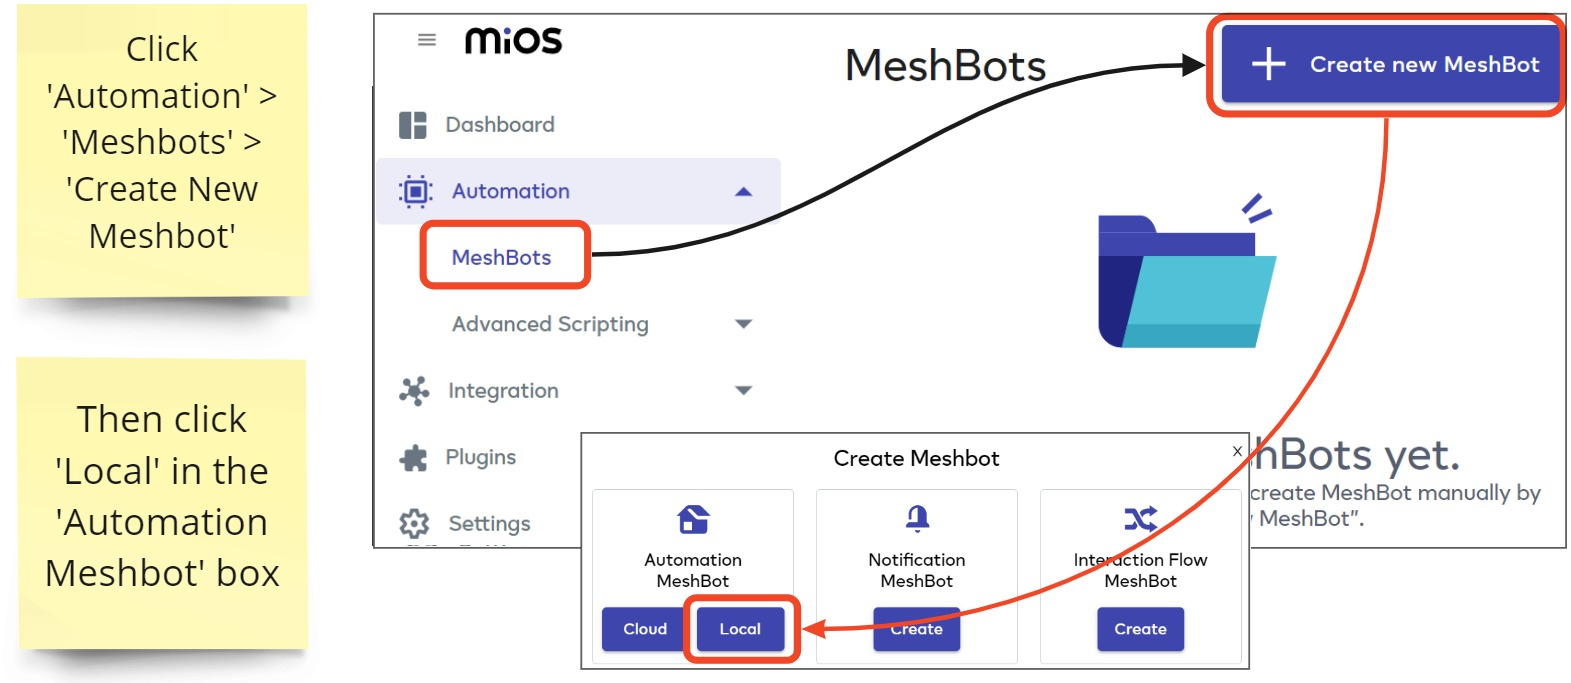
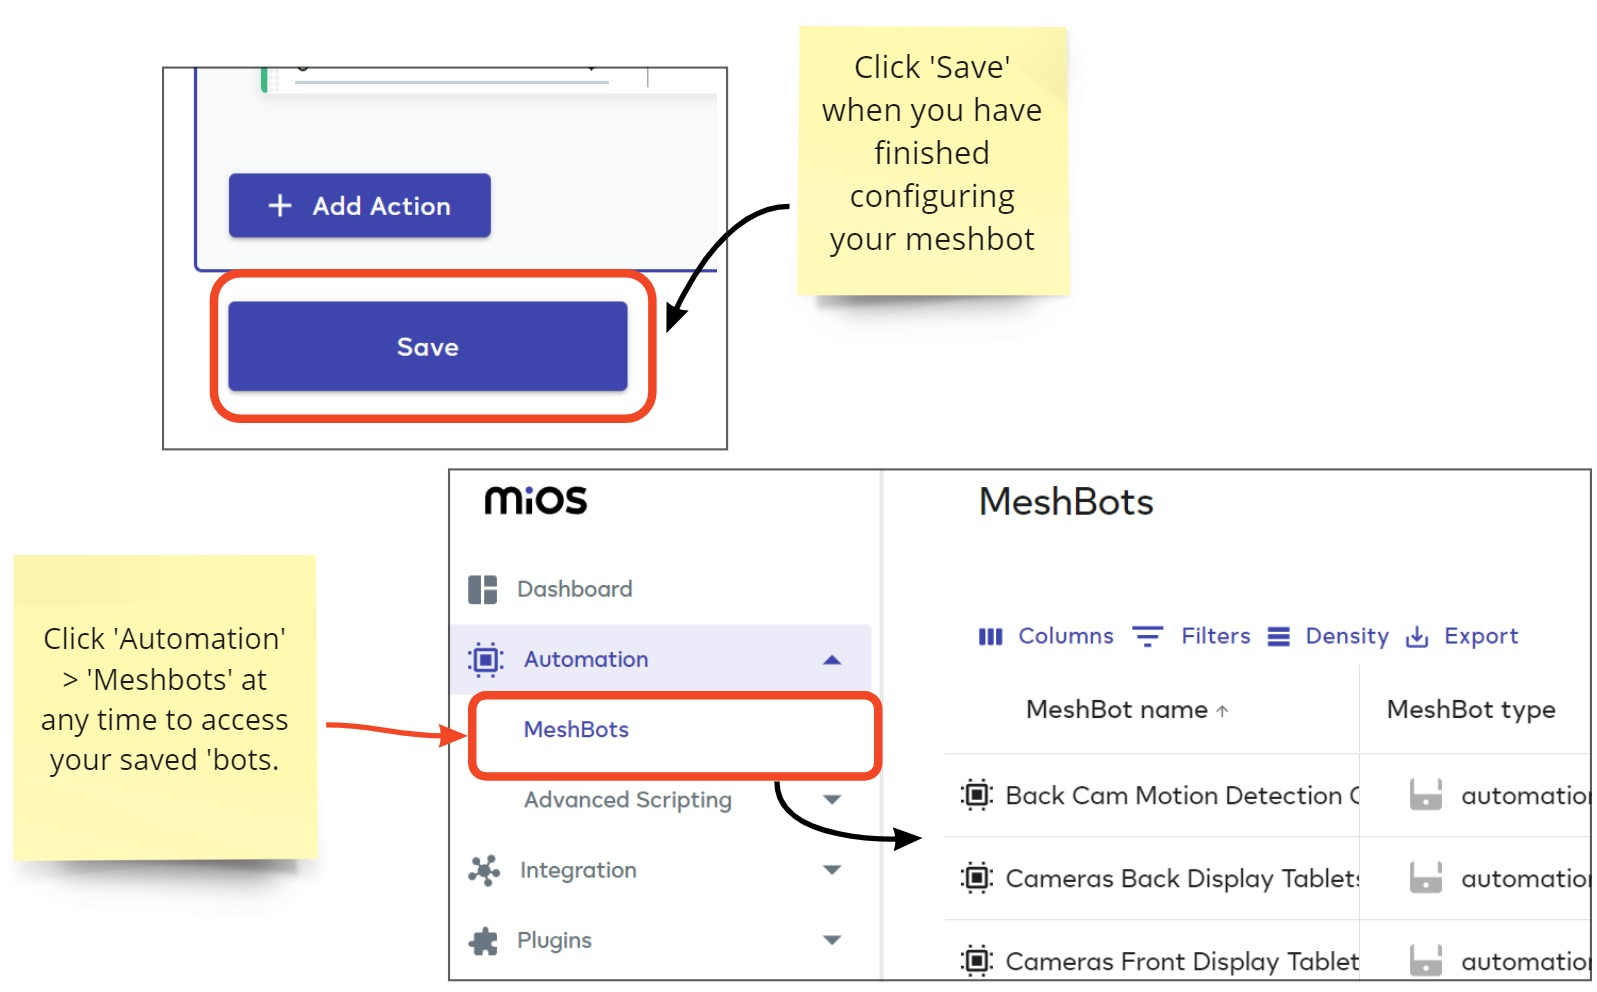
- Open EZlogic then click ‘Automation’ > ‘Meshbots’ > ‘Create New Meshbot’ > ‘Create’:
A meshbot trigger contains the items and conditions whose status you want to monitor. Once the conditions of your trigger become ‘True’ the meshbot will implement the actions you have set up (more on ‘actions’ later).
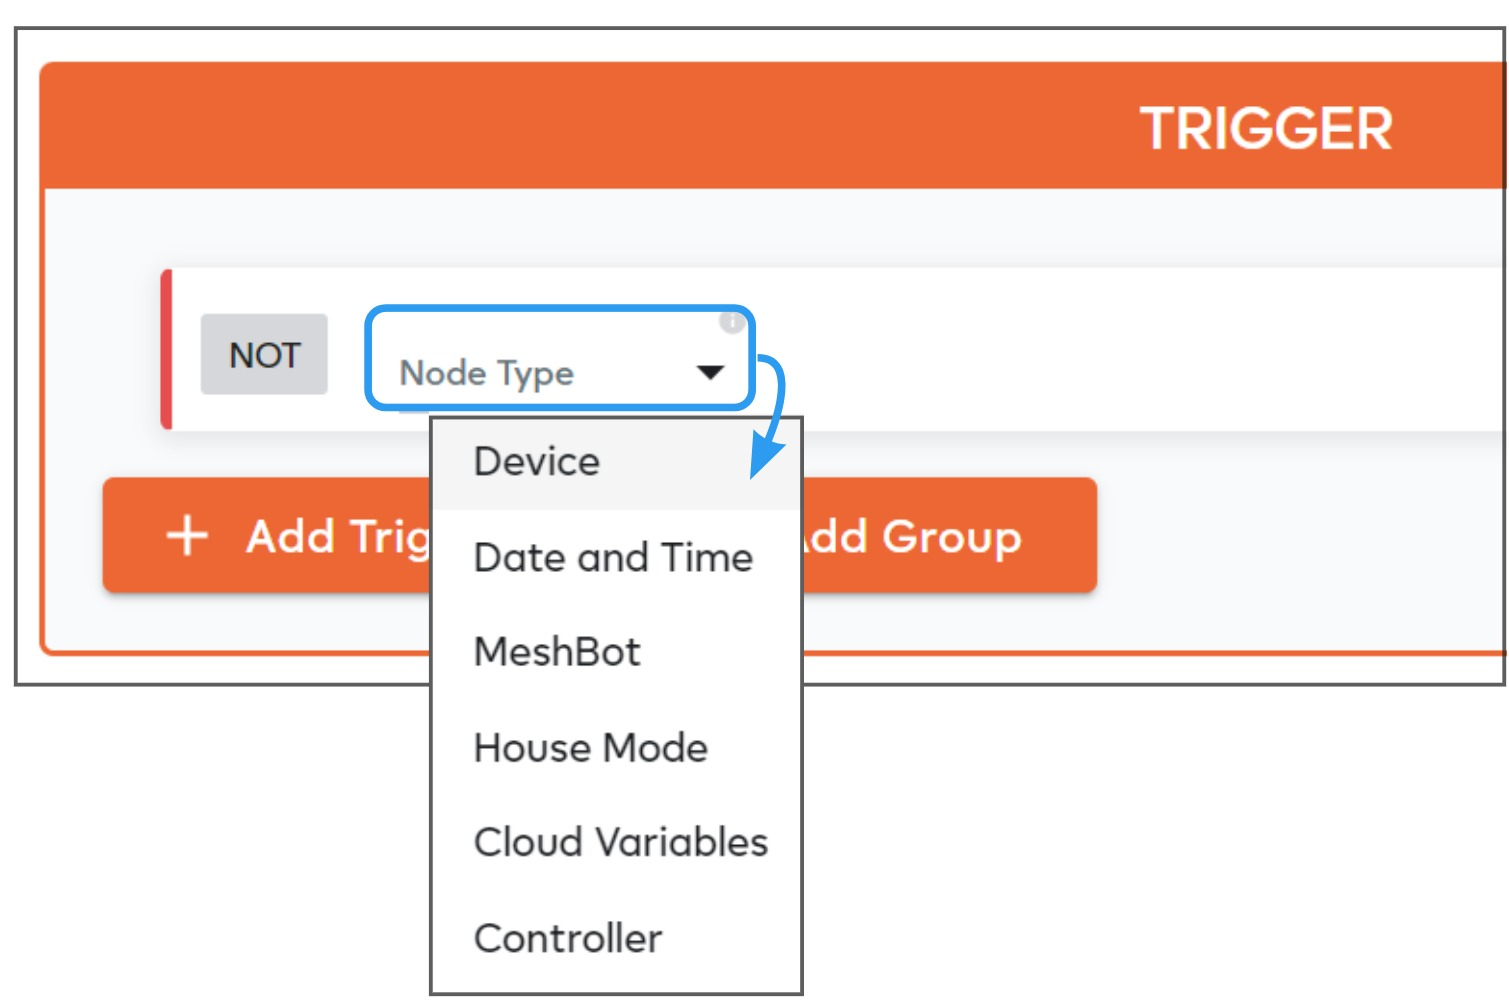
You can choose from the following types of trigger:
-
Device – The meshbot will run its actions when a device changes status or is in a particular mode. For example, if the temperature changes, or a door opens, or motion is detected. See the Device page if you need more help with this.
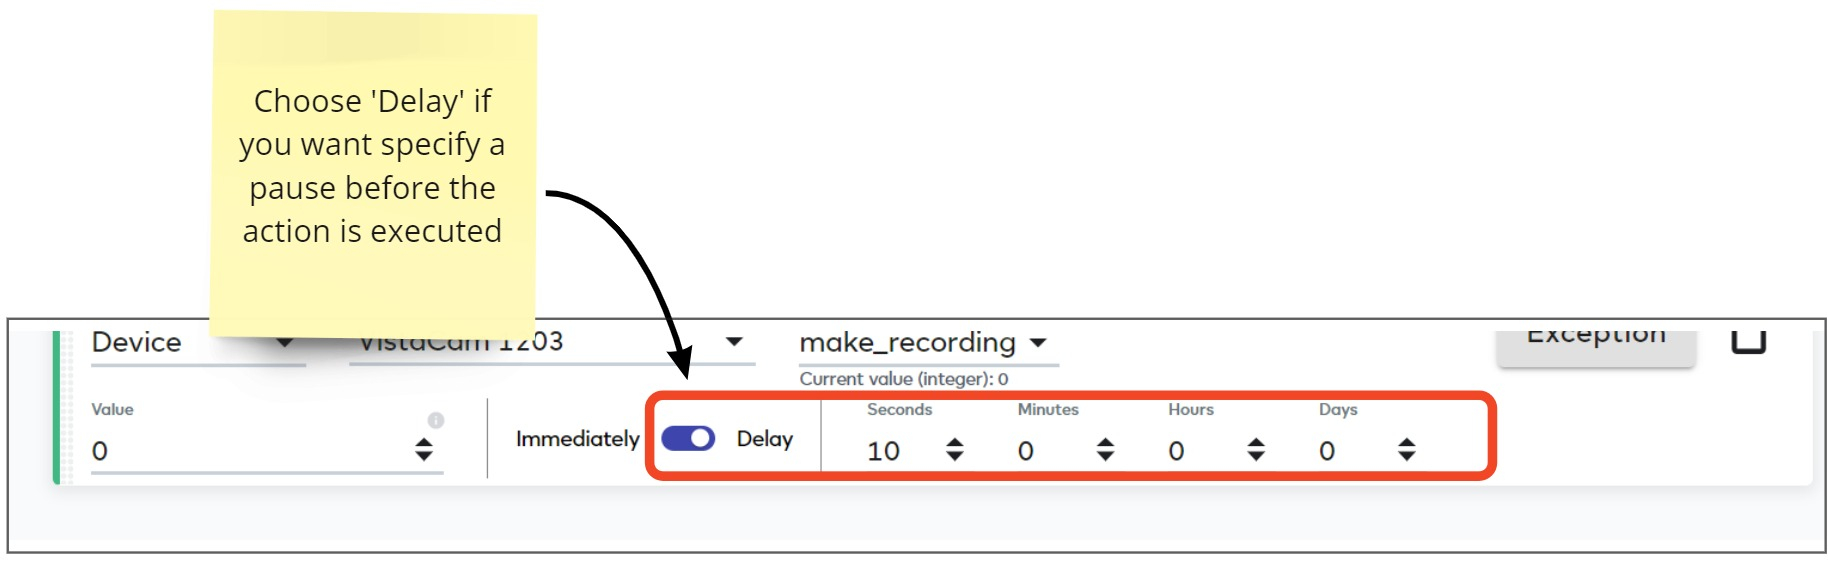
Some devices have capabilities that let you set a custom value:
- Expression – An expression is a piece of code which is capable of housing various values. You can reference these values in a meshbot and use it to trigger an action. See the Expressions page if you need more help with this.
- Value – Enter a specific integer or state that you want to use to activate the trigger. Values may be boolean (true/false) or an integer (a number, scale or percentage) depending on the requirements of the device capability.
- Variable – A variable is a user-created item used to house a specific piece of data. For example, you could use a variable to store the ‘on/off’ state of a switch, or the temperature from your thermostat, or some data from an external resource such as a website. See the Variables page if you want more information
- Date and Time – The meshbot will activate according to a schedule of your choice. This could be at a specific time or daily, weekly, monthly, at certain intervals, or at sunrise/sunset etc. See the Date and Time page if you need more help with this.
- Meshbot – The meshbot will run based on the outcome of the actions of another meshbot. See the Meshbot page if you want more help with this.
- House Mode – A house mode is a collection of device settings that let you set the status of a range of devices with a single click. Each mode is preconfigured to arm devices and take actions in accordance with typical user needs during that time. For example, ‘Night Mode’ will arm all of your sensors and alarms and lock all of your doors. See the House Modes page for more information.
- Controller – Use the status of your smart-home hub to trigger actions and scenes. You can trigger actions based on the controller’s battery level, charging status or whether it currently has a connection to MiOS cloud services. See the controller help page to learn more about this type of trigger.
- Expression – Expressions let you retrieve the current status or setting of a device and use that value as the condition of your trigger. For example, if the current temperature of your thermostat is X degrees Fahrenheit then turn the trigger true and run an action. See the Expressions page for more help with this node type.
- Local Variable – Use the current value of an existing variable as the condition of your trigger. You can create triggers which activate when a variable achieves a specific value (e.g., when variable ‘X’ = ‘27’ or when variable ‘Y’ = ‘False’). You can also use a comparison of one variable with another variable to trigger your action (e.g. if ‘Current Temperature Variable’ >= ‘Switch on the AC Variable’). See the variables help page for more assistance with this node type.
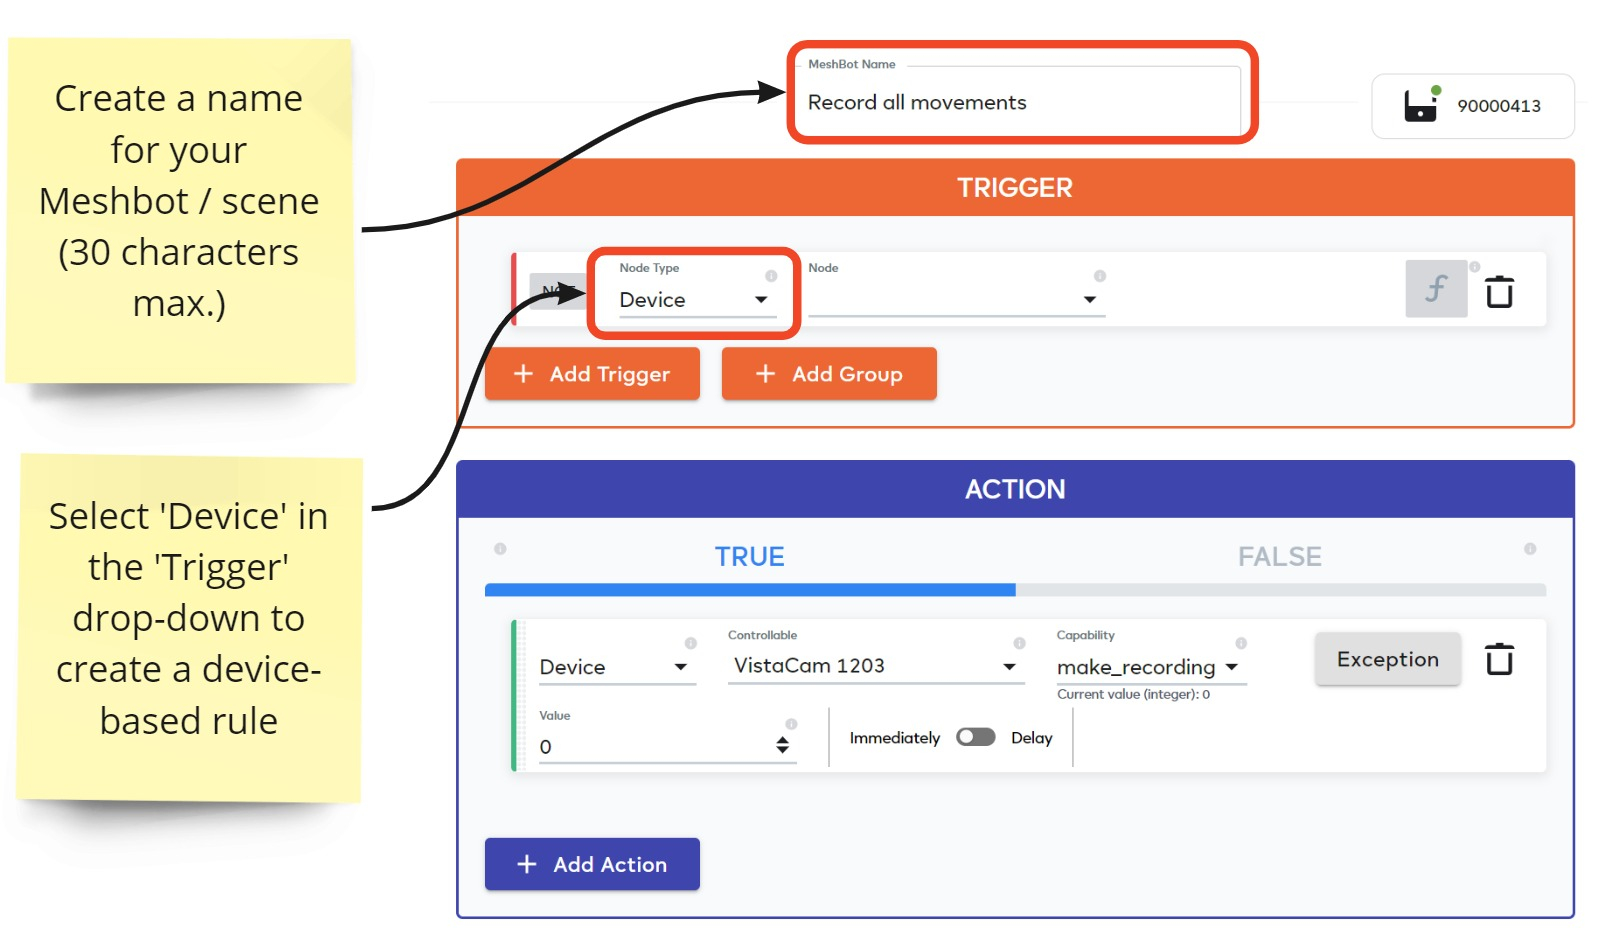
In this example we will create a simple meshbot which tells a camera to make a recording IF the motion detector detects movement under any circumstances. We therefore select ‘Device’ as the meshbot type in the first drop-down:
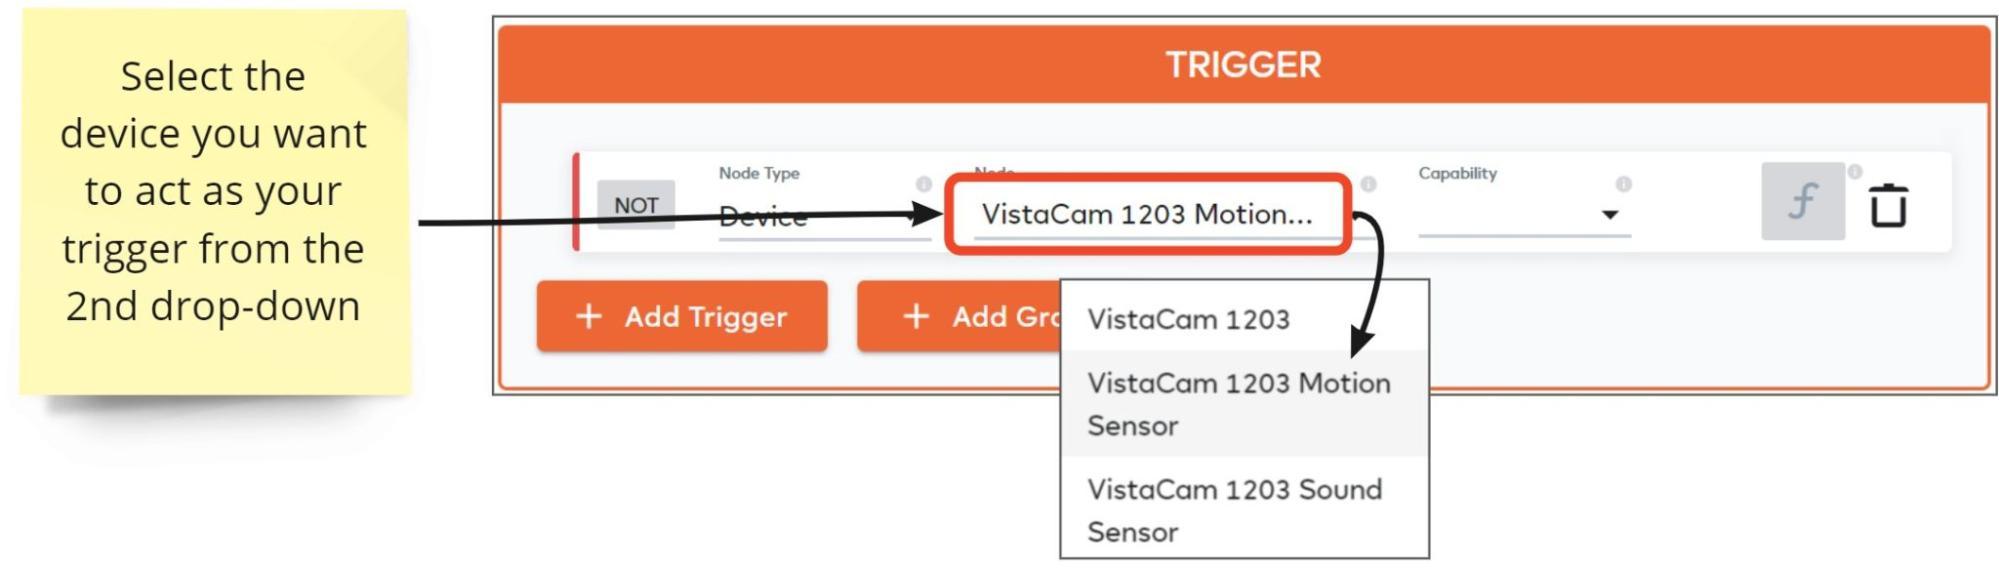
Choose the device which you want to use to trigger the action. In our example, we select the ‘VistaCam 1203 Motion Sensor’:
This activates the capabilities menu which shows all possible activities, features and statuses that the chosen device can report to EZLogic. If the condition in the capability menu is detected then EZlogic runs whatever action you specify in the ‘Action’ panel.
In our simple example, we just want to create a recording if the motion sensor detects movement under any circumstances, so we choose ‘Motion’:
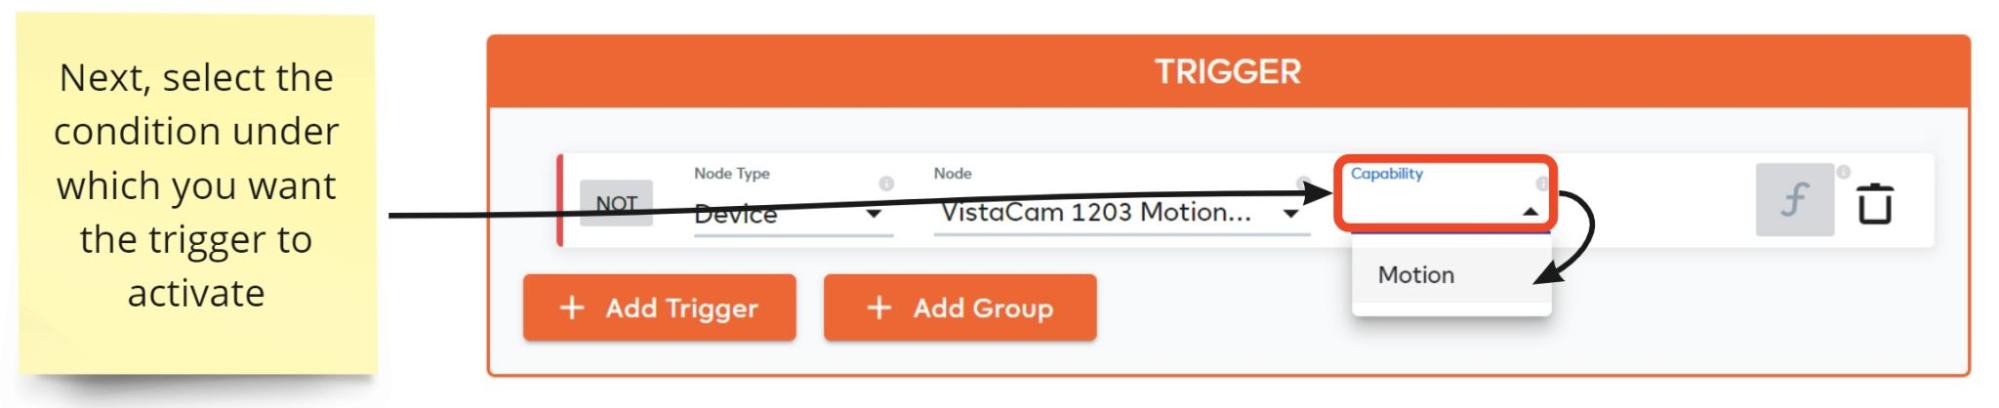
Note – The capabilities shown for your brand of device may differ to the simple ‘Motion’ shown above. For example, you might see options such as ‘…whether armed or disarmed’, etc. Choose the capability that best fits your requirements.
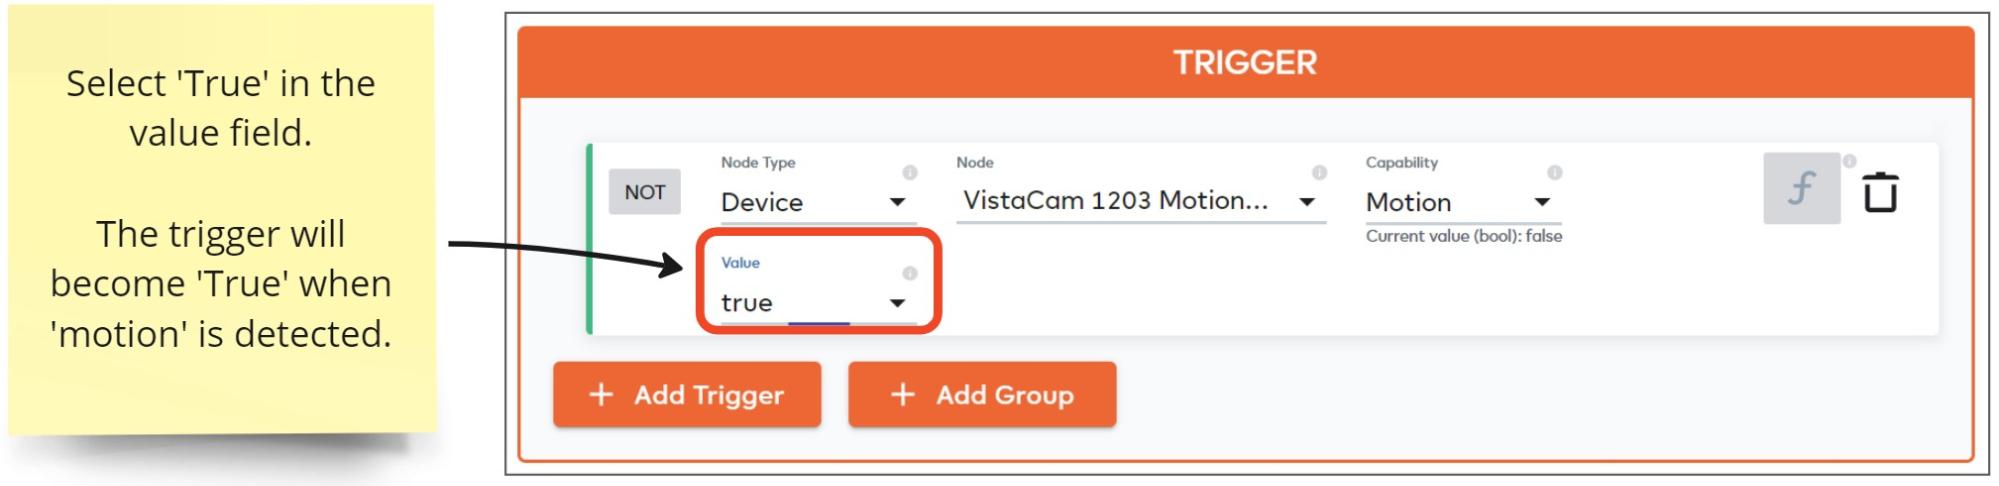
Finally, select ‘True’ in the value field. This means the trigger will become true if the capability (motion) is ‘True’. If you instead chose ‘False’ then the trigger would be true whenever motion was not detected:
At this point, our simple trigger is complete and we can move onto the meshbot action. First, however, here’s some more details about the other options you can use in a trigger. These items are not essential to our trigger so you can skip them if you desire:
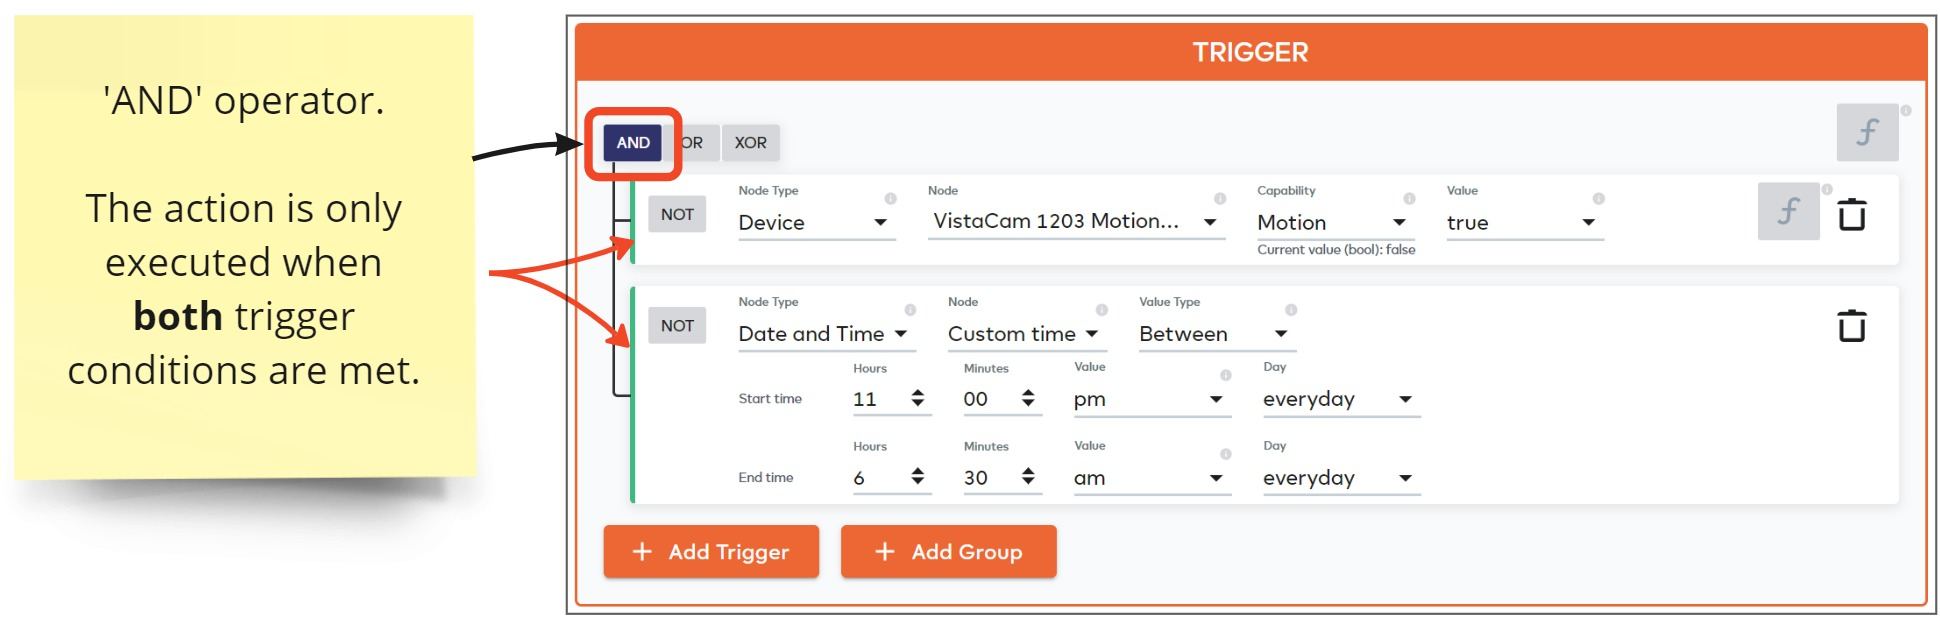
‘Operators’ appear if you click the ‘Add Trigger’ button. They let you set the relationship between multiple triggers in your trigger group. For example, you may want to fire your action if motion is detected ‘AND’ the time is between 11 PM and 6.30 AM.
- AND – Executes the action when the conditions of all linked triggers are met. For example, ‘When the motion sensor detects movement’ AND ‘The time is between 11 PM and 6.30 AM’:
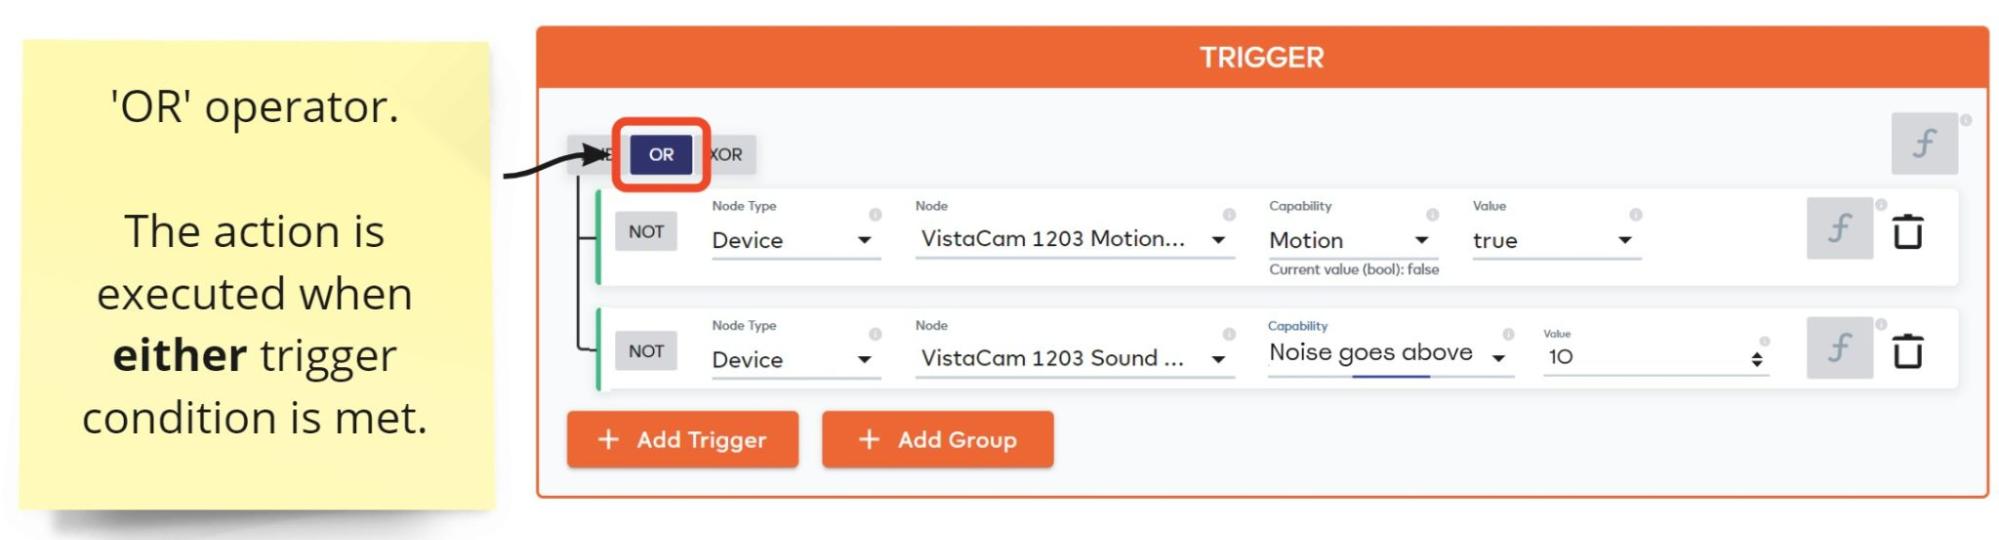
- OR – Executes the action when any of the conditions in the linked triggers are met. For example, ‘When the motion sensor detects movement’ OR ‘The ambient noise goes above a certain level’:
- XOR – Executes the action only if exactly one of the conditions is true and all other conditions are not true. This does have its uses, but they are quite niche/advanced.
- NOT – This means ‘if the reverse of the named condition is true then proceed’. If we clicked ‘NOT’ in our example then it would trigger the action when the sensor did not detect motion. Similarly, if we chose ‘Wednesday’ as the trigger day, then clicked ‘NOT’, it would execute the action on all days except Wednesday.
A trigger group exists when you add more than one trigger to a meshbot. Trigger groups let you use the ‘AND’, ‘OR’ and ‘XOR’ operators to their full potential, to create complex scenarios which target very specific situations. They also allow you to consolidate the many triggers for an action in a single place. Without them, you may have to create separate meshbots with different trigger-actions to accomplish the same overall task.
See the ‘Trigger Groups’ section for a more detailed explanation of how to use trigger groups in your meshbots.
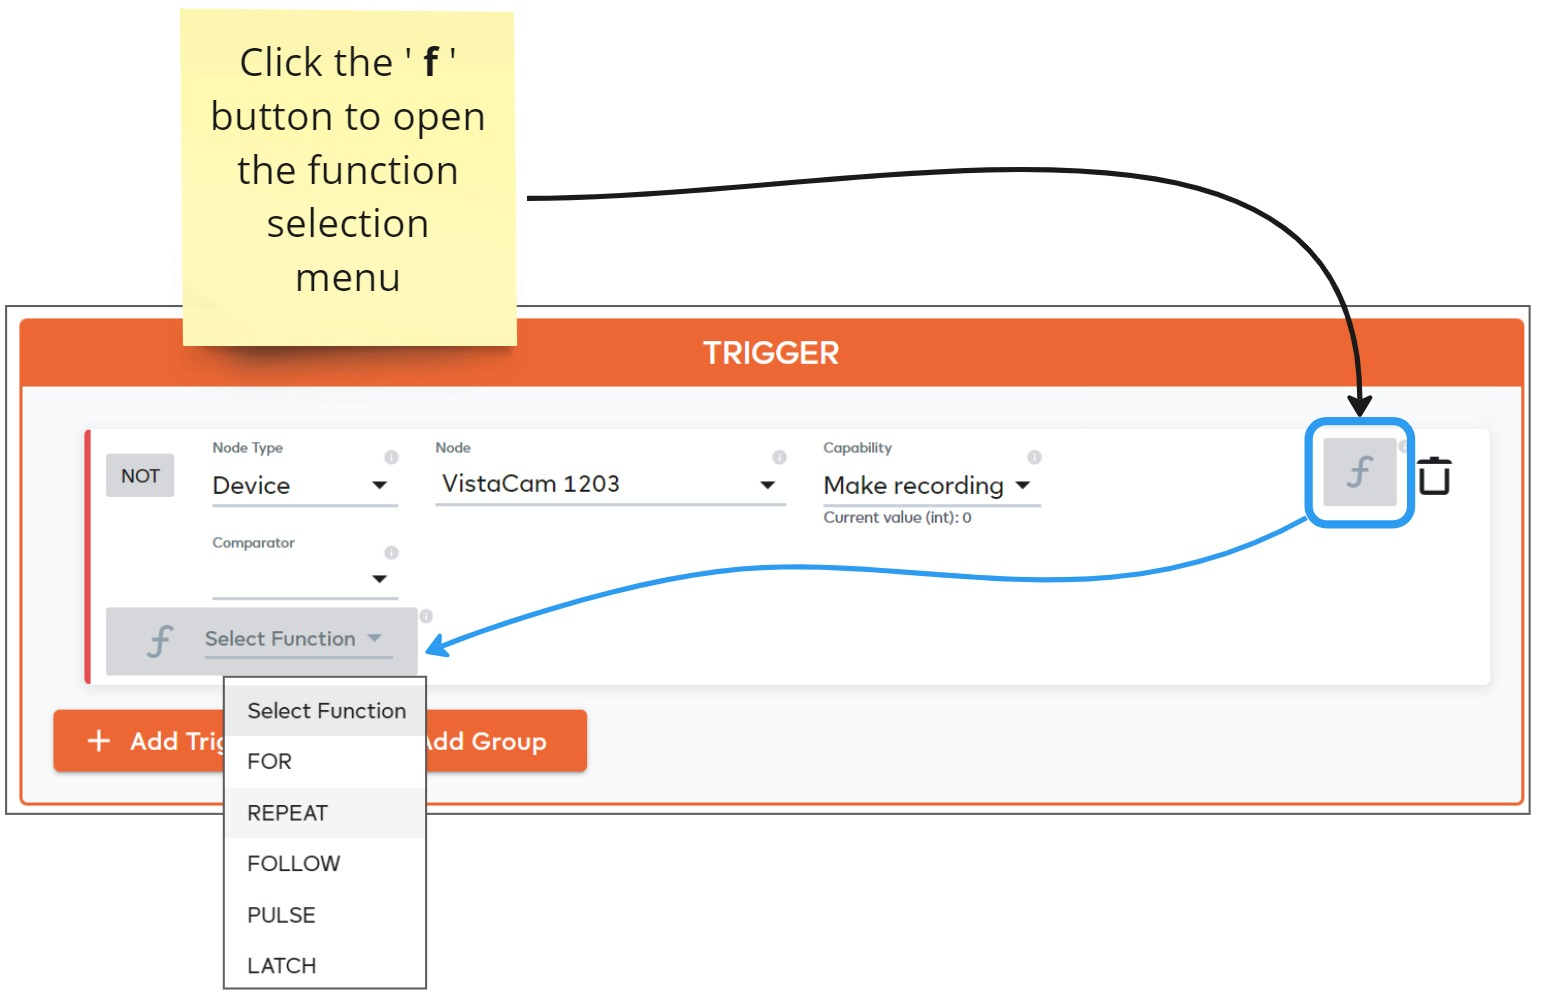
You can choose from the following types of function:
- FOR – The trigger only activates if your condition remains true for the length of time you specify. For example, a door must remain unlocked for 3 minutes before sending out an alert notification. See the FOR page if you want more help with this.
- REPEAT – The trigger only activates if your condition is true multiple times during a set time-period. For example, a security camera only starts recording if a motion sensor is tripped 3 times in 30 seconds. See the REPEAT page if you want more help with this.
- FOLLOW – Temporarily keep the state of a trigger at ‘true’, even when its conditions have become false. For example, to keep a hallway light switched on for 3 minutes when a motion sensor detects movement, even if the person stops moving. See the FOLLOW page if you want more help with this.
- PULSE – Lets you run actions which repeat at an interval of your choice based on whether or not the trigger is true. For example, you want Alexa to issue voice notifications every 3 minutes if your front door is left open. See the PULSE page if you want more help with this.
- LATCH – Locks a trigger at true indefinitely once its condition becomes true. It will remain true until the trigger is reset. For example, you have a trigger which activates when a dynamic variable hits a certain value, but you don’t want the trigger to become false (and stop the action) if the variable changes. See the LATCH page if you want more help with this.
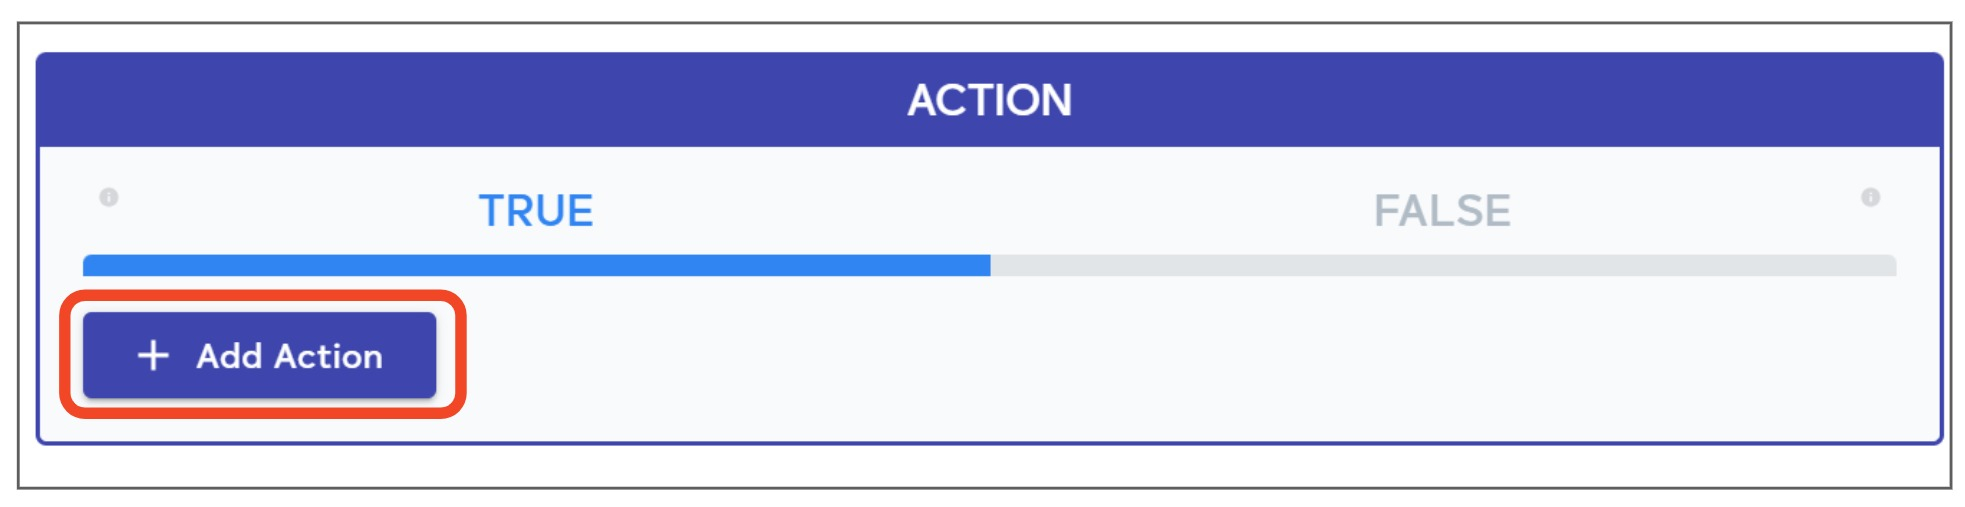
Once you have decided on your triggers you are ready to choose the response-action you want the trigger to initiate. The ‘Action’ panel is directly below the trigger(s) you just specified in the previous step.
Click ‘Add Action’ in the actions panel:
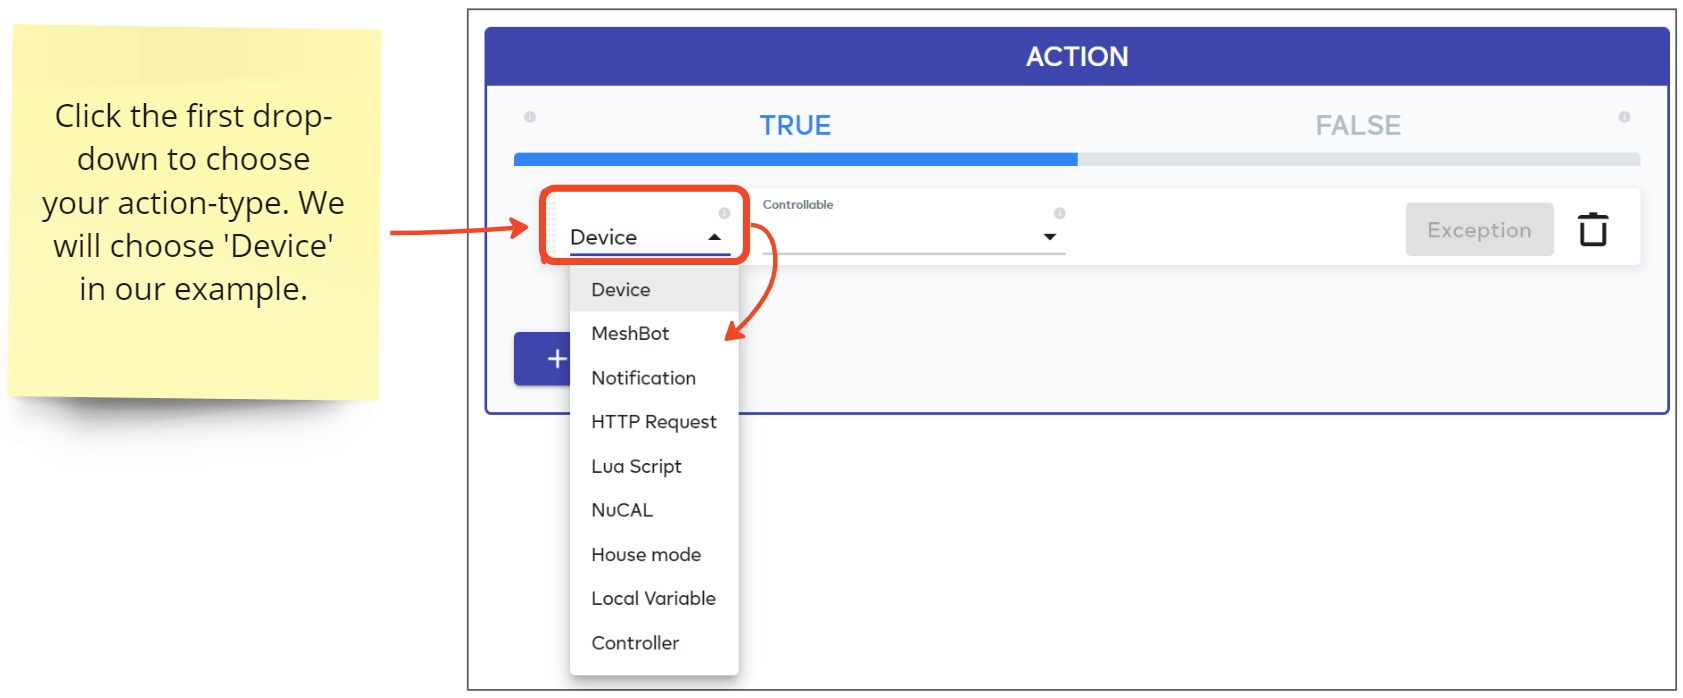
- Device – Commands a device to perform an action if the conditions of your triggers are met. See the Controllable Devices page if you want more help with devices in an action.
- Meshbot — Activates a different meshbot if the conditions of your trigger become ‘true’. For example, you might want your trigger to activate your ‘I’ve left the house’ meshbot. Think of running a meshbot in your actions as like running a subroutine in a program. See the Meshbot as an Action page if you want more help with this.
- Notification – Lets you send email alerts and push notifications to selected recipients if the conditions of your trigger are met. See the Notifications page if you want more help with this feature.
- Lua Script – Runs a Lua script to implement an action if the conditions of your triggers are met. You can find some sample scripts in a community post here. Advanced users and developers can learn more about scripts in our API documentation here.
- NuCAL – Send a command or a request for data to one of EZlogic’s integrated services. For example:
- Create an action to update your Prospectio CRM when a customer makes a purchase from your website
- Automatically create a Shipday delivery to a customer when your CRM registers that your business has fulfilled an order.
- Pull today’s forecast from Accuweather and put this data in a tile on your dashboard.
- HTTP Request – Send a HTTP command to retrieve information from a server or implement a custom action. See the Http Request page to learn more about this type of controllable.
- House Mode – Activate or deactivate one of your house modes if the trigger becomes true. See the House Modes page if you want to learn more about house modes.
- Controller – Reboot or reset your smart-home hub when the conditions of your trigger become true. See the controller-as-an-action page to learn more.
- Local Variable – A variable is a user-created container used to house a specific piece of data. You can use variables on devices with capabilities that can be at a range of levels. The ‘Local Variable’ action lets you directly set the value of an existing variable you have created. See Local Variable and the variables help page for more details.
Our simple, one-trigger example only requires a camera device to make a recording if the motion detector detects movement, so we choose ‘Device’ as the type:
Next, choose the specific device that you want to react to the trigger, followed by the action you want it to take. In our example, we pick the device ‘VistaCam 1203…’ and the action ‘make_recording’:
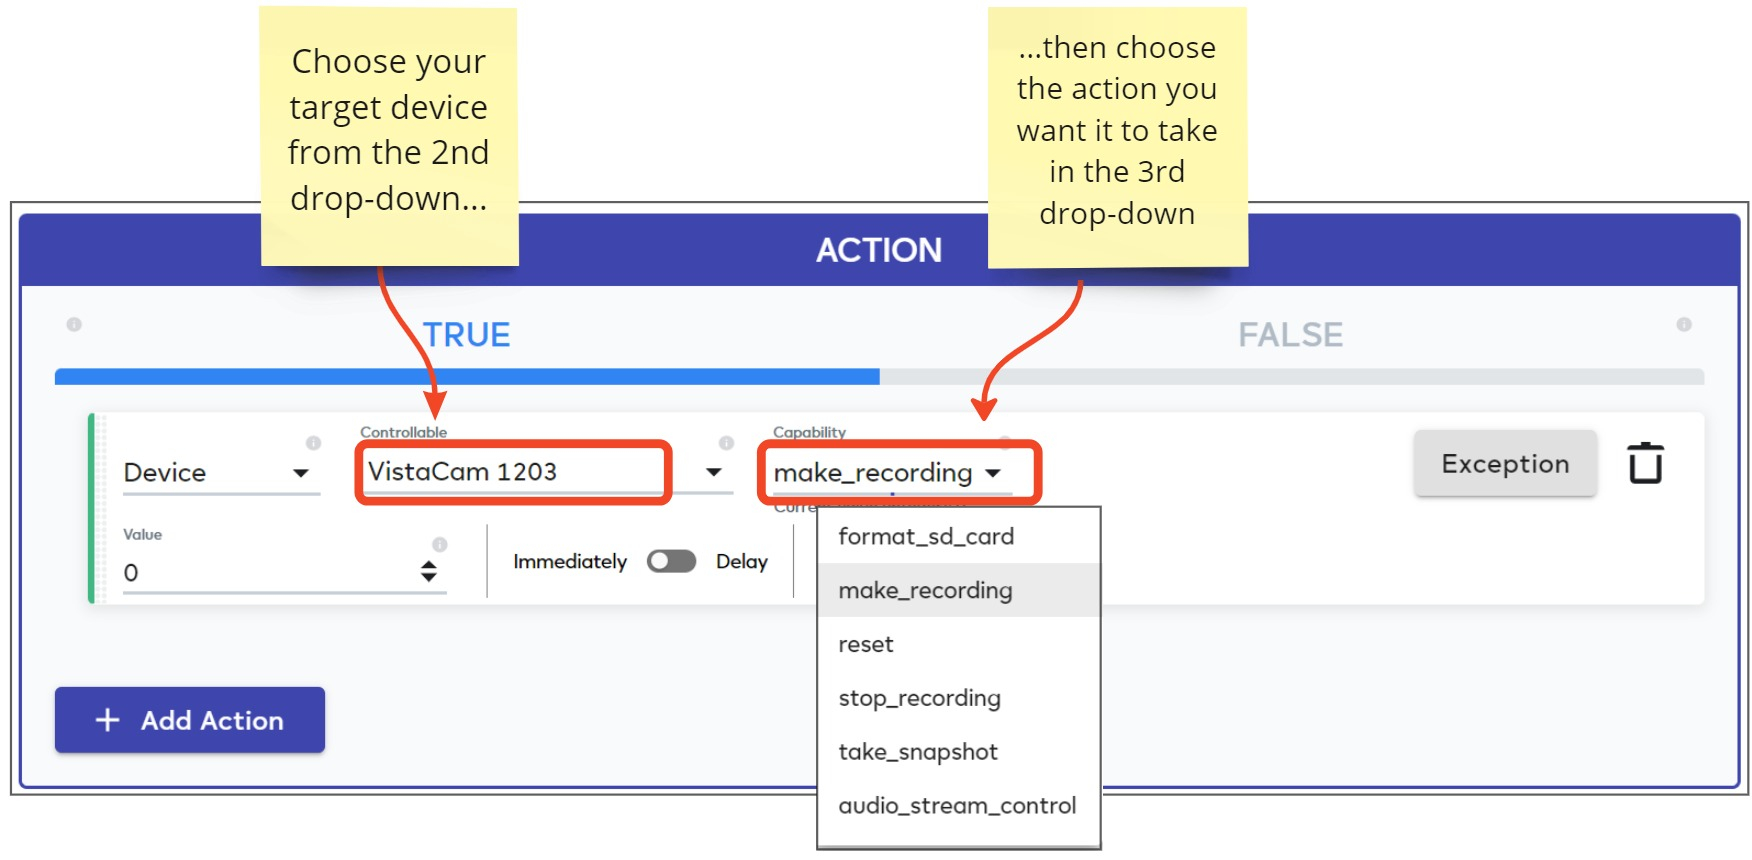
- Exceptions – Exceptions are additional triggers that you can add to specific actions in an action group. For example, you want to implement a device action unless the house-mode is ‘Away’ or ‘Vacation’. Click here if you want to learn more about exceptions.
- FALSE – This tab contains actions that you want to implement if the trigger is not true, or ceases to be true. For example, you set up a rule to turn on your closet dimmer light at 50% whenever the closet door is opened after sunset. This is your ‘TRUE’ action, but the light would remain on unless you specify otherwise. In the ‘FALSE’ tab you can set an action that sets the light to ‘Off’ if any of your trigger conditions are not met. In this example, these are if the door is not open (you closed the door) OR it is not after sunset.
See True / False actions if you want to learn more on this.
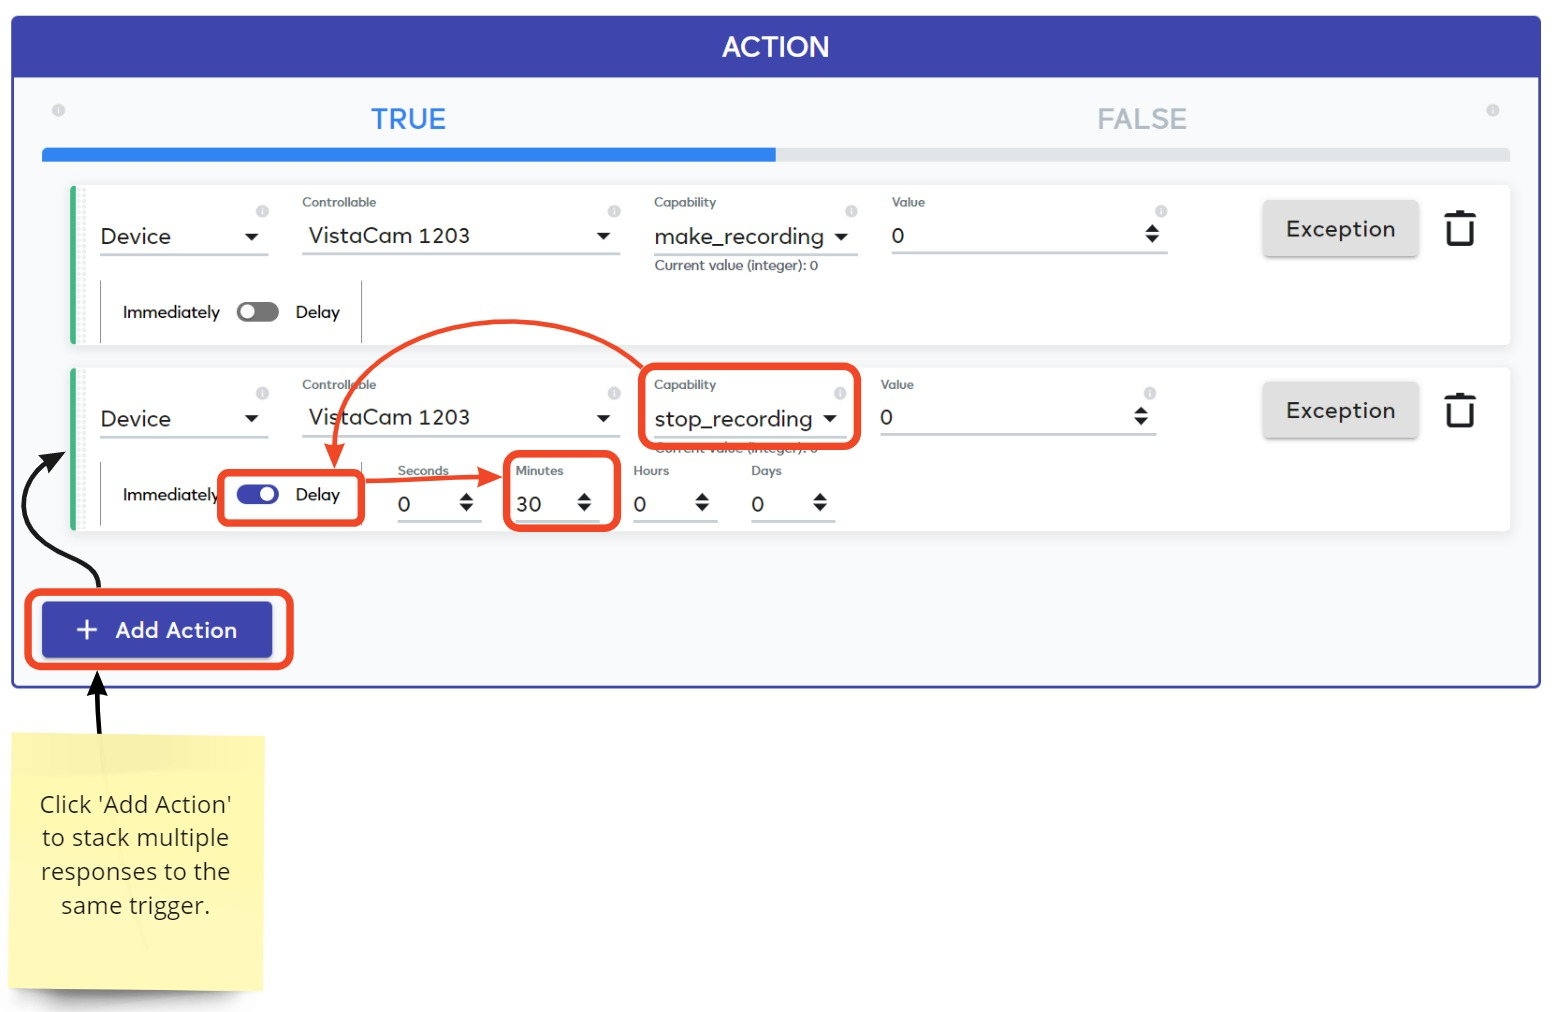
You can specify multiple responses to a trigger by clicking the ‘Add Action’ button. For example, ‘Enable motion sensors’ AND ‘Enable Alarms’ AND ‘Enable Security Cameras’ after 11 PM.
The following screen shows how you could add a second action to specify that the camera keeps recording for 30 minutes:
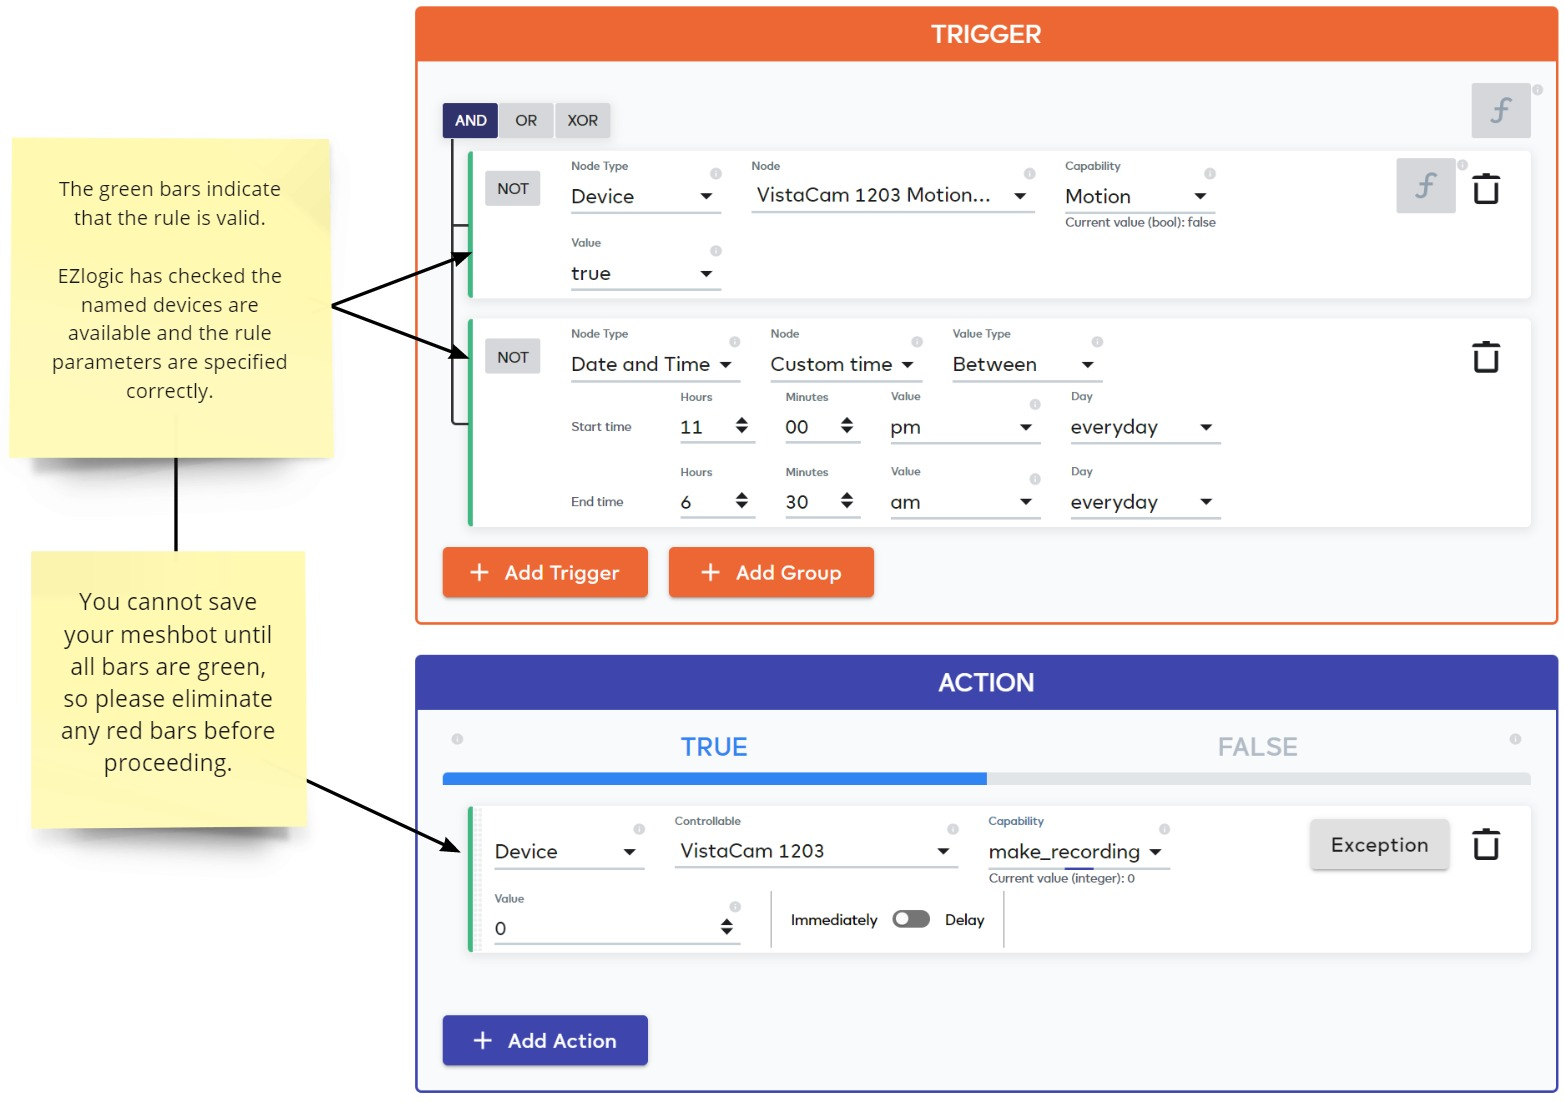
Your competed rule should look something like this:

Active – Use this switch to enable or disable the meshbot. Newly saved bots are active by default, so remember to disable them if you don’t want them to run just yet.
Run Once – Assumes all trigger conditions are true and runs the actions in your meshbot one time. This runs regardless of whether the bot is ‘Active’.
Edit – Opens the meshbot editor and allows you to make modifications to the bot.
Columns – Specify what information is shown on this page. All columns are shown by default except the internal meshbot ID.
Filters – Create commands that specify which meshbots are shown in the list. For example, you can create a filter to show only bots which are active, or of the bot type ‘Cloud’, etc. You can add and activate multiple filters at once. This feature is especially useful if you have a large number of bots.
Density – Simple layout options which control how much white space is shown between each meshbot in the list. The more dense, the more meshbots are shown on a single page.
Export – Generates a .csv file of the meshbots you have listed on the current screen. The .csv reflects any filters you have applied and any modifications to the list columns.