‘LATCH’ Function
‘LATCH’ is a trigger function that keeps a trigger at true indefinitely once its condition becomes true. It will remain true until the trigger is reset.

Why use ‘latch’?
- You have a trigger conditional on a dynamic variable, but you don’t want the trigger to become false if the variable changes. For example, you want your water sprinklers to activate at a certain temperature, but not deactivate if the temperature falls.
- You have a switch that you want to remain on regardless of whether somebody presses it again. For example, you have a device that you want to operate with separate ‘on’ and ‘off’ buttons.
- You want a meshbot to perform an action once if true, but not stop or repeat the action if the condition state subsequently changes. For example, sending a one-time notification if a garage door is open between certain times of the day.
- You want a trigger to become active every year at a changeable date until a specific date. For example, you want your Christmas lights to come on from Black Friday every year until 8th January the following year.
How do I unlatch a latched trigger?
Unlatching a trigger resets it so it responds to changes in its monitored condition again.
You can unlatch a trigger using any one of the methods below:
- Place it in a group with non-latched triggers linked by the ‘AND’ operator. If any of the non-latched triggers become false then the group becomes false. This resets the latched trigger. See Example 1.
- Name the latch then use a meshbot action to unlatch the trigger. This is especially useful for standalone/single latched triggers. See Example 2.
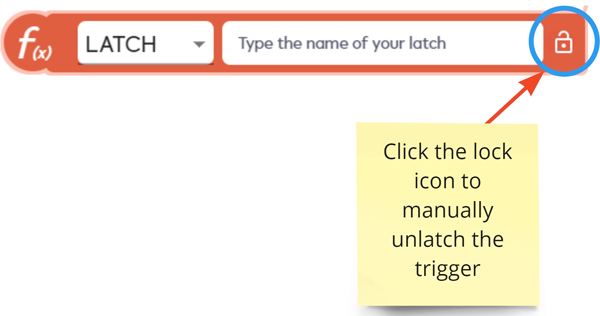
- Manually unlatch the trigger by clicking the lock icon shown below:
Example 1
- You have a schedule to turn on your backyard water sprinklers for 30 minutes every day at 12 PM during the summer months.
- You want to run a second sprinkler cycle in the evening IF the temperature is still above 28° after 6 PM.
- Issue – What if the temperature hits 28 degrees then dips below again? Ordinarily, this would stop your action running because the trigger became false.
- Solution – Use ‘Latch’ to lock the trigger at true once the temperature hits 28°.
Let’s see this example in a meshbot before explaining the steps in full:
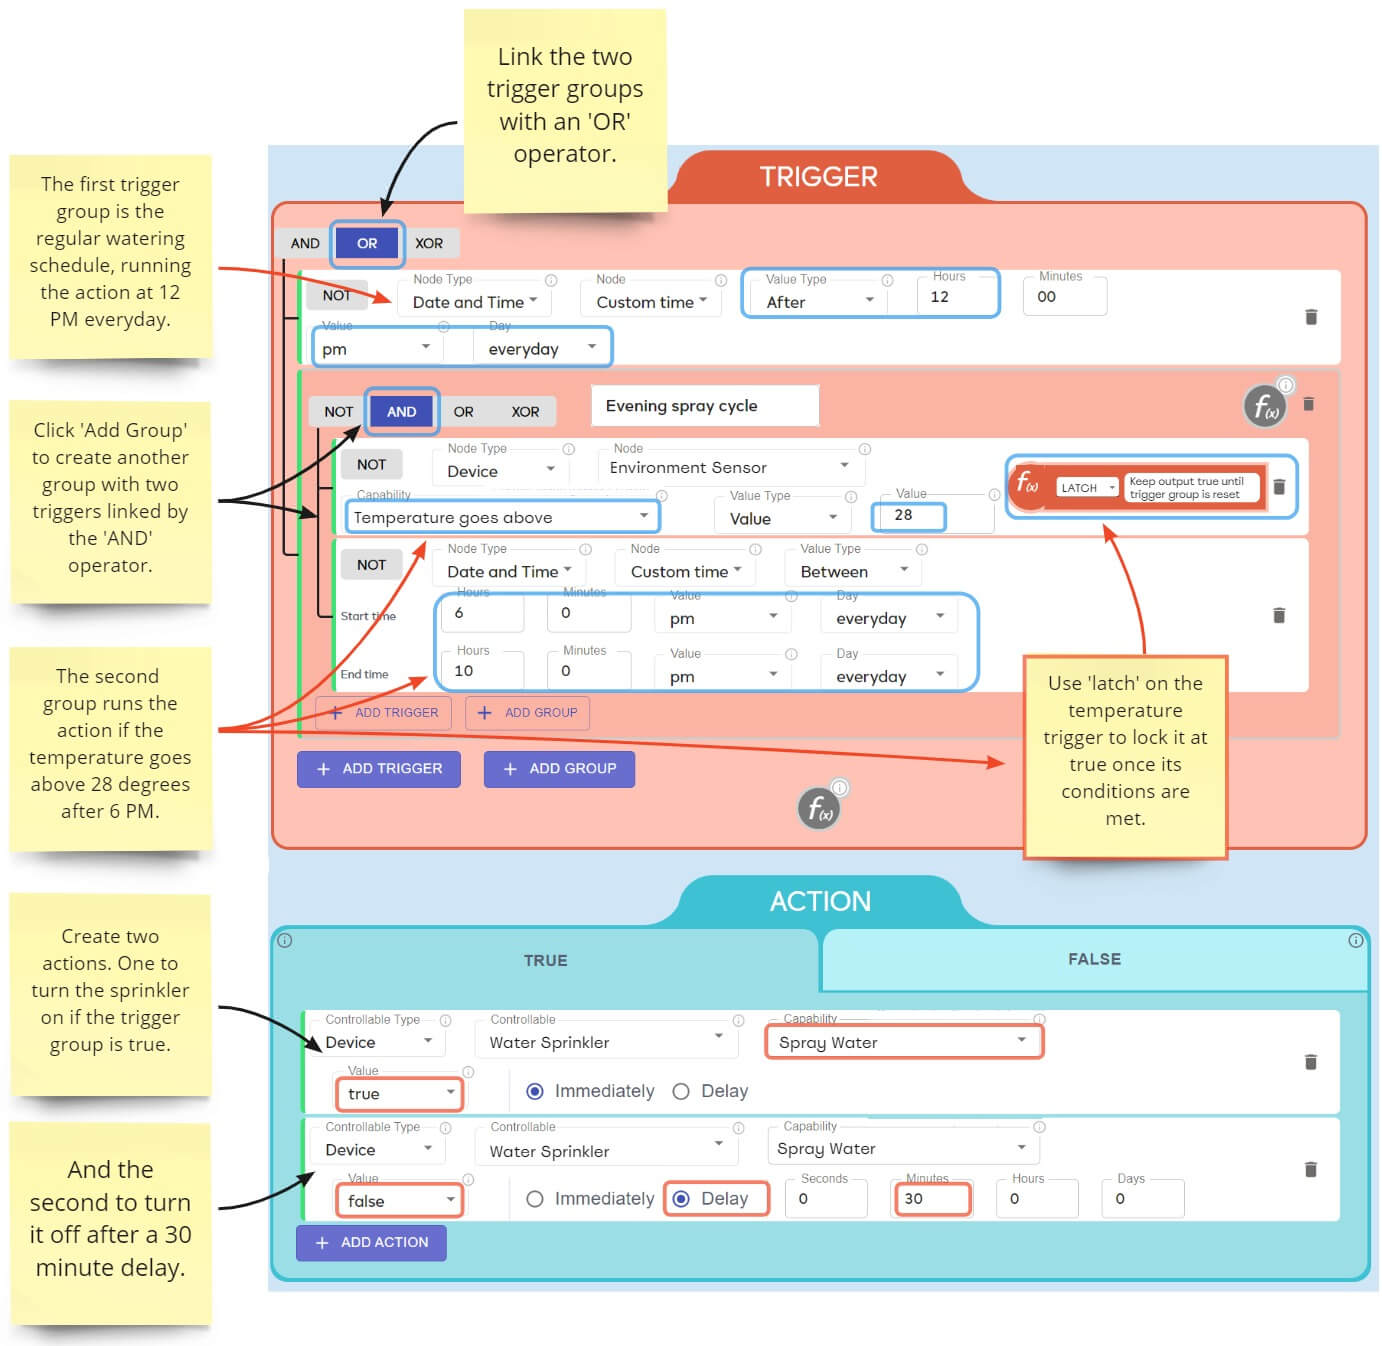
- Create a Date and Time > Custom Time trigger which becomes true after 12 PM everyday. This is your first trigger group and represents your daily watering schedule.
- Click ‘Add Group’ to create a 2nd group with two triggers.
- Trigger 1 in the 2nd group becomes true if your environment sensor detects that the temperature is above 28°. Add the ‘LATCH’ function to this trigger.
- Trigger 2 in the 2nd group is a date/time trigger which becomes true if the time is after 6 PM. Do NOT add latch to this trigger. Leave it unlatched.
- Link both triggers in the 2nd group with an ‘AND’ operator.
- Link the 1st and 2nd trigger groups together with an ‘OR’ operator (using the uppermost operators at top-left).
- Create an action to turn-on the water sprinklers. Add a 2nd action to turn them off. Delay the ‘off’ action for 30 minutes so the water remains on for half an hour.
- The sprinklers will run for 30 minutes at the daily watering time of 12 PM. They will run another 30 minute cycle IF the temperature hits 28° AND the time is after 6 PM.
- The ‘latch’ function on the temperature trigger prevents it from becoming false and turning off the water should the heat drop below 28°. The latch also means the watering cycle only runs once, even if the temperature fluctuates up and down.
- The second trigger group is disabled at 10 PM (if active). The first trigger is disabled at midnight, ready for the next day.
Example 2
This example has a similar objective to example 1 but only has a single trigger. The only way to unlatch ‘standalone’ triggers in an automated fashion is to use the ‘unlatch’ capability in a meshbot action.
- You want to switch on the fan in your lounge for 30 minutes if the thermostat detects a temperature of 18° c or above.
- You create a single trigger set to go true once the temperature goes above 18° c. You latch the trigger so the fan runs for the full 30 minute cycle, even if the temperature drops below 18° c.
- You create two actions – one to turn the fan on, and one to turn it off 30 minutes later.
- Issue – There is no way to turn the trigger false once it has been latched because it is a single, ungrouped trigger. There are no other triggers which can go false to turn the group false and thus reset the latch. This locks the trigger in a ‘true’ state and potentially keeps the fan running forever.
- Solution – Name the latch, then create another meshbot with a trigger that goes true when the first meshbot has completed its 30 minute run-cycle. The action of this 2nd meshbot is to unlatch the trigger in the first meshbot.
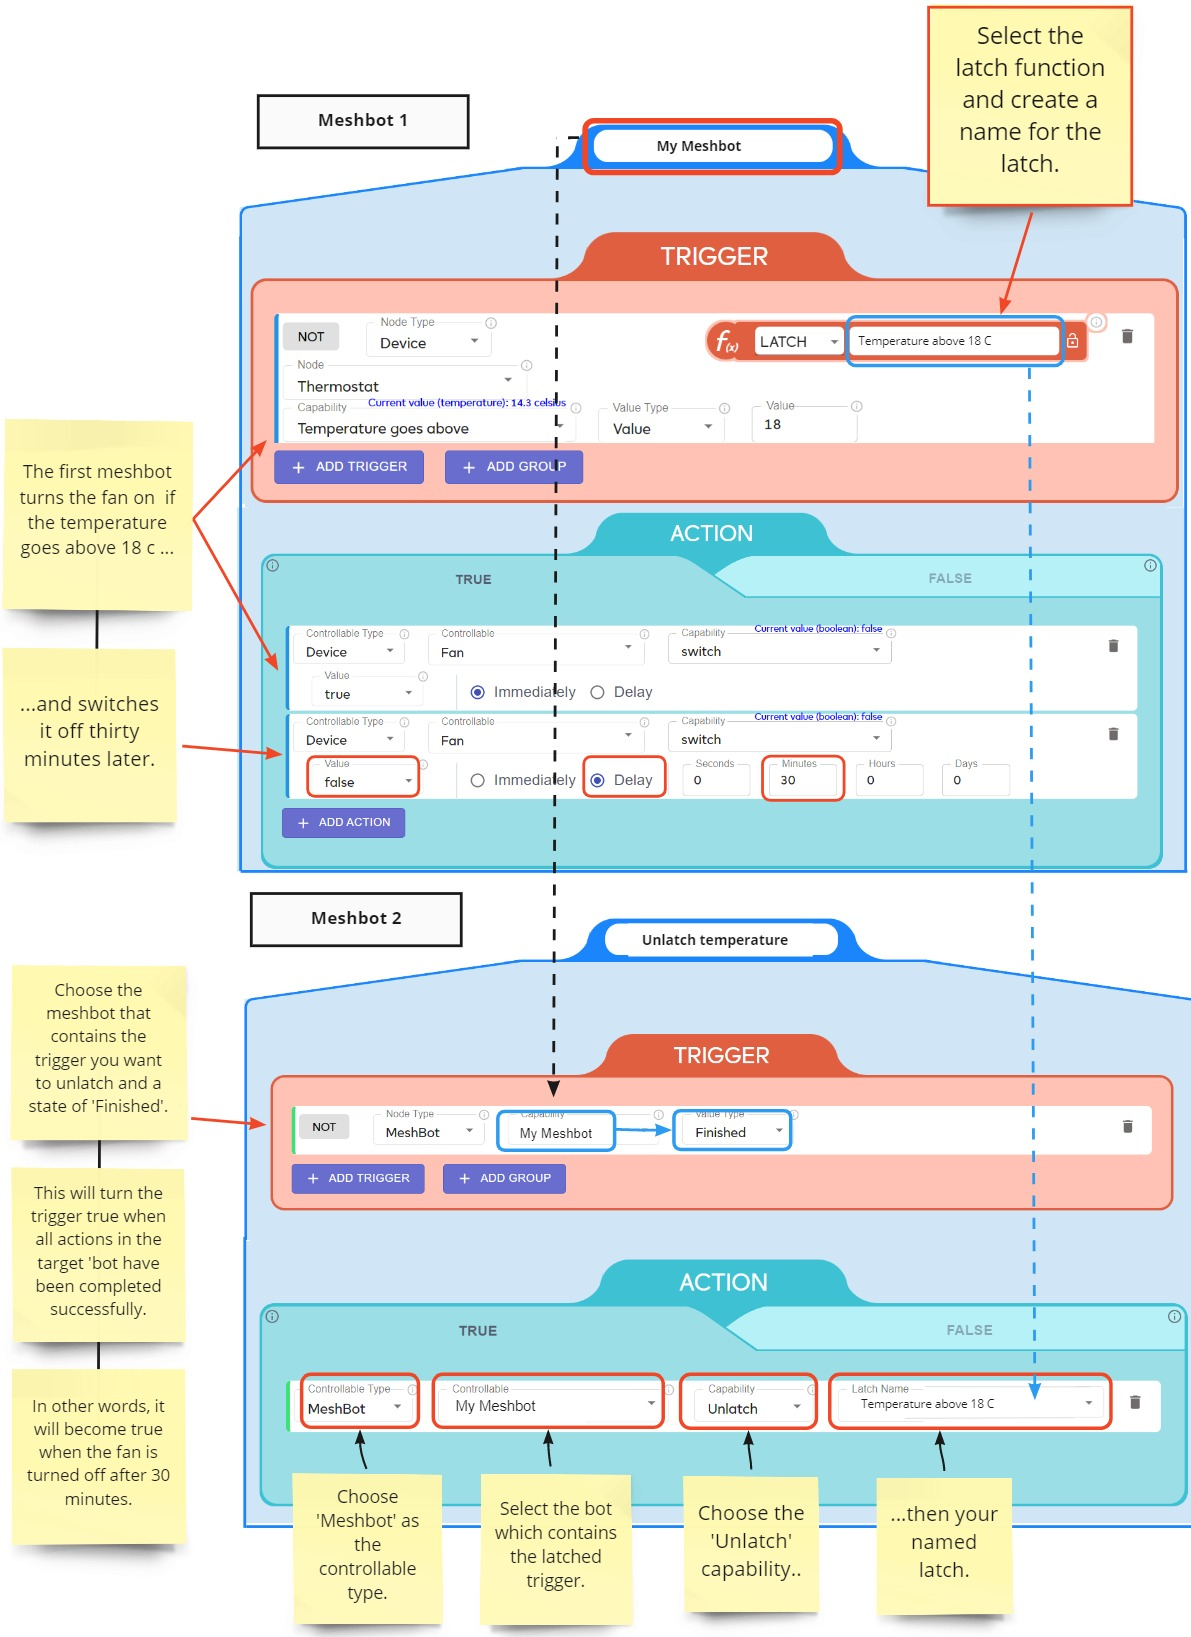
Meshbot # 1
- Create a trigger which becomes true if the thermostat detects a temperature of 18° c or above.
- Click the ‘f(x)’ button and add a ‘Latch’ function to the trigger. Click the field alongside and type a name for the latch. In our example, we use ‘Temperature above 18° c’.
- Click ‘Add action’ and create an action to turn on your lounge fan. Click ‘Add Action’ again and create a 2nd action to turn the fan off after a 30 minute delay.
- The latch on the trigger keeps it at true once its conditions are met, preventing it from going false should the temperature drop below 18° c. This allows the fan to run for the full 30 minutes to fully cool the room even if the temperature fluctuates.
- Save meshbot # 1 with a name of your choice. We used ‘My Meshbot’ in the example, but you should give it a more descriptive name like ‘Lounge Fans on at 18° c’, or something.
- Next, we need to unlatch the trigger after the fan completes its 30 minute run to reset the meshbot.
Meshbot # 2
- Select ‘Meshbot’ as the trigger node-type then choose your meshbot # 1 name in the capability drop-down.
- Select ‘Finished’ in the ‘Value Type’ field. This means the trigger will go true when every action in the target meshbot was successfully completed. You can read more about these options in the meshbot-as-a-trigger help page.
- Next, click ‘Add Action’. Select ‘Meshbot’ as the controllable type then your meshbot # 1 name in the controllable drop-down.
- Select ‘Unlatch’ as the capability then choose the name of the latch you created in meshbot # 1. In our example, we named the latch as ‘Temperature above 18° c’.
- Save meshbot # 2 with an appropriate name. For example ‘Unlatch lounge fan trigger’, or similar.
The lounge fan will run for 30 minutes when the thermostat detects temperatures of 18° c or over. It will remain running even if the temperature drops below 18 degrees because we latched the trigger. This gives the fan a chance to properly cool-down the room without interruption.
When the 30 minute run is over, the meshbot # 2 trigger will go true because all actions in meshbot # 1 completed successfully. The meshbot # 2 action will then unlatch the trigger in meshbot # 1, resetting it for another cycle.