Meshbot
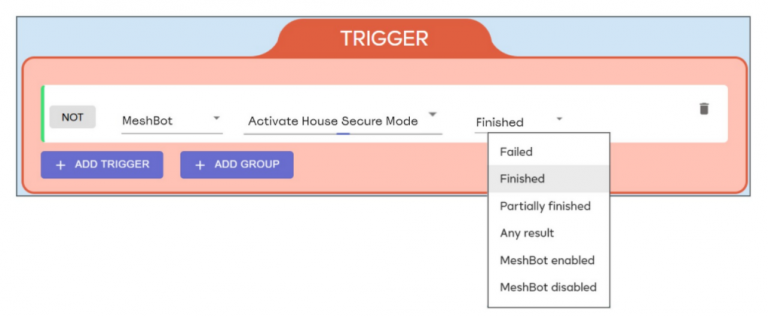
Meshbot is a node type in a meshbot trigger which lets you choose another meshbot as the data source for the trigger. The trigger reacts to the status of the actions in the target meshbot. You can choose the status upon which the trigger becomes true from a list as shown below:
Using a meshbot as a trigger item can offer additional functionality and flexibility when constructing scenes for your home or work environment. Here’s a few ways you might find this feature useful:
- Sequential meshbots. Set a meshbot to run only if another meshbot has fully completed its actions. This is especially useful if you have delayed actions in the target meshbot, or it contains actions which take time to complete. For example, you want to be notified when all aspects of a house-mode are fully operational in addition to a simple notification that the mode has been enabled.
- Failover meshbots. You can set a meshbot to run if the actions of another meshbot are not successful. For example, notify me immediately if any security-related action in my ‘Vacant House’ meshbot fails to engage. You could also set up meshbots which are alternatives to the failed meshbot. For example, if a voice-command to a meshbot which switches on your kettle fails, then you can have a different meshbot switch on the coffee-maker instead.
- Save time. ‘Any Result’ lets you build another meshbot based on the ‘true’ state of the triggers in the target meshbot, without needing to reconstruct those triggers in your new meshbot. This can be especially useful if you have multiple connected triggers in a complex meshbot and don’t want to have to modify both bots when you want to change something. You only need modify the trigger in the original meshbot to update the trigger in any meshbots which reference it.
- Reference triggers. Say you have a commonly-used trigger which you want to use in many different meshbots. For example, ‘40 minutes before sunset’. You can create a meshbot containing only this trigger and no actions. You then add this meshbot as a node in any new meshbots you want to run at the specified time (you can use ‘Finished’ or ‘Any result’ as the status). If the date/time trigger in the target meshbot becomes true, then it also becomes true in your new meshbot. This means you don’t have to re-build the trigger every time in your new meshbots.
Meshbot Statuses
The following table explains the various statuses you can choose:| Status | Description |
|---|---|
| Failed | The trigger will activate when the trigger group in the target meshbot is true, but the meshbot did not successfully complete any of its actions. For example, you have a meshbot that locks your windows when you pass beyond a geofence perimeter. You can set an action to send you a notification if this meshbot fails. |
| Finished | The trigger will activate when the trigger group in the target meshbot is true, and it successfully completed all of its actions. For example, you have a meshbot that updates your CRM with account details whenever a new customer buys something from your website. You can set an action to send a notification to your sales team to check the new account, but you only want the notification sent once the CRM has been successfully populated. |
| Partially Finished | The trigger will activate when the trigger group in the target meshbot is true and at least one action was successful and one action failed. You could set up a notification that informs you of the actions which failed in the target meshbot. |
| Any Result | The trigger activates when the trigger group in the target meshbot is true and all actions have completed their execution, regardless of whether those actions were successful or not. In other words, ‘Any result’ will run your meshbot simply if the trigger group in the target meshbot becomes true. It ignores whether the actions in the target meshbot were ‘Failed’, ‘Finished’ or ‘Partially Finished’. |
| Meshbot Enabled | The trigger will become true if the target meshbot is currently active. You can enable or disable specific meshbots using the ‘Active’ switch in the ‘Meshbot Automation’ area. |
| Meshbot Disabled | The trigger will become true if the target meshbot is not active. You can enable or disable specific meshbots using the ‘Active’ switch in the ‘Meshbot Automation’ area. |
Notes and Advice
- Be clear on what you want to do. Ask yourself these two questions:
- Does the target meshbot have actions?
- If ‘Yes’, do I want my new trigger to react to the outcome of those actions?
If the target meshbot has no actions then it is effectively a ‘reference’ trigger group as explained earlier. You can choose ‘Finished’ or ‘Any Result’ as the status in your new meshbot.
If the target meshbot does have actions, then do you want to use them to determine whether the trigger in your new meshbot becomes true?
- If you don’t want to use them then select ‘Any Result’ in your new meshbot. This means your new meshbot only considers whether the triggers are true in your target meshbot before proceeding. This is similar to creating a ‘reference’ trigger group BUT lets you leverage the triggers of a ‘working’ meshbot which has running actions.
- If you do want to consider the actions in the target meshbot, then select ‘Finished’, ‘Failed’ or ‘Partially Finished’ depending on the task you want to achieve.
- ‘Any Result’ is somewhat of an outlier. Whereas ‘Failed’, ‘Finished’ and ‘Partially Finished’ react to the result of the meshbot actions, ‘Any result’ effectively reacts to whether the triggers in the target meshbot became ‘true’. We say ‘effectively’ because EZlogic still parses the results of the actions like the other cases, but turns your trigger true regardless of them. So your new trigger becomes true simply if the trigger group in the target meshbot becomes true. In this way, using ‘Any Result’ is similar to just adding another action to the target meshbot, but gives you flexibility to build another meshbot based on its triggers without reconstructing those triggers.
Example
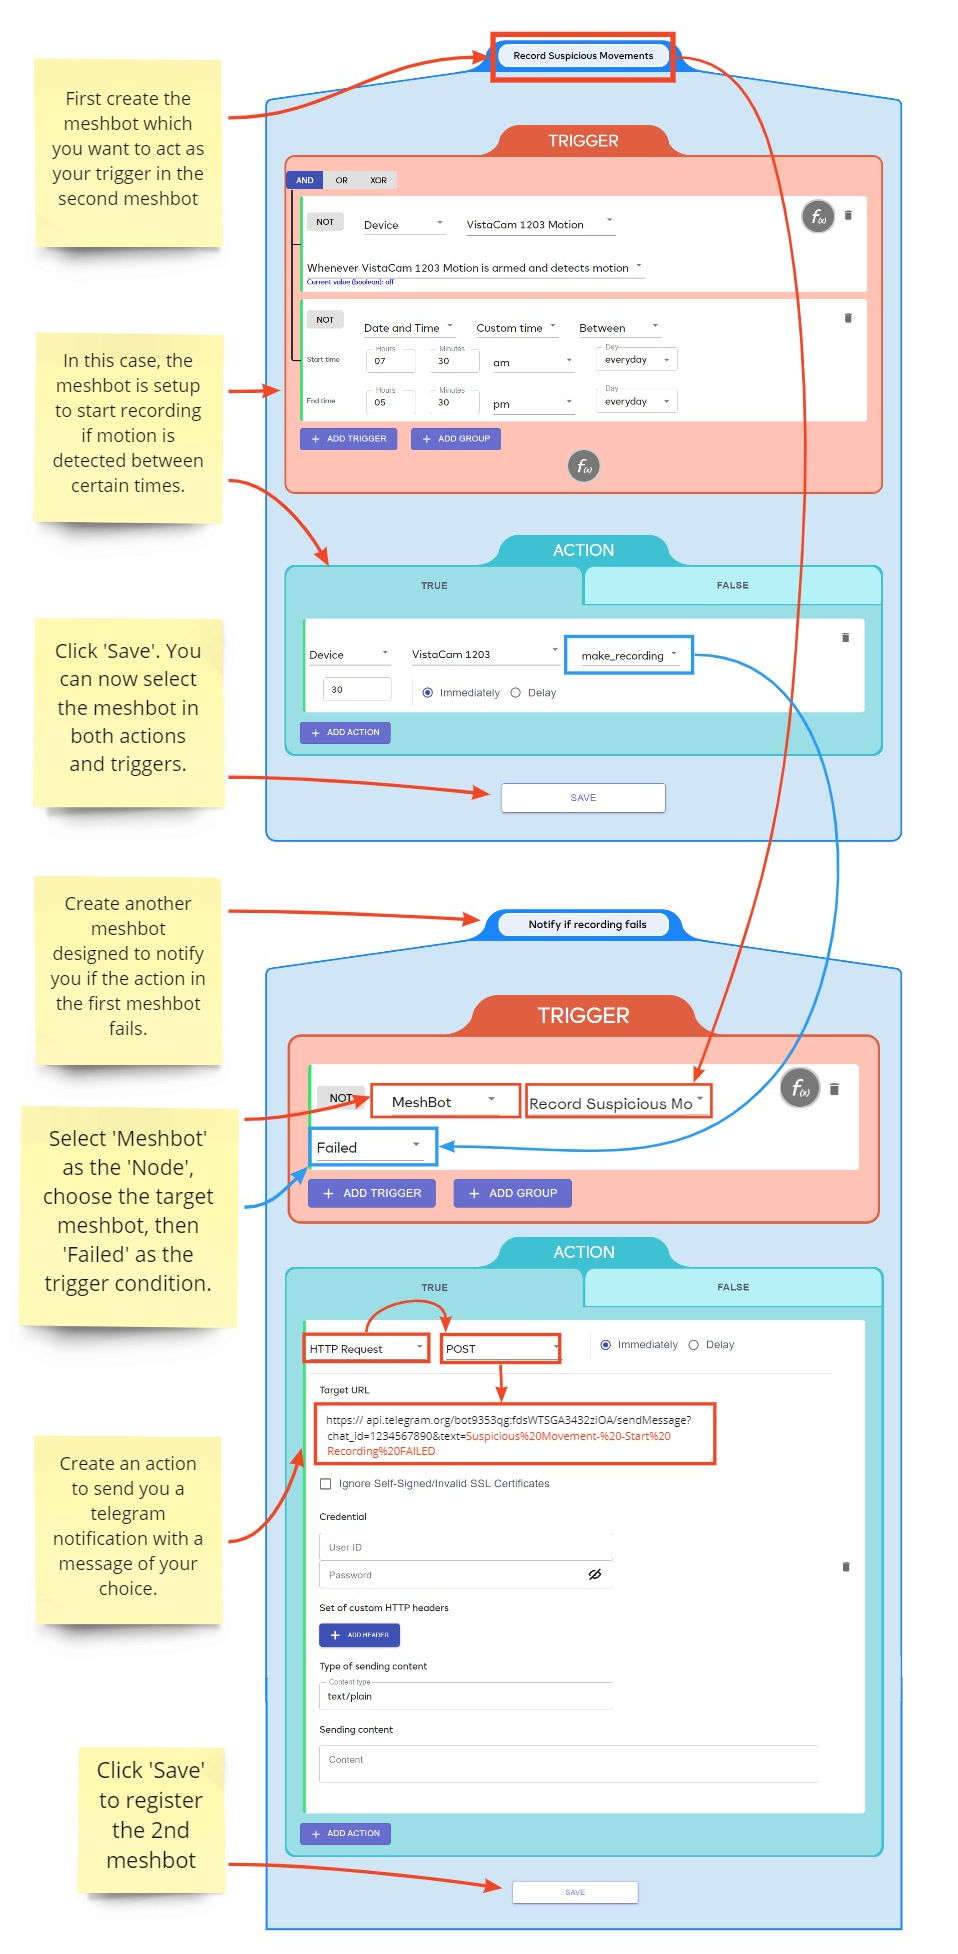
Here’s an illustrated example of how you can create a meshbot which is conditional on another meshbot:
Further Reading
See Create your first Meshbot for a walk-through of meshbot creation.
See Telegram http meshbot for a guide to sending Telegram notifications via a meshbot.