Ezlo MQTT Plugin
The MQTT plugin lets you use the MQTT messaging protocol in order to control your devices and run scenes.
- Install and setup the MQTT Plugin
- Subscribe to and create topics with the MQTT Plugin
- Publish messages with the MQTT Plugin
- MQTT is a messaging protocol used for machine-to-machine communications. It is often used to pass critical telemetry or security information between subscribed client entities.
- It uses a publish-subscribe model and is designed for connections with remote devices that have resource constraints or limited network bandwidth. Users can use the MQTT protocol to control their devices as an alternative to HTTP, HTTP/2 and Websockets.
- MQTT’s small footprint, scalability, reliability and minimal bandwidth use has made it a popular choice for major IoT deployments and large-scale communications. For example, Facebook Messenger, Amazon Web Services and Microsoft Azure’s IoT Hub all use MQTT.
- The protocol can also be used to interface with IoT platforms such as Tuya IoT, IBM Watson IoT, Node-Red and more.
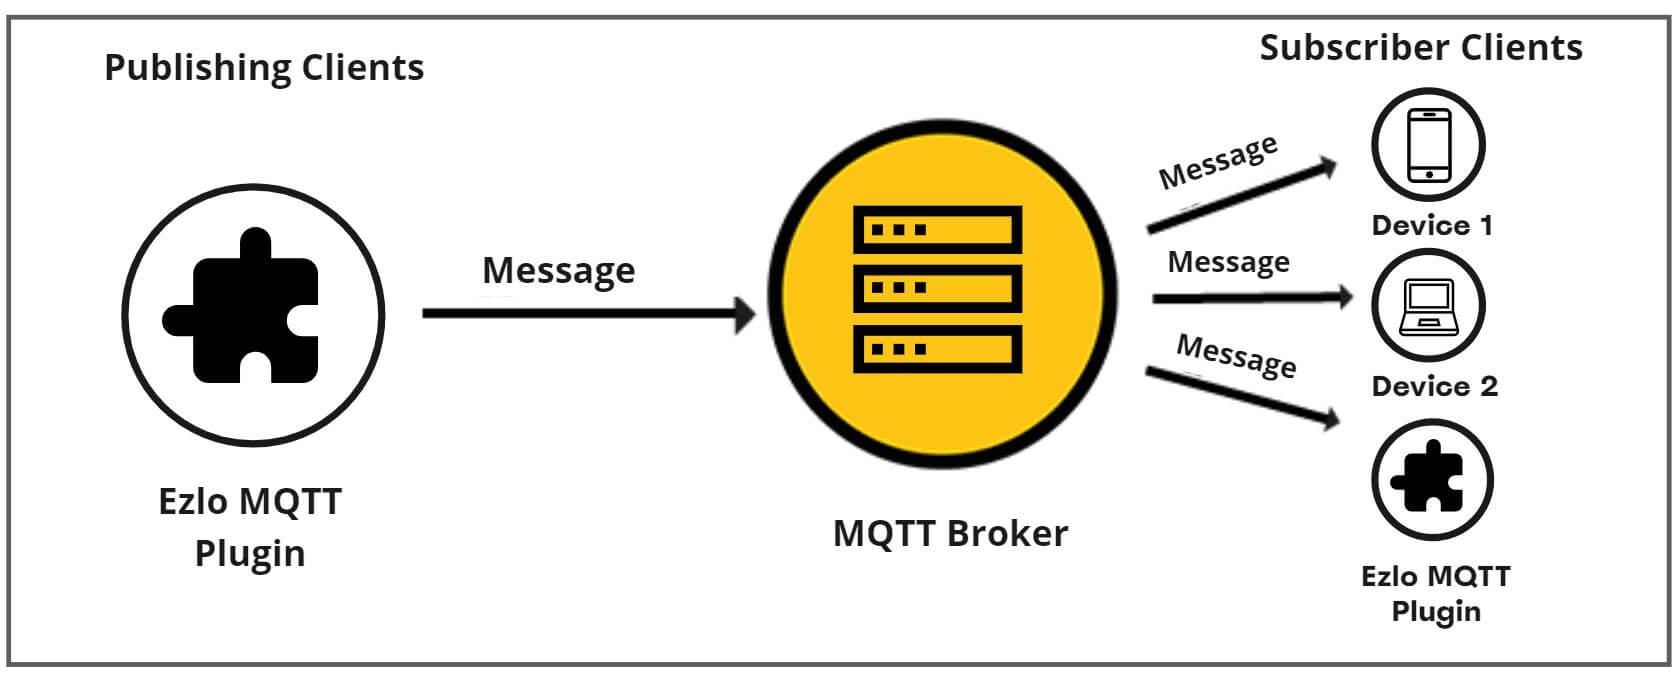
The MQTT network model consists of two entities – a message broker (or server) and one or more message clients:
-
Broker/ server – An intermediary entity which acts similarly to a post office, receiving incoming messages from clients then distributing them to subscribed clients. There are two types of broker – ‘managed’ and ‘self-hosted’. Managed brokers require little set-up on your behalf, whereas self-hosted require you install the broker on your own server with a static IP. Here are some popular brokers you may want to consider:
- Mosquitto – Self-hosted and managed options.
- HiveMQ – Self-hosted and managed options
- Mosca / Aedes – Self-hosted and managed options
- EMQ X – Self-hosted
- AWS IoT Core MQTT – Managed
- Azure IoT Hub – Managed
You can create topics on your broker by selecting ‘Mqtt Topic’ in a meshbot trigger. Other MQTT clients can then subscribe to the topic, and the broker forwards them any messages addressed to the topic.
- Client – Clients can be almost any smart device including smartphones, web apps, sensors, laptops or actuator devices. Individual clients can send (publish) messages to a topic on a broker, or receive messages, or both. Once installed, our plugin creates an MQTT client device in EZLogic which can communicate with your MQTT broker.
-
Topic – A topic is a form of address that allows clients to share information between each other. Topics are dynamically created on the broker by the simple act of a client subscribing to a topic or publishing a message to a topic. Topics use a structure similar to that used for files and folders, using the forward slash (/) as a delimiter. You are free to organize and create your own structures, but here are some example topic names:
home/lounge/main-light home/lounge/sofa-lamp home/kitchen/back-door home/garage/alarm home/ home Etc
Note – You need to specify paths differently in meshbot triggers and actions:
- Actions – The MQTT plugin uses a built-in topic of ezlo_mqtt/set/item/ which must be used as a prefix in your meshbot actions. For example, if you want to publish a message to ‘home/garage/alarm’ then you should enter it as ‘ezlo_mqtt/set/item/home/garage/alarm’ in your action.
- Triggers – You do not need to use the prefix in ‘Topic’ triggers because they implicitly assume the default path.
Example – you want to run some action if the message ‘Go’ is sent to ‘/my/topic’. You would specify the paths in your two meshbots as follows:
Meshbot 1
Action = Publish message ‘Go’ to ezlo_mqtt/set/item/my/topic
Meshbot 2
Trigger 1 = Mqtt message = ‘Go’ Trigger 2 = Mqtt topic = my/topic Action = < your desired action >
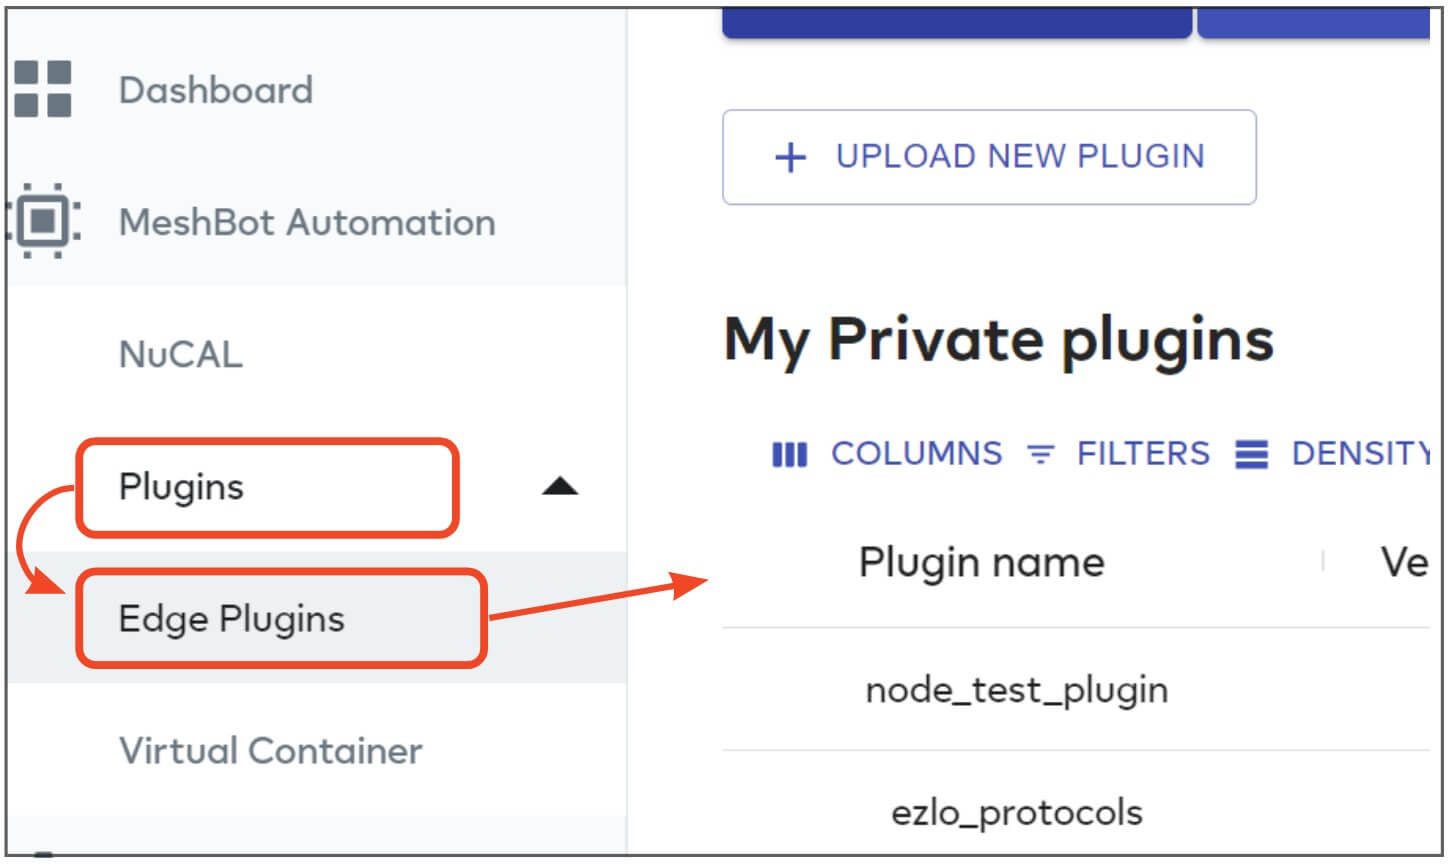
Login to EZLogic then click ‘Plugins’ > ‘Edge Plugins’ in the left-hand menu:
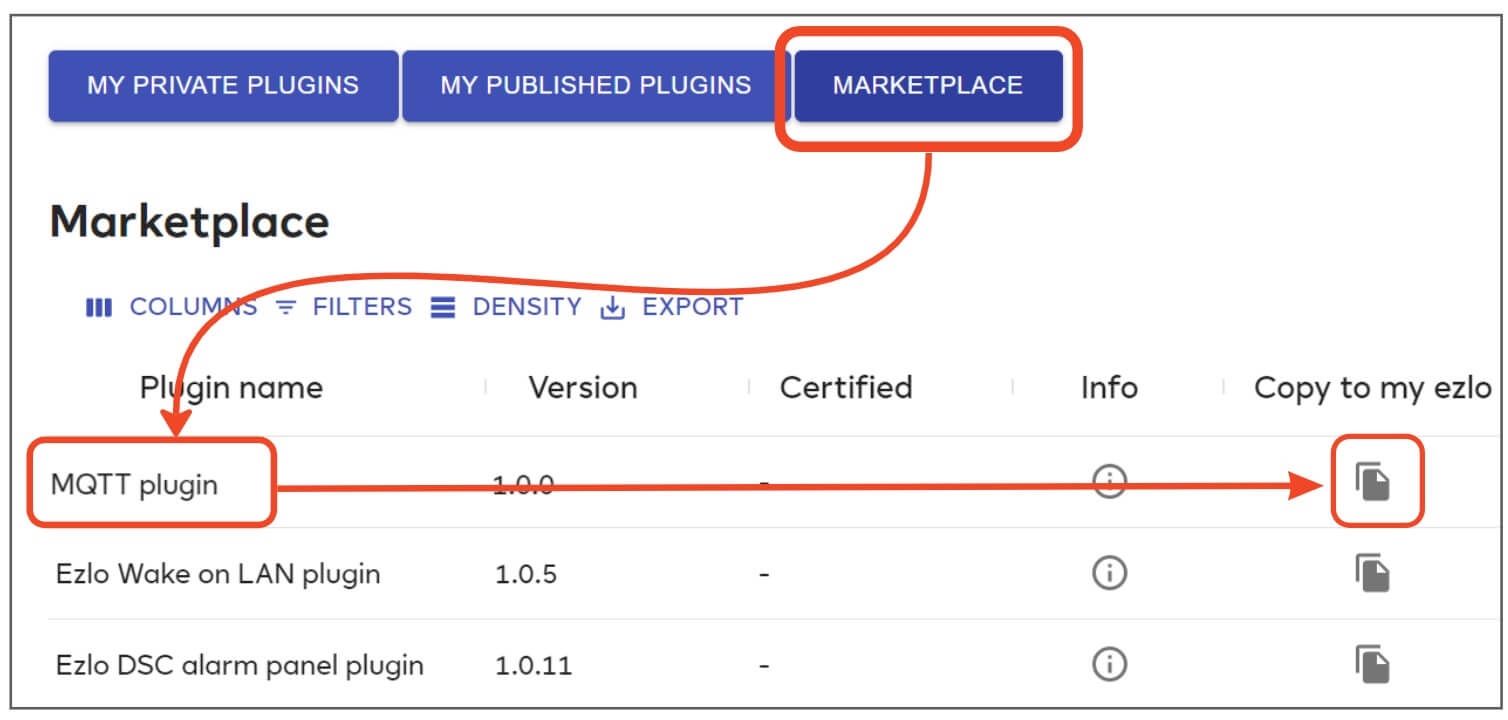
- Click ‘Marketplace’, locate the ‘MQTT plugin’ row then click ‘Copy to my Ezlo’:
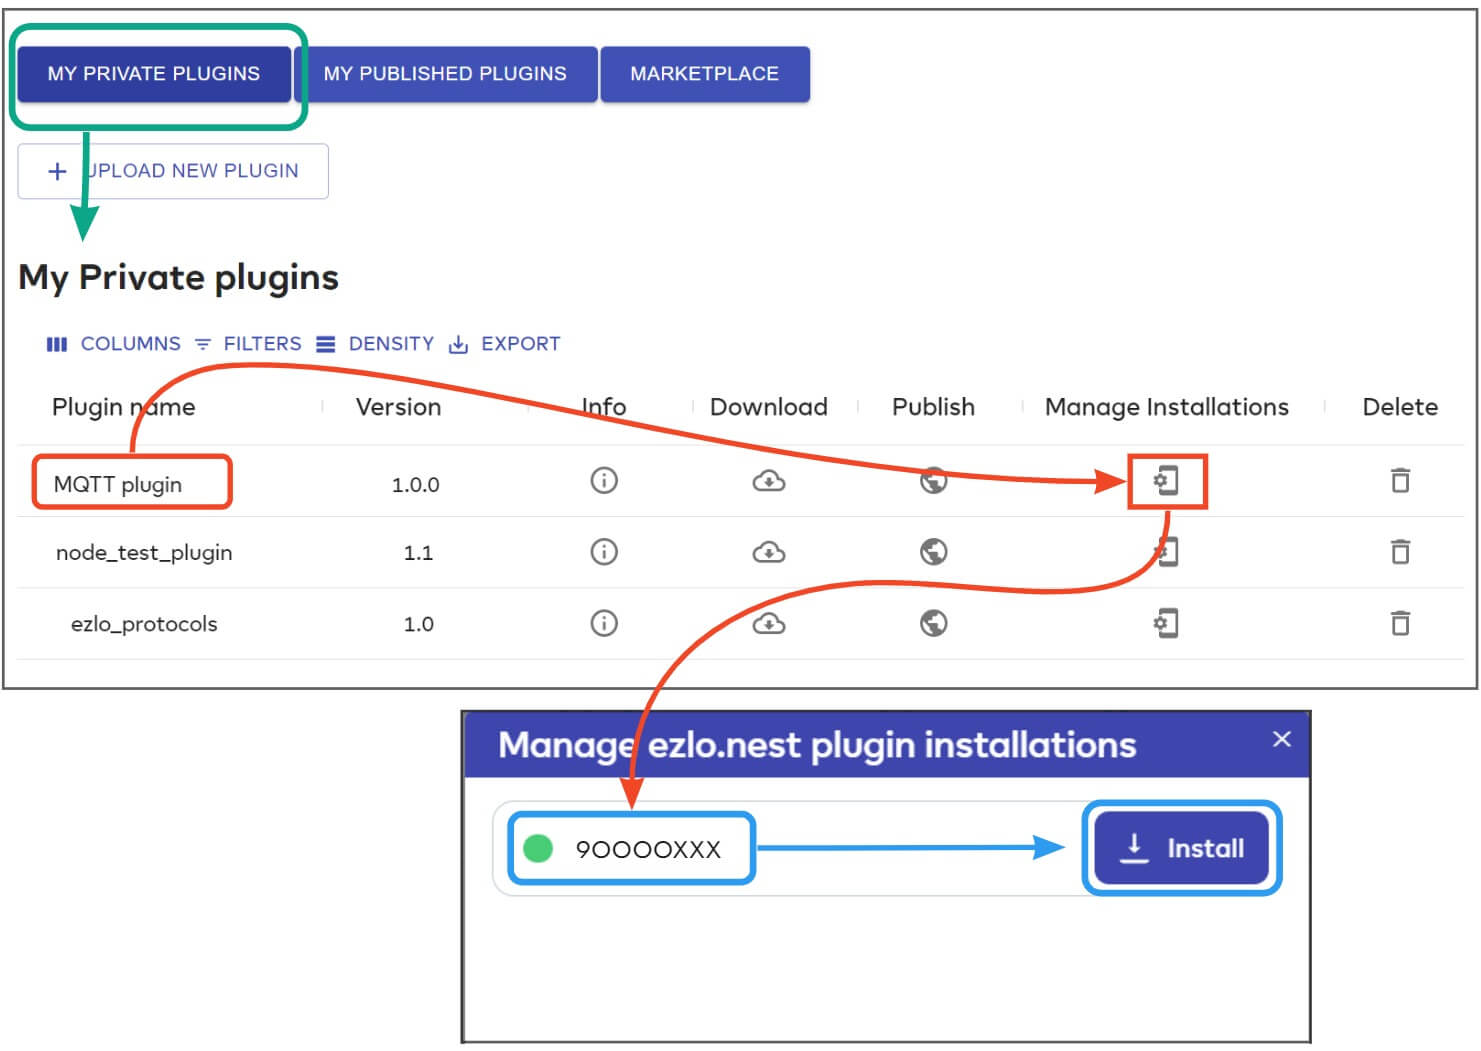
- Click the ‘My Private Plugins’ button along the top of the screen.
- Locate the ‘MQTT plugin’ row then click ‘Manage Installations’.
- Choose the controller you want to use then click ‘Install’:
- Once installation is complete, click the ‘Manage Installations’ icon again then click ‘Configure’:
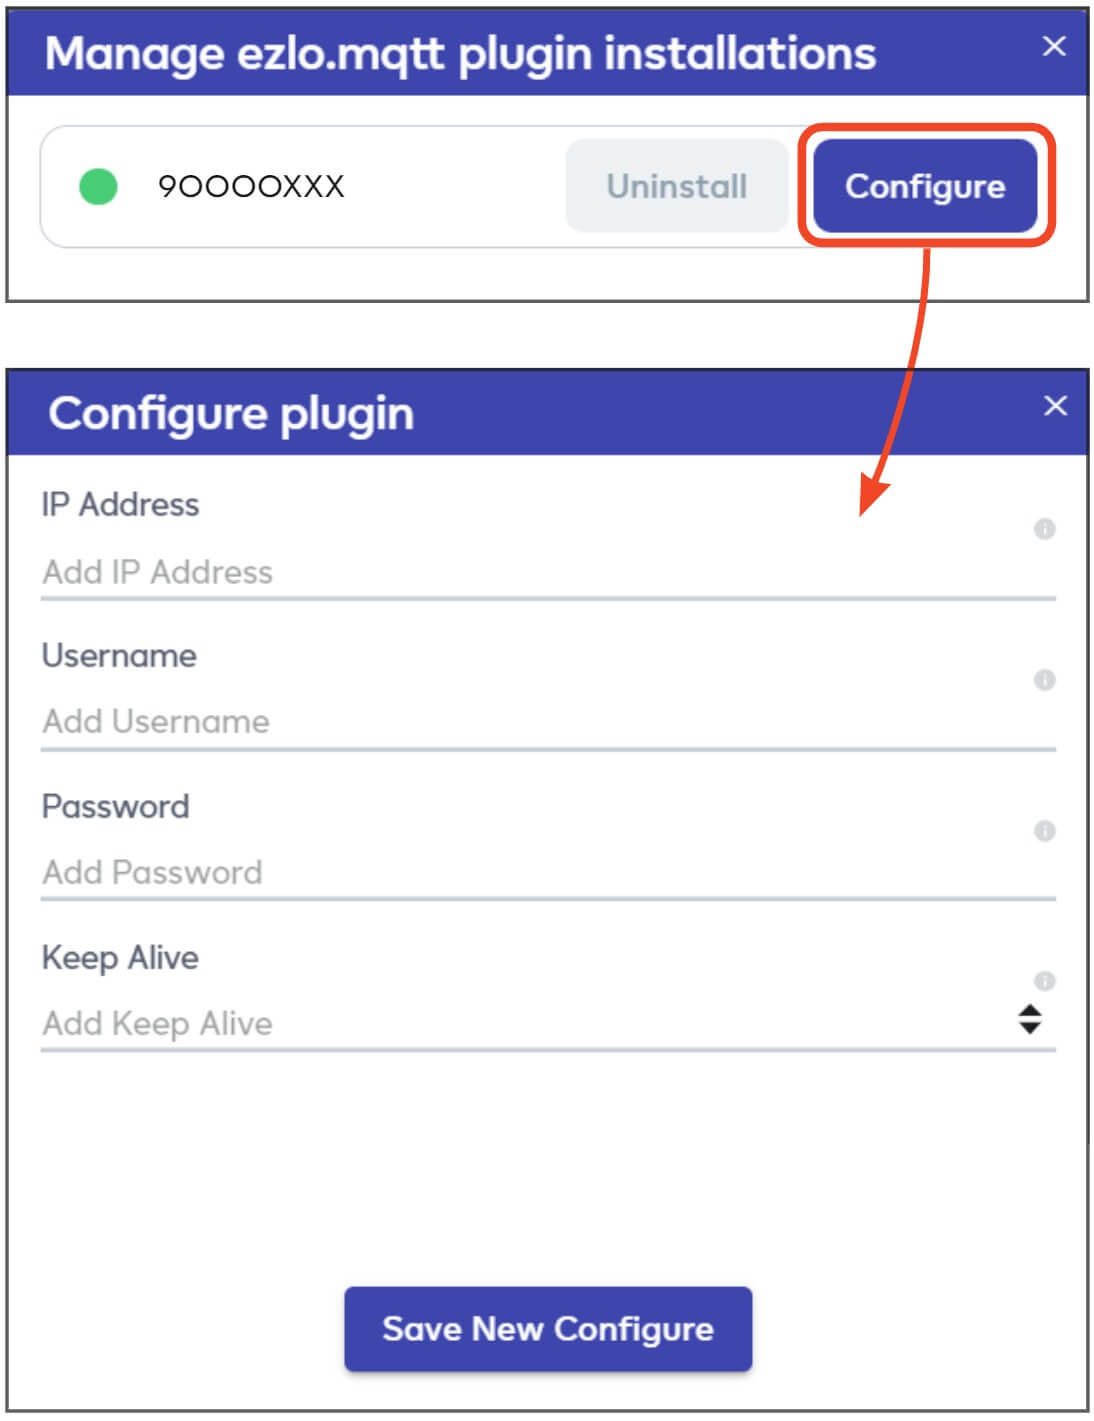
Complete the four fields on the form’:
| IP Address |
Enter the IP address of your MQTT broker (aka ‘server’). This is the server that will relay your messages to your subscribed client devices. Click here for a list of broker providers that you might want to try. |
| Username / Password |
Credentials to authenticate the MQTT plugin client to the broker / server. Complete these fields only if the broker has authentication enabled. You can leave these fields blank if authentication is not enabled on the broker / server. If you need help enabling or disabling authentication on a Mosquitto server then this excellent guide by Stephen Cope is a great place to start. |
| Keep Alive |
Enter a number between 0 and 65535. 60 (seconds) is the Python MQTT client default and is also a good starting point if you are unsure. ‘Keep Alive’ is the maximum time in seconds that the plugin should maintain a connection with the broker without receiving a response. The plugin will close the connection if the response time exceeds the figure you set here. The MQTT plugin client periodically pings the broker with PINGREQ messages in order to decide whether or not to keep the connection open. These requests are answered by the broker replying with a PINGRESP message. A successful response will keep the connection open. The keep alive time determines how many consecutive seconds can elapse without successfully receiving a response. |
Click ‘Save New Configuration to complete the plugin setup. You can now start using the plugin in meshbot triggers and actions to run MQTT-based automations.
You can subscribe to and create topics simply by creating a meshbot trigger that uses the MQTT plugin. You can also use triggers to listen for specific messages in order to run actions.
- Install and configure the MQTT plugin if you haven’t done so already.
- Create a new meshbot and add a new trigger.
- Select ‘Device’ > ‘MQTT Client’ as the node type and node respectively.
- There are two options in the ‘Capability’ field – ‘Mqtt topic’ and ‘Mqtt message’:
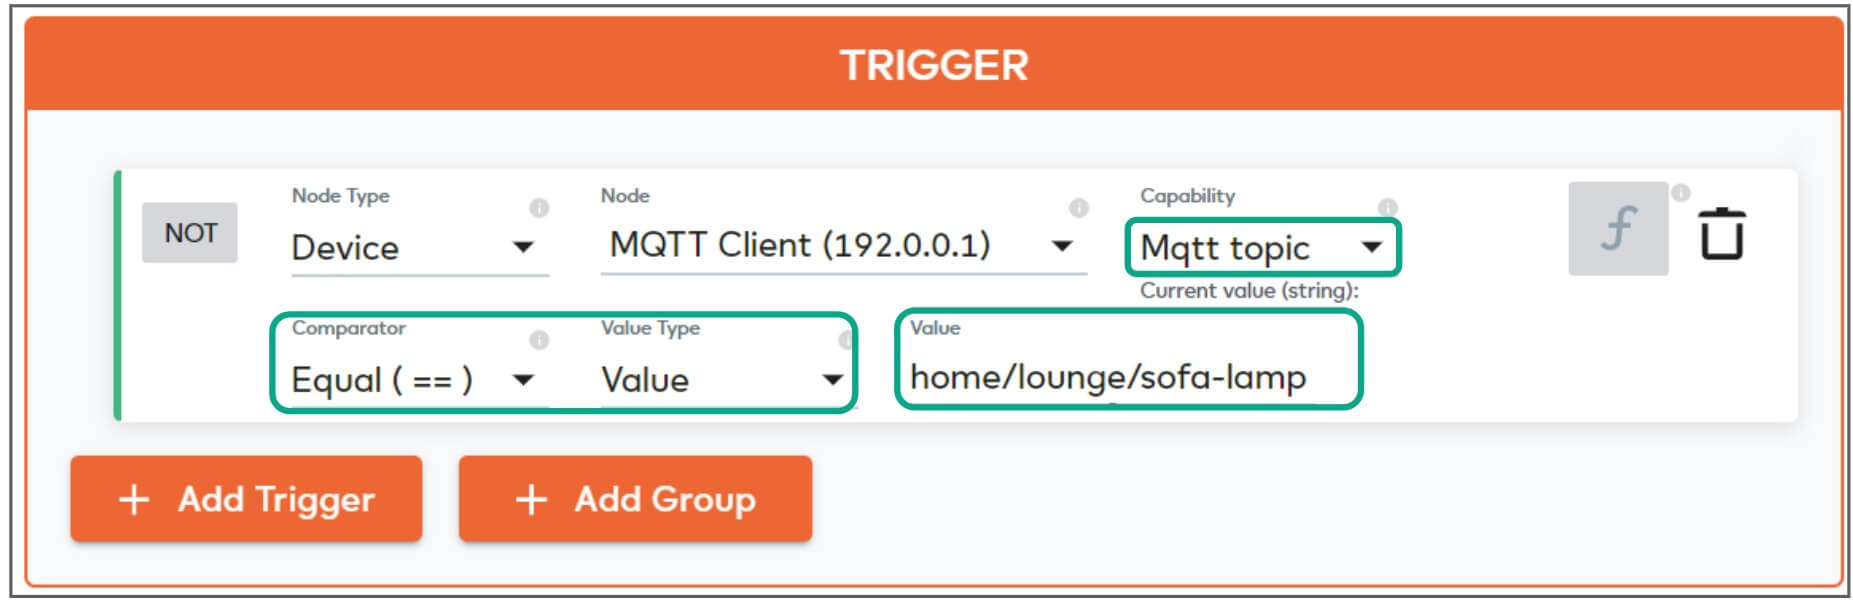
Mqtt topic – Creates and subscribes to a topic on the broker and receives messages sent to it.
You should enter the topic in the ‘Value’ field as shown below:
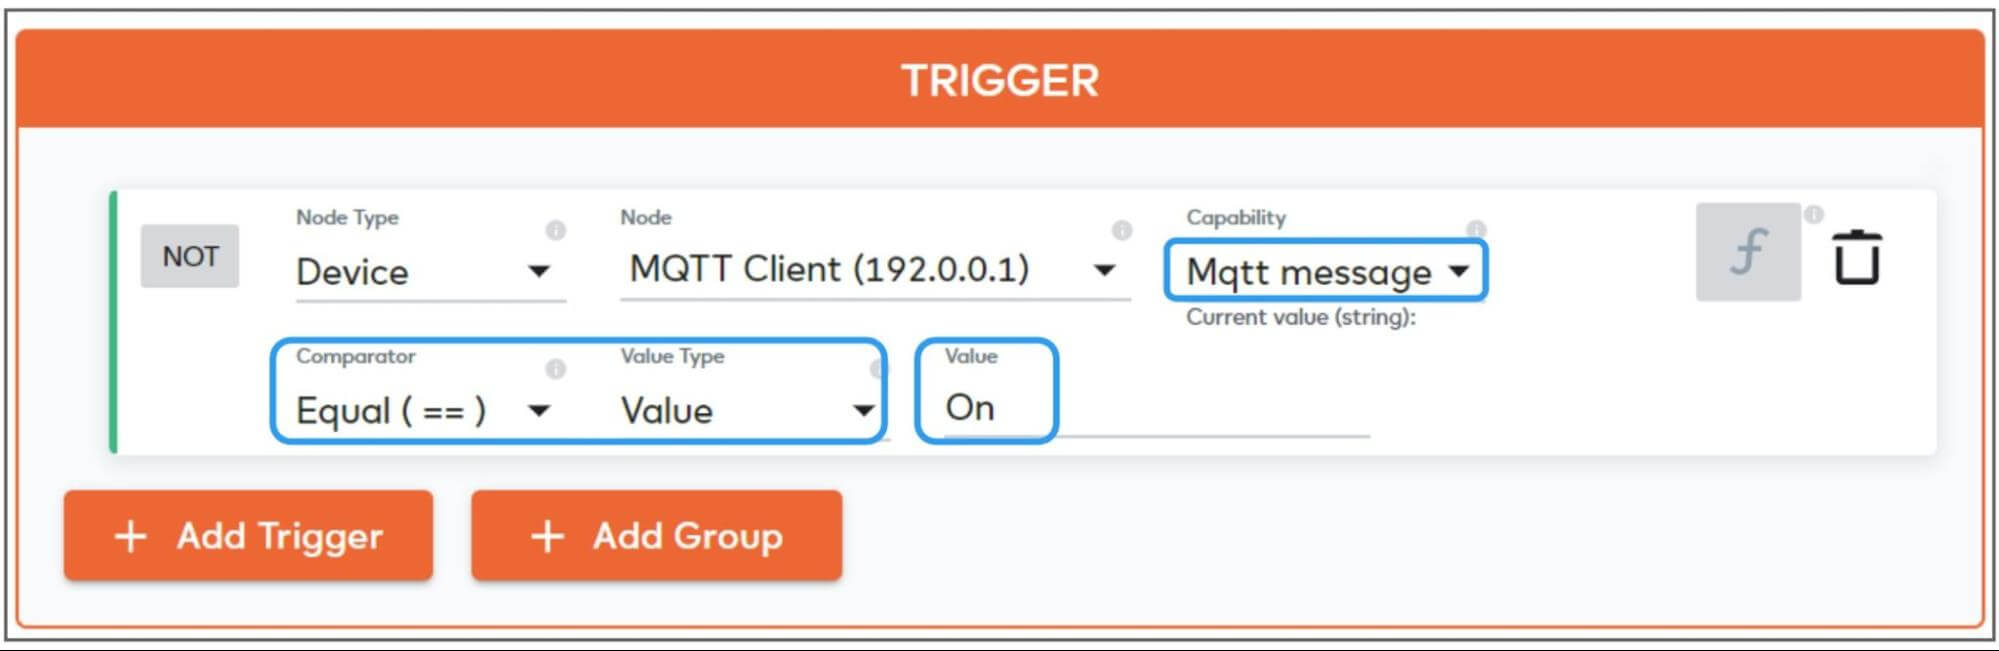
Mqtt message – Turns the trigger ‘True’ if a specific message is received from the broker. You should enter the message you want to listen for in the ‘Value field’. The example below shows a trigger that goes true if it receives the message ‘On’:
Note – You need to ‘AND’ together an ‘Mqtt topic’ and an ‘Mqtt message’ trigger if you want it to go true if a specific message is received from a certain topic. The following example shows a trigger group that would turn on a sofa lamp if the message ‘ON’ was published to the topic home/lounge/sofa-lamp:

Once you have setup the plugin, you can publish messages to a topic via a meshbot ‘Action’:
- Install and configure the MQTT plugin if you haven’t done so already.
- Create a new meshbot and add a new action.
- Select ‘Device’ > ‘MQTT Client’ > ‘mqtt_packet_send’ in the action fields.
- Specify the address/path of your topic in the ‘Topic’ field.
Note – The MQTT plugin implicitly subscribes to the topic ezlo_mqtt/set/item/, so you must prefix topics in an action with ‘ezlo_mqtt/set/item/’.
For example if you want to publish a message to ‘home/lounge/sofa-lamp’ then you should enter the absolute path of ezlo_mqtt/set/item/home/lounge/sofa-lamp in the topic field. This requirement does not apply to triggers.
- Enter the message you want to send in the ‘Message’ field.
- In the example below, we send the message ‘On’ to the topic ‘ezlo_mqtt/set/item/home/lounge/sofa-lamp’:

Click ‘Save’. You can run the ‘bot as a standalone action directly from the meshbot listing screen. Alternatively, you could incorporate the action above into a scene by adding triggers and other actions.