Overview
Actions are the ‘then do this’ part of a meshbot. They are the responses that you want to implement once the conditions of your trigger group become ‘True’.
Here’s a few example actions you might want to set up in a meshbot:
- Set your lights to randomly turn on and off in various rooms when you’re on vacation to give the illusion that there’s people at home.
- Dynamically update a Google Sheet with the engagement statistics from your latest outreach campaign at work.
- Have the dimmer lights in your bedroom slowly illuminate in the morning as part of a wake-up scene. Ease-open the blinds and play soft-music too.
- Send a Slack notification to the sales team if you sign up a new customer through a web-form.
- Make a water-sensor in your basement notify you if there is a flood and have the system turn-off the water mains for good measure.
You can run your actions immediately when the trigger conditions are true, or set a delay period.
See the following items for more help with actions:
The action interface
- Login to MiOS EZlogic
- Click ‘Meshbot Automation’
- Click ‘Create New Meshbot’
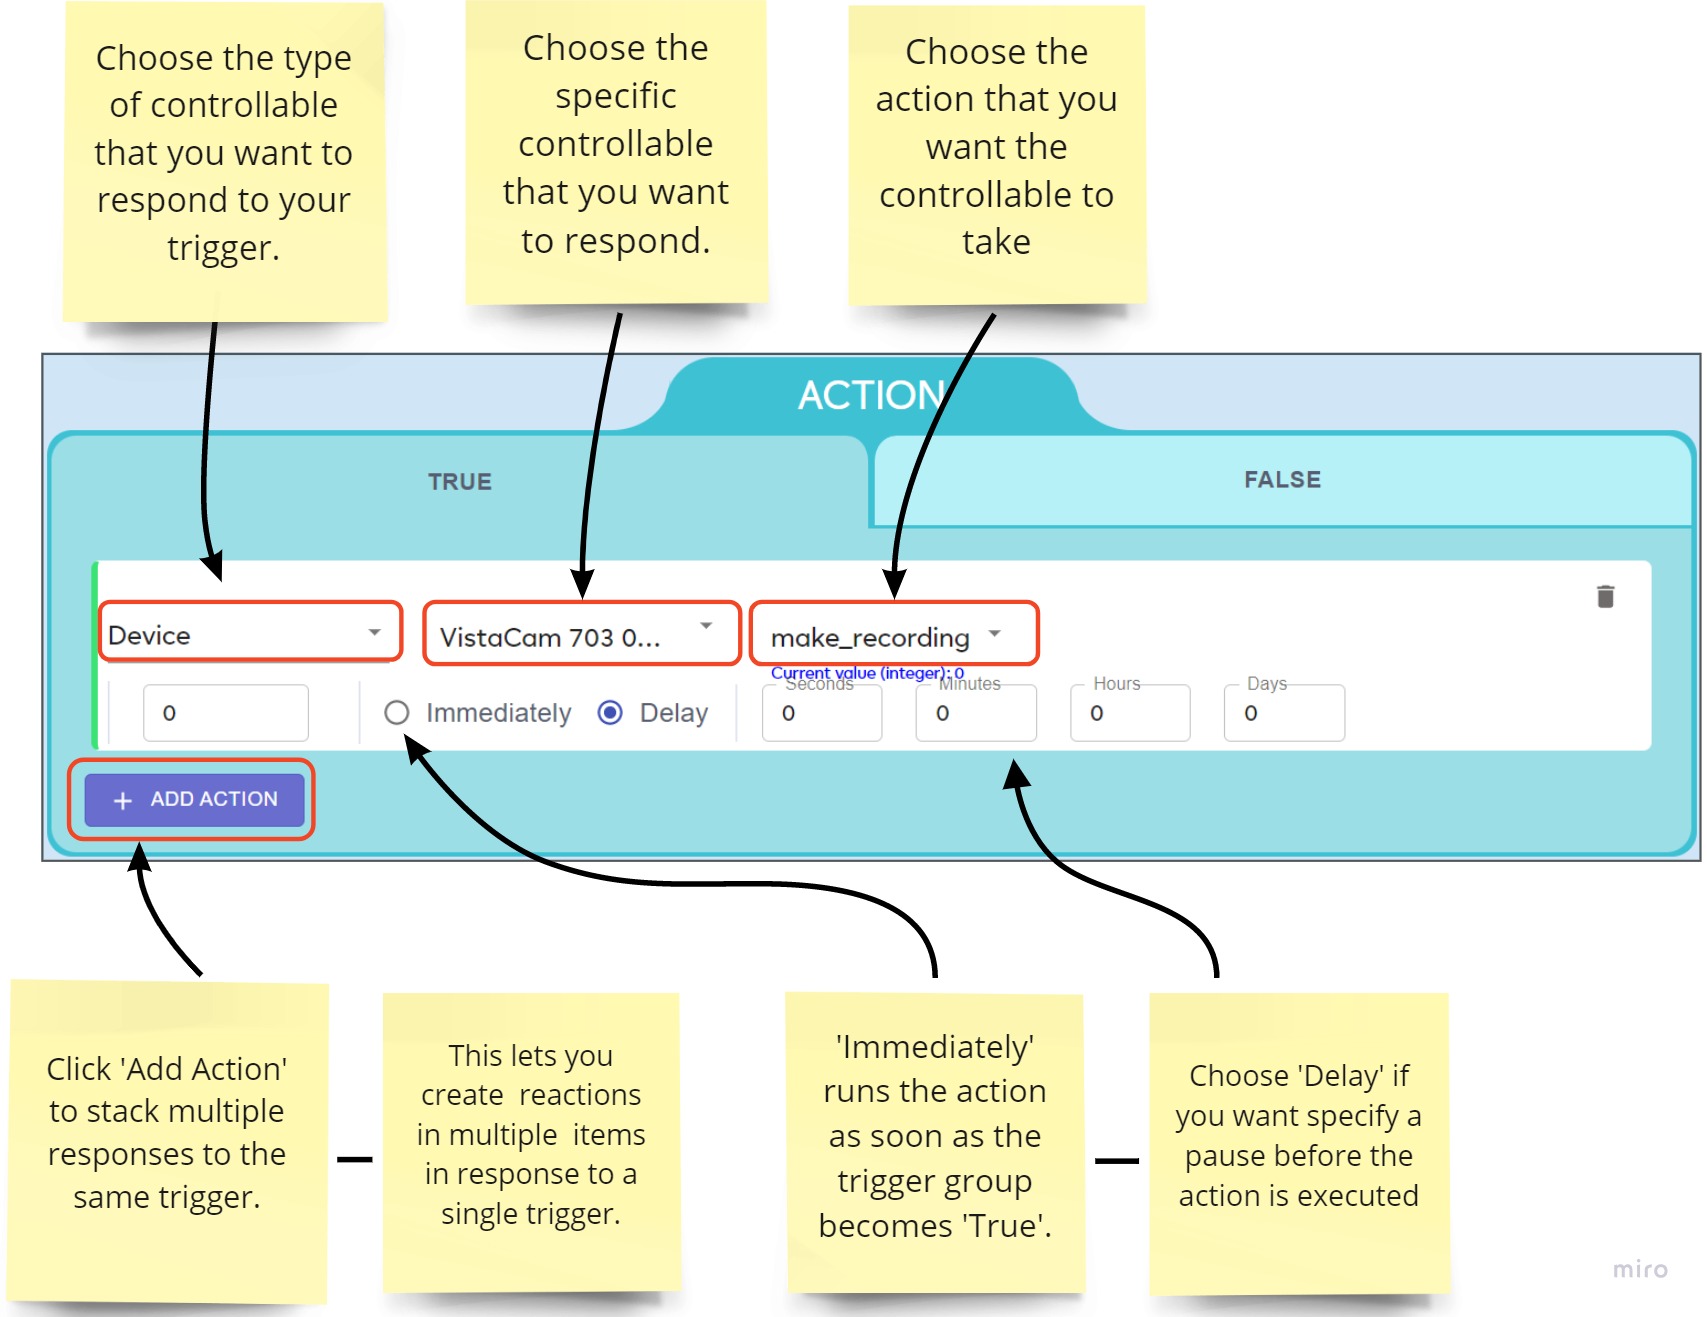
The entity that will implement your action is known as a ‘controllable’. This is the device, service, meshbot or type of data that you want to respond when the trigger is true:
- Device – Commands a device to perform an action if the conditions of your triggers are met. See the controllable devices page if you want to learn more about devices in an action at this point.
- Meshbot – Activates a different meshbot if the conditions of your trigger become ‘true’. For example, you might want your trigger to activate your ‘I’ve left the house’ meshbot. Think of running a meshbot in your actions as like running a subroutine in a program. The meshbot as an action page has more information about this type of controllable.
- Notification – Lets you send push messages and emails to selected recipients if the conditions of your trigger are met. See the notifications page if you want to learn more about this type of controllable right now.
- Lua Script – Runs a Lua script to implement an action if the conditions of your triggers are met. You can find some sample scripts in a community post here. Advanced users and developers can learn more about scripts in our API documentation here.
- NuCAL – Send a command or a request for data to one of EZlogic’s integrated services. For example:
- Create an action to update your Prospectio CRM when a customer makes a purchase from your website
- Automatically create a Shipday delivery to a customer when your CRM registers that your business has fulfilled an order.
- Pull today’s forecast from Accuweather and put this data in a tile on your dashboard.
- Http Request – Send a HTTP command to retrieve information from a server or implement a custom action. See the Http Request page to learn more about this type of controllable.
- House Mode – Activate or deactivate one of your house modes if the trigger becomes true. See the House Modes page if you want to learn more about these modes.
- Controller – Reboot or reset your smart-home hub when the conditions of your trigger become true. See the controller-as-an-action page to learn more.
- Local Variable – Update the value of an existing local variable when your trigger conditions become true. See the variables guide page for more help with this type of controllable..
True and False actions
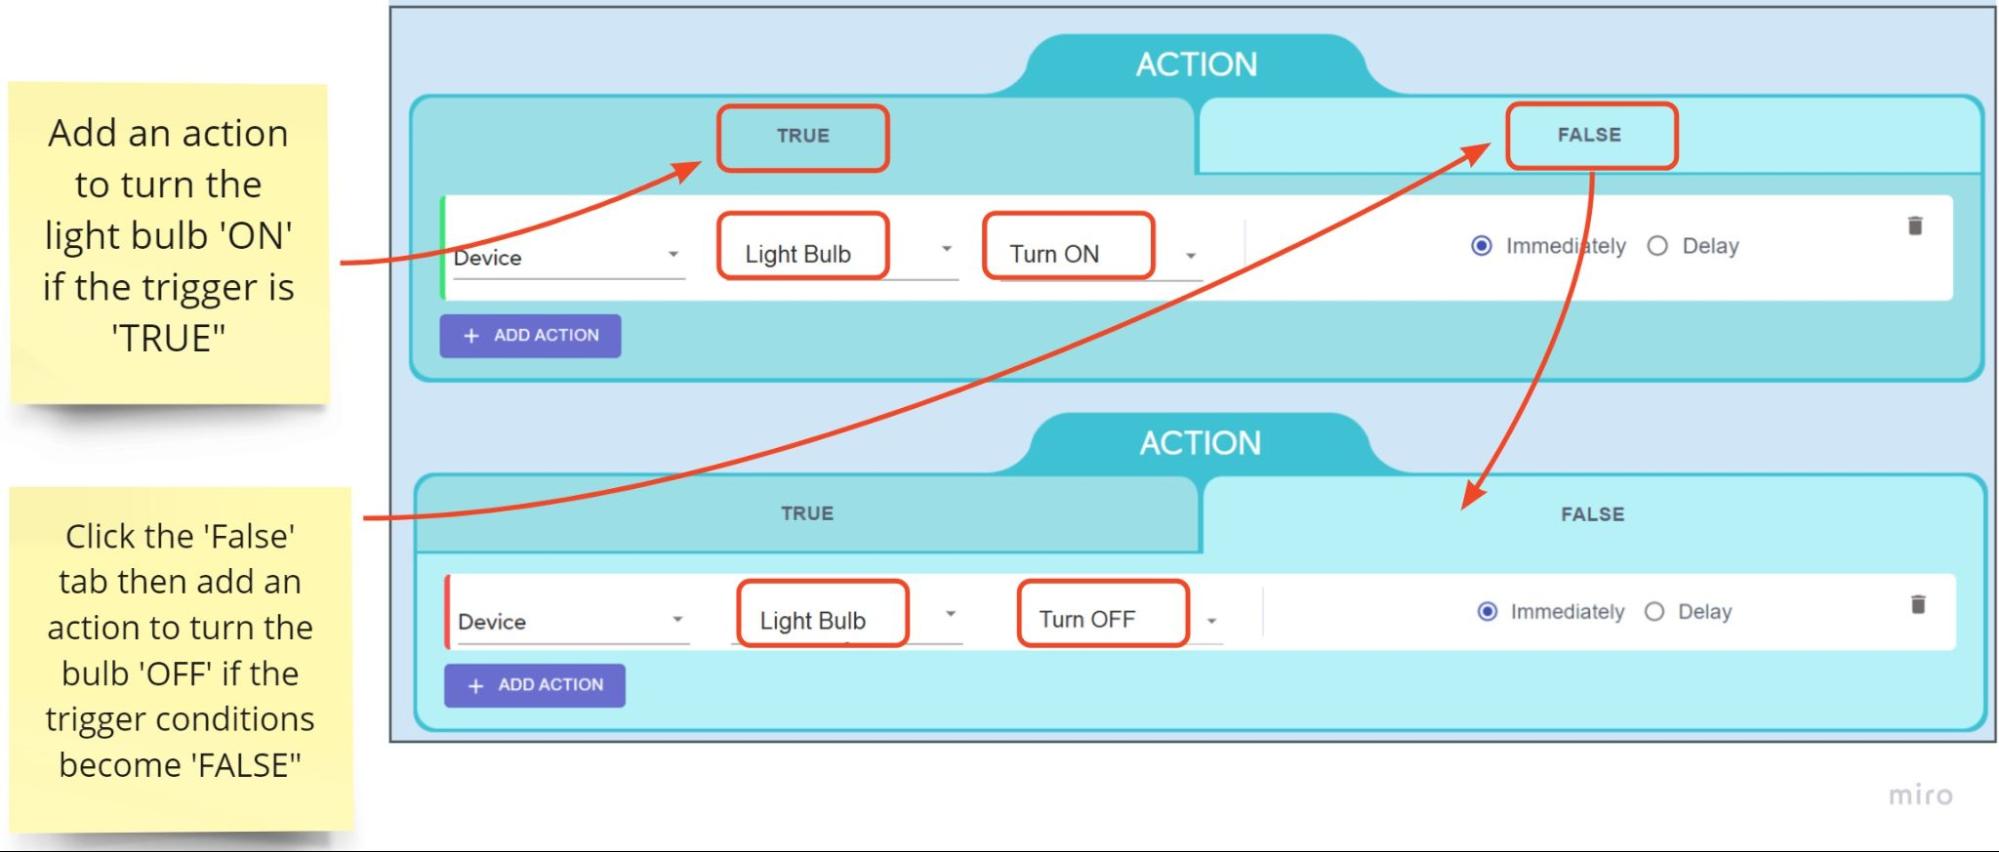
There are two halves to each action — the true and false actions. ‘True’ actions run when all conditions in your triggers have been met (all trigger conditions are ‘true’). ‘False’ actions run when the conditions cease to be true. EZLogic continuously evaluates the true/false state of the triggers so it can implement the corresponding action.
For example, you set up a rule to turn on your closet dimmer light at 50% whenever the closet door is opened after sunset. This is your ‘TRUE’ action, but the light would remain on unless you specify otherwise. In the ‘FALSE’ tab you can set an action that sets the light to ‘Off’ if any of your trigger conditions are not met. In this example, these are if the door is not open (you closed the door) OR it is not after sunset.
Not all actions you set up will need a ‘False’ setting. Examples include ‘one-off’ actions like sending an alert if your door is open, having Alexa speak a voice-message, or making a http request. Some actions may be stopped naturally by another meshbot you have running. For example, your kitchen lights might be switched on by a ‘wake-up’ scene but turned off when you activate your ‘House is vacant’ meshbot. Or maybe it’s an action that you want to terminate manually or by voice-command (e.g. turning the shower or toaster-oven off).
Other actions will most definitely require a false state or they will keep running forever. Experimentation is key to discovering the sequence of rules that work for your unique set of devices, apps and services.
Exceptions
An exception is an additional condition that you can add to one or more actions in your action group. If you add an exception to an action, then both the main trigger group AND the exception must be ‘True’ before the action will run.
- Actions that do not have exceptions will run as normal when the main trigger group goes true. Actions that *do* have exceptions will only run when the main trigger group goes true AND the exception(s) are true.
- A key distinction between a trigger and an exception is that triggers cause the action set to run. Exceptions do not cause the action set to run. They only act as a check or condition that might allow or block an action from running after the main trigger group has become true.
- You can apply exceptions to an action one at a time, or create an exception group containing multiple exceptions. You can also use logic operators to establish relationships between exceptions.
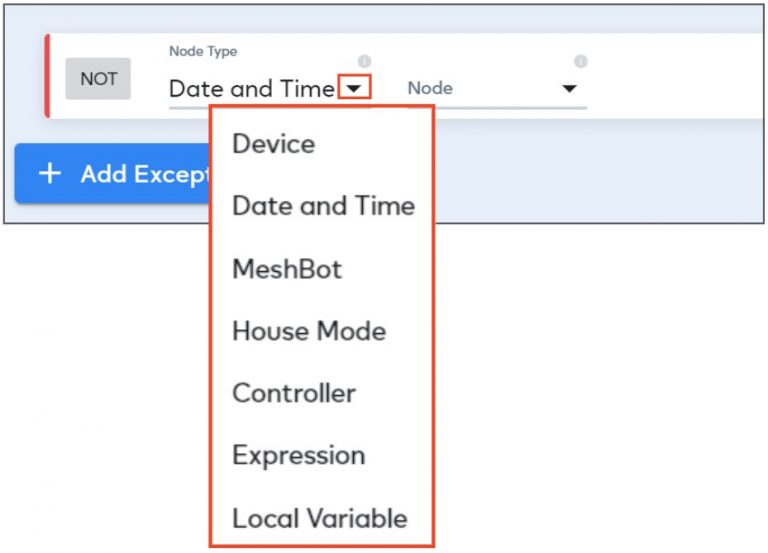
- You can create exceptions based on device, date/time, meshbot, house mode, controller, expression and local variable trigger types:
Example
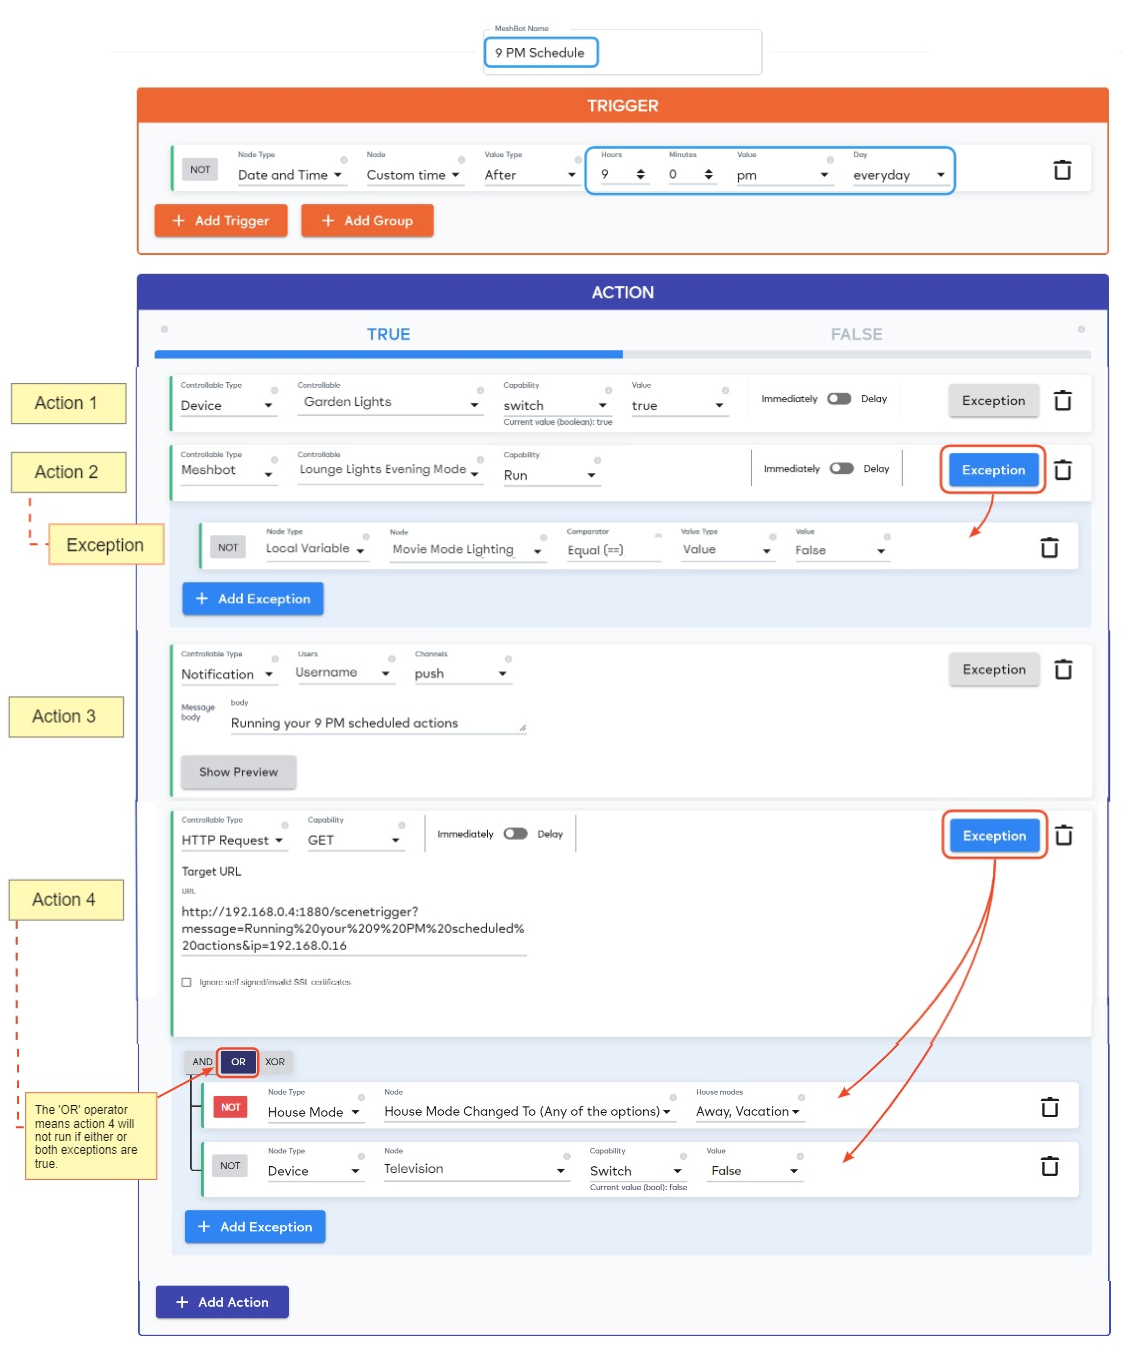
You have a trigger which becomes true at 9 PM every night and launches 4 actions called your ‘9 PM schedule’. However, some of the actions have exceptions under which you don’t want them to run.
9 PM actions:
- Turn on the garden lights.
-
Set the lounge lights to ‘Evening Mode’.
- Exception – unless ‘Movie Mode’ lighting is active. You don’t want to disturb your movie by changing the existing lighting.
- Send a push notification to your phone that your 9 PM schedule has run.
-
Get your voice assistant to speak a notification that your actions have run.
- Exception – unless ‘Away’ or ‘Vacation’ modes are active. There is nobody there to hear the message.
OR
- Exception – unless the television is on. You don’t want the voice message to interrupt the movie or show you are watching.
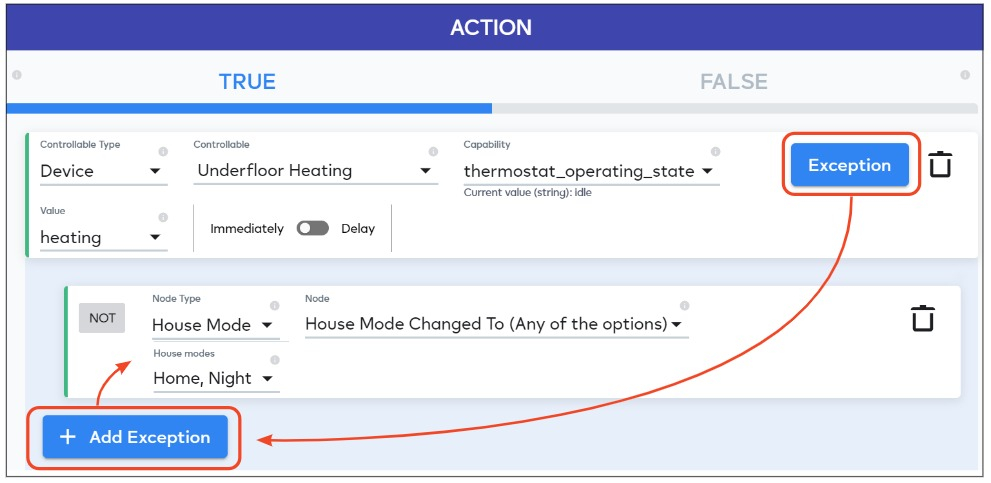
Actions 1 and 3 will run in all circumstances at 9 PM. Action 2 will only run if movie mode lighting is not active. Action 4 will run unless the house is empty or the television is on.
Here’s how the example above could look in a meshbot:
Why use exceptions?
Exceptions can help save you time in tasks with multiple conditions. You can often achieve similar results without them, but you’d have to create multiple meshbots and might unintentionally fire your actions by modifying one of your trigger items.
Here’s how the example above would look if you didn’t use exceptions:
| Triggers | Actions | |
|---|---|---|
| Meshbot 1 | 1. After 9 PM everyday |
|
| Meshbot 2 |
|
1. Set lounge lights to ‘Evening Mode’ |
| Meshbot 3 |
|
1. Get voice assistant to speak notification |
- That’s three separate meshbots you have to remember, open, and configure when you want to adjust your 9 PM schedule.
- Also, toggling any of the additional triggers (movie mode lighting, house-mode or TV on/off) would cause the corresponding action to run, which may not be desired. For example, switching your TV on then off again would cause another voice notification.
It’s more effective and easier to manage if everything is kept in a single meshbot:
| Triggers | Actions | |
|---|---|---|
| Meshbot 1 | 1. After 9 PM everyday |
|
The meshbot above has a single trigger, ‘After 9 PM’ which, when true, causes the actions to run. Modifying the items in the exceptions (e.g. turning the TV on/off) does not cause a repeat action to be fired, as it would in the 3 meshbot example.
Notes and advice
- ‘After 9 PM’? See this explanation if you are wondering why we used ‘After’ instead of ‘At’ in this example.
- Voice notifications. See this tutorial if you are wondering how to get your voice assistant to speak custom notifications.
Execution Policies
Execution policies are rules that let you define the sequence and conditions under which your actions are run. For example, you might want your actions to execute in order from top-to-bottom, or for the action group/scene to stop if a specific action fails.
There are two types of action execution rules – Global and Individual.
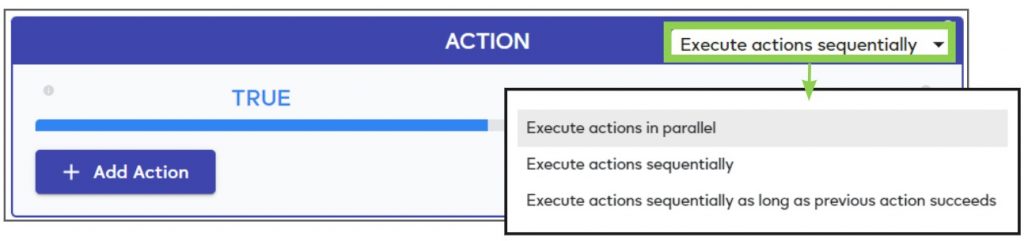
- Global Rules – Global rules apply to all actions that have ‘Inherit Global Setting’ as their individual rule. You apply global rules from the drop-down at the top of the action module:
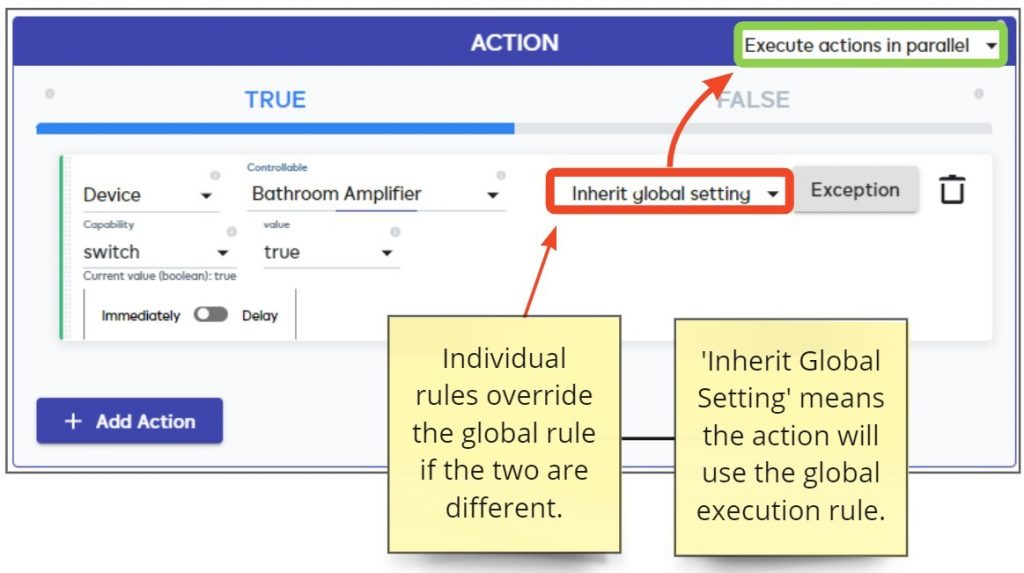
- Individual Rules – Individual rules apply to specific actions in the action group/scene. Individual rules supersede global rules if the two have different settings. You apply individual rules from the action itself:
The following global execution policies are available:
Execute in parallel
- EZLogic runs all actions independently.
- The success or failure of an action does not affect the running of other actions.
- EZLogic does not wait for (long-running) actions to complete before running the next action.
Execute sequentially
- EZLogic runs all actions in order from top (first) to bottom (last).
- EZLogic waits for the current action to complete before running the next action.
- The success or failure of an action does not affect the running of the next action.
Execute sequentially only if previous action succeeds
- EZLogic runs all actions in order from top (first) to bottom (last).
- EZLogic waits for the current action to complete before running the next action.
- EZLogic will only proceed to the next action IF the current action is successful. If an action fails then EZLogic will not run any actions that come after the failed action.
Inherit Global Setting (individual rules only)
- The action will use whatever setting is used as the global rule. For example, if the global rule is ‘Execute sequentially’ then the action will also use ‘Execute sequentially’.
- As a reminder, the individual rule supersedes the global rule if the two are different. For example, if the global rule is ‘Execute in Parallel’ but the individual rule is ‘Execute Sequentially’, then the action will use ‘Execute Sequentially’.
General Advice
EZLogic always runs actions in order from top (first) to bottom (last), regardless of your setting for the global or individual rules.
For example, the following setup will wait until action 1 is complete before moving onto action 2, and will wait for action 3 to complete successfully before moving to action 4:
Global rule – ‘Execute Actions in Parallel‘
Action 1 – Execute next action sequentially
Action 2 – Inherit Global Setting
Action 3 – Execute next action sequentially if successful
Action 4 – Inherit Global Setting
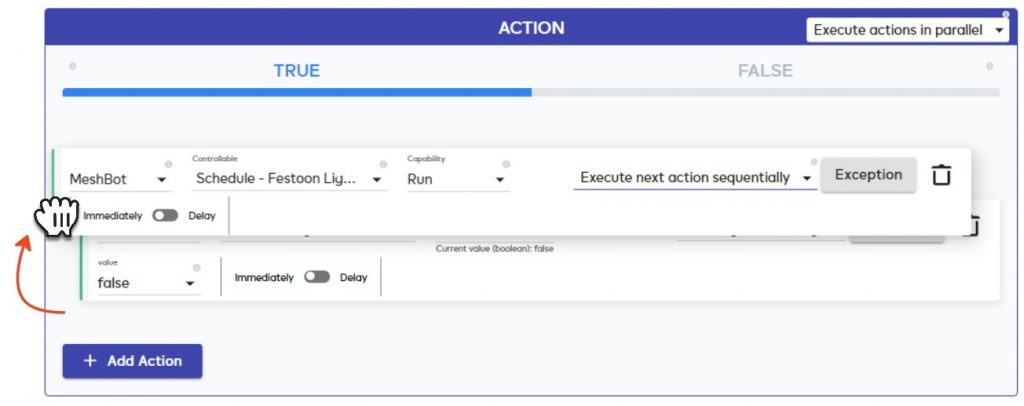
Tip – You can drag and drop individual actions to resequence them in the list (hold left-click on the left of the action box):
Action Groups
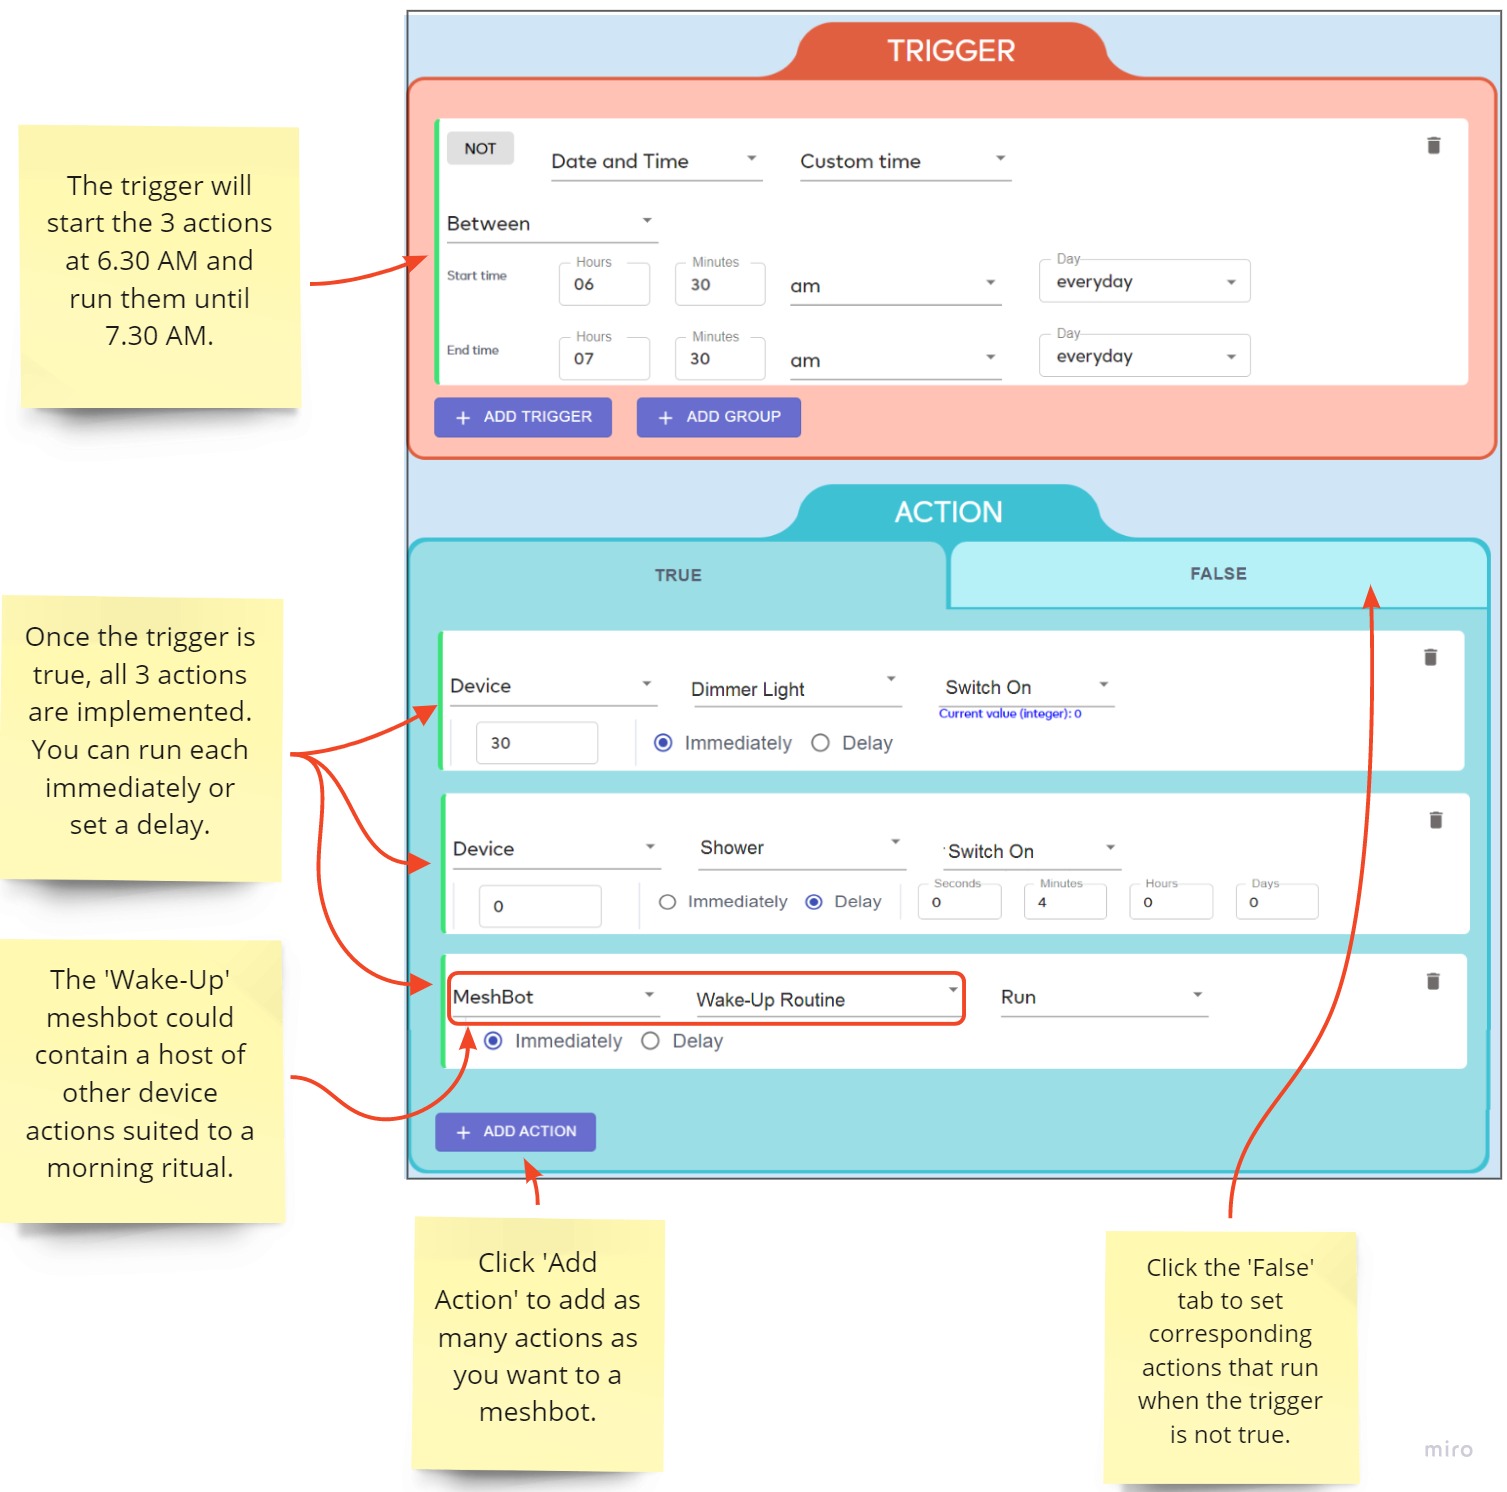
Click the ‘Add Action’ button to specify multiple responses to a trigger. For example, ‘Enable motion sensors’ AND ‘Enable Alarms’ AND ‘Enable Security Cameras’ after 11 PM. You need to set a ‘False’ action to stop the activity unless the action is a ‘one-off’, terminated manually, or will be stopped later by some other rule.
The following example shows a bot designed to slowly illuminate a bedroom dimmer light, switch on the shower and run a ‘wake-up routine’ meshbot at 6.30 AM: