Ezlo platform – How to use HTTP API commands aka Luup Requests
PART 1 – Running scenes with authentication turned on
This guide explains how to control devices and scenes via HTTPS commands.
In Vera as you may know we had the Luup Requests API where we could easily send simple one line HTTP commands to Vera to control devices, run scenes and set device variables etc.
This was very useful for all sorts of things and integrations with different devices and apps on your local LAN.
Ezlo has similar functionality as we will go on to see.
By default the Ezlo hub will require a username and token (password) and will use HTTPS.
You can now turn off the authentication to enable you to use more simple one line HTTP commands like you can with Vera Luup Requests.
Scene example with authentication turned on:
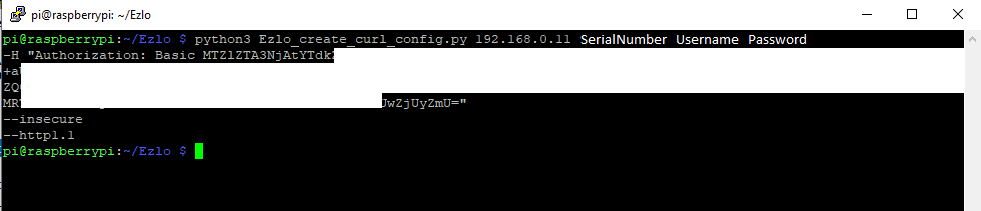
If you wish to leave authentication turned on you will need to use this Python script here to get your token from your Ezlo hub / Ezlo cloud.
I am using my Raspberry Pi for testing all this. Using WinSCP on my Windows 10 laptop I uploaded the Python script “Ezlo_create_curl_config.py” to my Pi in to my “Ezlo” directory.

Then using Putty and SSH connecting to the Pi, I ran this command to get my token for my Ezlo Plus hub:
python3 Ezlo_create_curl_config.py HubIP HubSerialNumber Username Password
Note: Its your regular Vera account username and password you use here.
If it works you will get a long token string copy all of this to a notepad for later.
Note: If it doesn’t work and you get no token given back, remove your Ezlo Plus hub from your Vera account and add it back in again. I had to do this to get my token.

On the Pi I then created a file to store my token called “ezlo_plus_curl_auth” in my “Ezlo” directory.
and pasted in the token to this file, it should look something like this:

Now we can use CURL to test its working, enter the IP address of your Ezlo Plus hub.
curl -K ezlo_plus_curl_auth https://192.168.0.11:17000/v1/method/hub/info/get
You should get an output like this if it works with the hub info:

Now we need to use the online API tool to find out some scene ID numbers, so we can try and run a scene via HTTPS command line.
Go to https://apitool.ezlo.com/auth and login with your Vera username and password.
Select your Ezlo Hub’s Serial number and click the Connect button.

Then from the API Calls drop down list select hub.scenes.list and press the Query button.
Scroll down to the Response section and this will list all the scenes on your Ezlo hub.


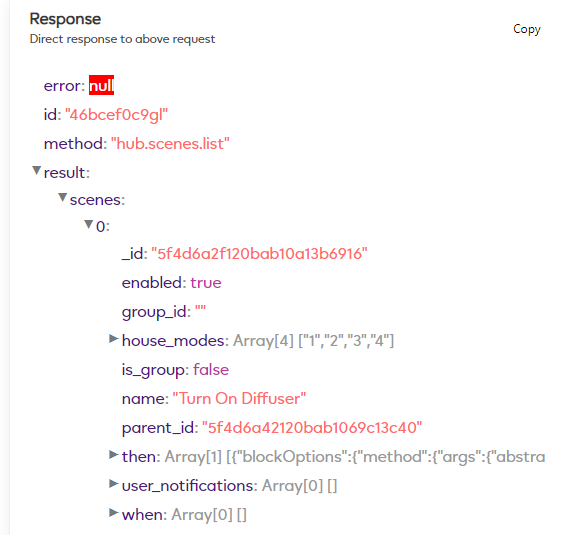
I want to run my “Turn On Diffuser” scene via HTTPS command line, make a note of the scenes _id number.
In this example its: “5f4d6a2f120bab10a13b6916”
Now we can construct our HTTPS command to run in Curl.
curl -K ezlo_plus_curl_auth –http1.1 –insecure https://192.168.0.11:17000/v1/method/hub/scenes/run?sceneId=5f4d6a2f120bab10a13b6916
Running the scene command in Curl:

Your scene should run if it worked OK !
PART 2 – Running scenes with authentication turned off
If you can’t be doing with all the hassle of auth tokens you can turn off authentication.
Don’t port forward your Ezlo hub from the Internet (WAN) to the LAN however. This is really only for internal use on your LAN.
To turn off authentication we have to go back in to the online API tool https://apitool.ezlo.com/auth login with your usual Vera account username and password.
Select your Ezlo Hub’s Serial number and click the Connect button.
In the API Calls drop down select “hub.info.get” and press the Query button.
Scroll down to the “Response” section and expand “Result”.
You should see that “offlineAnonymousAccess” and “offlineInsecureAccess” are set to false.

Now in the API Calls drop down list select “Not Listed”
In the text box enter this code:
{
“method”: “hub.offline.anonymous_access.enabled.set”,
“id”: “12345”,
“params”: { “enabled”: true }
}
And press the Query button.
Now enter this code in to the “Not Listed” text box and click the Query button again.
{
“method”: “hub.offline.insecure_access.enabled.set”,
“id”: “12345”,
“params”: { “enabled”: true }
}
If you now select hub.info.get again from the API Calls drop down list and hit the Query button you should see that both of these items are now set to true.

Congratulations you have now turned off Authentication for HTTP API requests.
Scene example with authentication turned off:
OK so now we can try a HTTP command when auth is turned off.
Note: I was initially trying to send HTTP commands and it was not working. In fact you still need to use HTTPS even though auth is turned off.
So using our scene example from Part 1 we can try a Curl command but this time without having to specify authentication.
curl –http1.1 –insecure https://192.168.0.11:17000/v1/method/hub/scenes/run?sceneId=5f4d6a2f120bab10a13b6916

Your scene should of run if it worked OK.
Now because we are no longer using authentication I can run this HTTPS command from anywhere on my LAN.
For example I can just enter this in to my Chrome web browser and the Scene is run.
https://192.168.0.11:17000/v1/method/hub/scenes/run?sceneId=5f4d6a2f120bab10a13b6916
PART 3 – Controlling a device with authentication turned on
See Part 1 first on how to get your auth token.
Here are some HTTPS command examples for turning on a Z-Wave appliance plug.
Here we are using value_bool=true
curl -K ezlo_plus_curl_auth –http1.1 –insecure “https://192.168.0.11:17000/v1/method/hub.item.value.set?_id=5f4e5871120bab1069c13c4c&value_bool=true”
Or alternatively we can also use this command using value_int=1 to turn on the plug:
curl -K ezlo_plus_curl_auth –http1.1 –insecure “https://192.168.0.11:17000/v1/method/hub.item.value.set?_id=5f4e5871120bab1069c13c4c&value_int=1”
Here are some HTTPS command examples for turning off a Z-Wave appliance plug.
value_bool=false
curl -K ezlo_plus_curl_auth –http1.1 –insecure “https://192.168.0.11:17000/v1/method/hub.item.value.set?_id=5f4e5871120bab1069c13c4c&value_bool=false”
or alternatively using value_int=0
curl -K ezlo_plus_curl_auth –http1.1 –insecure “https://192.168.0.11:17000/v1/method/hub.item.value.set?_id=5f4e5871120bab1069c13c4c&value_int=0”
Dimming a light:
I haven’t tested this myself yet as I have no dimmable light connected to my Ezlo Plus, but I believe you can use the value_int= and then a percentage e.g. value_int=50 to dim to 50%
OK lets try these ON / OFF commands in Curl from the Raspberry Pi:

Your appliance plug or device should be turned on and then off.
How to find your device’s ID number?
So in our HTTPS commands to control the device we need to specify the devices item object _id number.
To find out what this ID number is? We need to use the online API Tool again.
Go to https://apitool.ezlo.com/auth and login with your Vera username and password.
Select your Ezlo Hub’s Serial number and click the Connect button.
From the Calls API drop down select “hub.devices.list” and hit the Query button.
Scroll down to the “Response” section and expand “Result”.
You will then see all your devices listed you can expand them further to see what the devices are.
For example here you can see my Everspring appliance plug.
Make a note of the _id number in this example its “5f4e5871120bab1069c13c49”

Now in the Calls API drop down list select “hub.items.list” and hit the Query button.
Go to the “Response” section again and expand “Result” and then “Items”.
Now I only have two Z-Wave devices paired to my Ezlo Plus the Everspring appliance plug and an Everspring door contact sensor.
Yet I can see 7 item objects.

Each physical device can have multiple “item objects”.
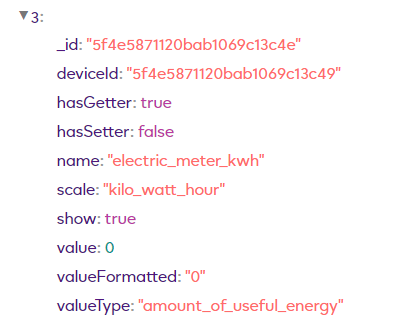
So if I start expanding these item objects I have discovered that my Everspring appliance plug has 4x item objects.
Note: I know I am looking at the right device I want because its “deviceid” is the same as the one we saw earlier when using the “hub.devices.list” query e.g. “5f4e5871120bab1069c13c49”
Here you can see the 4x item objects for my Everspring plug:
Basic –

Switch –

electric_meter_watt

electric_meter_kwh
So now knowing this, I now need to use the correct item object to control the ON / OFF via HTTPS commands.
In this example I can use either “switch” or “basic”.
Let’s use “switch”.
It’s here on this “switch” item object we find the correct _id number we need to use in our HTTP commands
In this example its “5f4e5871120bab1069c13c4c”

So if we look at one of our HTTPS commands again we can see we have the same _id in that command:
https://192.168.0.11:17000/v1/method/hub.item.value.set?_id=5f4e5871120bab1069c13c4c&value_bool=true
PART 4 – Controlling a device with authentication turned off
OK so if you haven’t already you need to follow Part 2 and turn off the authentication for the HTTP API.
See Part 3 for how to find the devices item object _id number.
Now you have done that we can issue HTTPS commands to control our device, in this example an Everspring appliance plug, so we will be using ON and OFF commands.
Here are some example Curl HTTPS commands with no auth:
Turning on the plug:
curl --http1.1 --insecure "https://192.168.0.11:17000/v1/method/hub.item.value.set?_id=5f4e5871120bab1069c13c4c&value_bool=true"
or alternatively we can use this command:
curl --http1.1 --insecure "https://192.168.0.11:17000/v1/method/hub.item.value.set?_id=5f4e5871120bab1069c13c4c&value_int=1"
Turning off the plug:
curl --http1.1 --insecure "https://192.168.0.11:17000/v1/method/hub.item.value.set?_id=5f4e5871120bab1069c13c4c&value_bool=false"
or alternatively we can use this command:
curl --http1.1 --insecure "https://192.168.0.11:17000/v1/method/hub.item.value.set?_id=5f4e5871120bab1069c13c4c&value_int=0"
Now because we have authentication turned off we can issue these HTTPS commands from any device or app on our LAN.
For example in the Chrome web browser on my laptop I can just enter these commands for ON / OFF:
Turning plug on via Chrome browser:
https://192.168.0.11:17000/v1/method/hub.item.value.set?_id=5f4e5871120bab1069c13c4c&value_int=1
Turning plug off via Chrome browser:
https://192.168.0.11:17000/v1/method/hub.item.value.set?_id=5f4e5871120bab1069c13c4c&value_int=0
PART 5 – Testing with Postman GUI application
Postman is a desktop application for Windows, MacOs and Linux for testing API’s for sending requests and viewing responses.
You can create different “Collections” and “Requests” in the menu on the left hand side.
You enter your HTTPS command in the Send field and the response can be seen below.
In this screen shot you can see the response is “Status 200 OK” for a run Scene command.

Controlling a device example.

To configure Postman to use authentication or no authentication:
No auth:

With auth:
Select “Basic Auth” from the drop down list and enter your Vera account username and your password token string.

PART 6 – OTHER CONTROL COMMANDS
1. Armed / Disarm a device.
Example Armed Command: (WORKING)
https://192.168.0.11:17000/v1/method/hub.device.armed.set?_id=5f4e588c120bab1069c13c4f&value_bool=true
Example Disarmed Command: (NOT WORKING – BUG OR SECURITY RESTRICTION ?)
https://192.168.0.11:17000/v1/method/hub.device.armed.set?_id=5f4e588c120bab1069c13c4f&value_bool=false
The arm command works and arms my Everspring Door Contact Sensor. The disarm command doesn’t work not sure why.
The easiest way to discover the correct deviceid _id number is to use the online API tool and watch the “Broadcast response – Hub’s latest broadcast messages” section.
Go to https://apitool.ezlo.com/auth and login with your Vera username and password.
Select your Ezlo Hub’s Serial number and click the Connect button.
In the Vera Mobile app press the “Armed” button on the device you want to construct a HTTPS command for.
Watch the Broadcast section for the response.